Are you ready to take your woodworking projects to the next level? Knowing the right joinery tools can make all the difference between a weak connection and a masterpiece that lasts for years.
This guide will help you discover the essential tools you need to create strong, precise joints every time. Whether you’re a beginner or looking to sharpen your skills, understanding these tools will save you time, reduce mistakes, and boost your confidence.
Keep reading to unlock the secrets that professional woodworkers rely on to build furniture that stands out. Your next project deserves the best – let’s get started!
Types Of Wood Joints
Wood joints are the places where two pieces of wood meet. They hold wood parts together in furniture and other projects.
Different types of joints serve different purposes. Some are strong, and others are simple to make.
Butt Joint
A butt joint is the simplest wood joint. It joins two pieces of wood by placing their ends together.
This joint is easy to make but is not very strong. It often needs nails, screws, or glue to hold well.
Dovetail Joint
Dovetail joints have a series of interlocking pins and tails. These parts fit together like puzzle pieces.
This joint is very strong and looks nice. It is often used in drawer construction.
Mortise And Tenon
The mortise and tenon joint connects two pieces at a right angle. One piece has a hole called mortise.
The other piece has a tongue called tenon that fits into the mortise. This joint is strong and stable.
Rabbet And Dado
A rabbet is a notch cut along the edge of wood. A dado is a groove cut across the wood grain.
These joints hold wood pieces together by fitting one piece into the notch or groove of the other.
- Rabbet joint: edge notch
- Dado joint: cross-grain groove
- Used in shelves and cabinets
Box Joint
Box joints have square-shaped fingers that interlock. They look like a checkerboard pattern.
This joint is strong and easy to make with a router. It is used in boxes and drawer corners.

Credit: wafuu.com
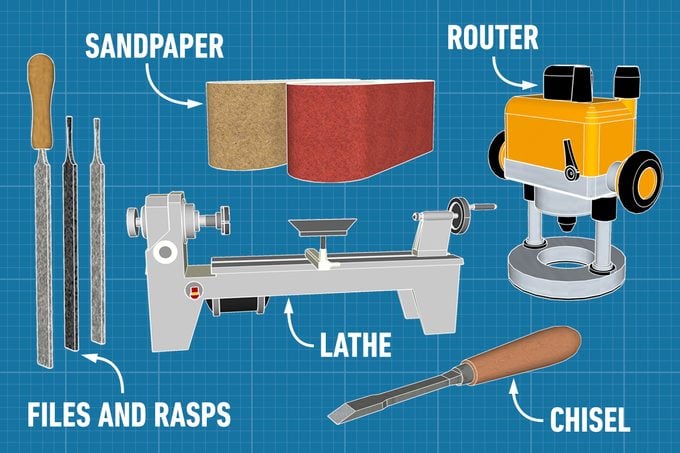
Essential Joinery Tools
Woodworking joinery needs the right tools to create strong connections. These tools help shape wood and fit pieces tightly together.
Using proper joinery tools improves accuracy and makes your work cleaner and easier.
Hand Saws
Hand saws cut wood by hand with control and precision. They come in different shapes for various cuts.
Common types include crosscut saws for cutting across the grain and rip saws for cutting along the grain.
- Crosscut saw – cuts across wood grain
- Rip saw – cuts along wood grain
- Dovetail saw – makes fine, detailed cuts
- Backsaw – has a stiff spine for straight cuts
Chisels
Chisels carve and shape wood by removing small pieces. They help create joints and clean edges.
Use sharp chisels with a wooden mallet for best results. Different sizes fit different tasks.
- Bevel edge chisel – good for tight corners
- Mortise chisel – strong for deep cuts
- Paring chisel – thin blade for fine trimming
Router
A router cuts grooves, shapes edges, and hollow outs wood. It uses a spinning bit to remove material quickly.
Routers help create complex joints and decorative edges in joinery work.
- Fixed base router – steady for straight cuts
- Plunge router – cuts start inside the wood
- Trim router – small for light work
Clamps
Clamps hold wood pieces tight while glue dries or during cutting. They keep joints aligned and secure.
Using clamps properly prevents gaps and ensures strong joinery.
- Bar clamps – long reach for large pieces
- C-clamps – strong hold for small work
- Spring clamps – quick and easy to use
- Pipe clamps – adjustable for wide projects
Marking Gauges
Marking gauges score lines on wood to guide cuts or chiseling. They help keep measurements consistent.
Adjustable gauges allow you to set the distance from the edge for precise marking.
- Single pin gauge – basic line marking
- Double pin gauge – marks two parallel lines
- Wheel gauge – rolls for smooth marking
Choosing The Right Tool For Each Joint
Woodworking joinery needs the right tools for strong, clean joints. Choosing the right tool saves time and effort.
Each type of joint uses specific tools. Knowing these tools helps you make better woodworking projects.
Matching Tools To Joint Types
Different joints require different tools. For example, dovetail joints need precise cutting tools, while mortise and tenon joints need chisels and saws.
- Butt joints use simple clamps and glue
- Dovetail joints need a dovetail saw or router
- Mortise and tenon joints require chisels and mortising machines
- Box joints work well with a table saw or router table
Tool Versatility
Some tools can work with many joint types. Versatile tools reduce the number of tools you need.
For example, routers can cut dados, rabbets, and even box joints. Chisels help clean up many joint edges.
- Router: fits many cutting tasks
- Chisels: great for cleaning and shaping
- Clamps: hold parts in place for all joints
- Hand saws: useful for many cuts
Precision Considerations
Precision matters for strong joints. The right tool helps keep cuts exact and clean.
Power tools with guides and fences improve precision. Hand tools need practice but offer fine control.
- Use marking gauges for exact measurements
- Use sharp blades to avoid rough edges
- Use guides and fences for straight cuts
- Check fit often during assembly

Credit: www.amazon.ca
Tips For Accurate Measurements
Accurate measurements are key to making strong and precise woodworking joints. Careful measuring helps avoid gaps and weak connections.
Using the right tools and techniques can improve your accuracy and save time on adjustments later.
Using Marking Tools Effectively
Marking tools like pencils, marking knives, and awls help you draw clear lines on wood. Choose the tool that suits the wood type.
Keep your marks thin and precise. Thick lines can cause cutting errors and poor fits.
- Use a sharp pencil or marking knife for fine lines
- Hold the marking tool steady to avoid wobbly lines
- Mark both edges of the cut for better guidance
- Use a square to keep lines straight and at right angles
Checking Alignments
Aligning parts before cutting is important. Misalignment leads to weak joints and uneven surfaces.
Use clamps and try dry fitting pieces to check if everything lines up well before final assembly.
- Use a try square or combination square to check corners
- Clamp pieces together to see if edges match
- Check measurements twice before cutting
- Adjust marks if parts do not align
Avoiding Common Mistakes
Many mistakes come from rushing or using dull tools. Take your time and keep tools sharp for best results.
Measure twice, cut once is a rule to reduce errors and wasted wood.
- Do not rely only on tape measures; use rulers for small marks
- Keep your work surface clean to avoid shifting wood
- Double check your marks before cutting
- Practice on scrap wood to improve your skills
Techniques For Clean Cuts
Clean cuts are important in woodworking joinery. They help pieces fit together tightly and look neat.
Using the right tools and techniques makes cutting easier and more accurate.
Proper Sawing Methods
Use a sharp saw blade to get smooth cuts. Dull blades cause rough edges and splinters.
Keep the saw steady and move it slowly. Let the blade do the cutting without forcing it.
- Mark your cut line clearly with a pencil.
- Clamp the wood to stop it from moving.
- Use long, even strokes for a clean cut.
- Check blade alignment before cutting.
Chisel Sharpening And Handling
Sharp chisels make precise cuts and reduce wood damage. Regularly sharpen your chisels using a whetstone.
Hold the chisel firmly and use controlled pressure. Always cut away from your body for safety.
- Keep the bevel angle consistent when sharpening.
- Test sharpness by gently slicing thin wood shavings.
- Use a mallet for controlled chopping motions.
- Store chisels with blade guards to keep edges sharp.
Using A Router Safely
Routers shape wood edges and create joints. Use the right bit and secure the wood before starting.
Hold the router with both hands and move it steadily. Avoid forcing it to prevent mistakes or injuries.
- Wear safety glasses and ear protection.
- Check the router bit is sharp and tight.
- Set the cutting depth before turning on the router.
- Work with the grain to reduce tear-out.
- Keep fingers away from the bit at all times.
Clamping And Assembly Strategies
Clamping and assembly are key parts of woodworking joinery. Good clamping holds pieces tightly and helps glue dry well. Proper assembly ensures joints fit perfectly and last long.
Using the right tools and methods makes the process easier. This guide covers how to pick clamps, apply pressure, and test joints before gluing.
Choosing The Right Clamps
Pick clamps that fit the size and type of your project. Different clamps work better for certain joints and wood thicknesses. Using the wrong clamp can damage wood or cause weak joints.
- Bar clamps are good for wide or long pieces
- C-clamps work well for smaller joints
- Spring clamps hold light parts quickly
- Corner clamps help keep right angles
- Pipe clamps offer adjustable length for big projects
Applying Even Pressure
Apply pressure evenly across the joint surface. Uneven pressure can cause gaps or squeeze out too much glue. Use multiple clamps if needed to spread force.
Check that clamps do not shift or tilt during drying. Tighten clamps slowly and watch for wood movement. Protect wood from clamp marks using scrap wood or pads.
- Place clamps opposite each other for balance
- Use a clamp pad to protect soft wood
- Tighten clamps just enough to hold firmly
- Check joints often while glue dries
Dry Fitting Joints
Always dry fit your joints before gluing. This means assembling parts without glue to check the fit. Dry fitting helps spot mistakes and adjust parts for a tight fit.
Make sure all joints align correctly and surfaces touch well. Fix any gaps or misalignments before applying glue. This saves time and improves the final strength of your project.
- Assemble all pieces without glue
- Check for gaps or loose joints
- Mark adjustments with a pencil
- Make corrections before final glue-up
Maintenance Of Joinery Tools
Keeping joinery tools in good shape is important for safe and precise work. Regular maintenance helps tools last longer and work better.
This guide covers key steps to maintain your woodworking joinery tools effectively.
Sharpening Blades And Chisels
Sharp blades and chisels cut wood cleanly and reduce effort. Dull tools can cause mistakes and accidents.
Use sharpening stones or systems to keep edges sharp. Always follow the original bevel angle when sharpening.
- Clean the blade before sharpening
- Use coarse stone first, then finer stones
- Keep a consistent angle during sharpening
- Hone the edge to remove burrs
- Test sharpness carefully before use
Cleaning And Storage
Clean tools after each use to remove dust, sap, and moisture. This prevents rust and damage.
Store tools in a dry place. Use protective covers or cases to avoid dulling and accidents.
- Wipe blades with a dry cloth
- Apply light oil to metal parts
- Keep tools in a toolbox or cabinet
- Separate blades to avoid contact
- Check storage area for humidity
Tool Calibration
Calibrate tools like marking gauges and squares to keep measurements accurate. Incorrect settings cause poor joinery fits.
Check calibration regularly and adjust screws or settings as needed. Use a reliable measuring tool for comparison.
- Inspect tools for wear or damage
- Use a ruler or square to verify accuracy
- Tighten or loosen adjustment screws
- Test tools on scrap wood
- Repeat calibration checks often
Credit: www.familyhandyman.com
Common Joinery Mistakes To Avoid
Woodworking joinery requires careful attention to detail. Avoiding common mistakes helps create strong, lasting joints.
Understanding these errors can save time and improve the quality of your projects.
Misaligned Joints
Misaligned joints happen when pieces do not fit together properly. This can cause weak structures and gaps.
Check measurements twice and use clamps to hold pieces in place. Ensure edges meet evenly before gluing or nailing.
- Measure pieces carefully
- Use right-angle tools for alignment
- Clamp securely before fixing joints
Overcutting
Overcutting means removing too much wood from a joint. This creates loose fits and weak connections.
Cut slowly and check the fit often. Use sharp blades and proper guides to control cuts precisely.
- Cut less at first, then trim more if needed
- Keep blades sharp for clean cuts
- Use stop blocks or guides for accuracy
Insufficient Glue Application
Using too little glue causes weak joints that may come apart. Glue must cover all surfaces evenly.
Apply a thin, even layer on all contact areas. Avoid thick glue that can squeeze out and cause mess.
- Spread glue with a brush or roller
- Cover all joint surfaces completely
- Clamp joints firmly while glue dries
Advanced Joinery Techniques
Advanced joinery techniques help woodworkers create strong and beautiful furniture. These methods improve the fit and finish of wood pieces.
Using tools and special methods can make complex joints easier and more accurate. This guide covers three key areas.
Using Jigs For Precision
Jigs are tools that hold wood in place during cutting or drilling. They help make exact cuts for tight joints.
With jigs, you can repeat the same cut many times. This keeps your joints consistent and strong.
- Drill guides for perfect holes
- Router jigs for even cuts
- Clamping jigs to hold pieces steady
- Angle jigs for accurate bevels
Incorporating Decorative Elements
Decorative joinery adds style to your wood projects. You can use special cuts to create patterns or textures.
Adding small details makes joints not just functional but also attractive.
- Dovetail joints with curves or shapes
- Inlays using contrasting wood pieces
- Carved edges on joint surfaces
- Exposed joinery for a rustic look
Combining Multiple Joint Types
Combining different joints can make structures stronger. Use each joint where it works best.
This approach helps balance strength, flexibility, and appearance in your project.
- Use mortise and tenon for frame corners
- Add dowels for extra hold in flat panels
- Use finger joints on long edges for strength
- Mix lap joints where pieces overlap
Frequently Asked Questions
What Are Essential Woodworking Joinery Tools?
Essential woodworking joinery tools include chisels, saws, and clamps. Chisels are crucial for precise cuts, while saws handle larger tasks. Clamps hold pieces securely during assembly. These tools ensure accurate and sturdy joints, enhancing your woodworking projects’ quality and durability.
How Do You Choose Joinery Tools?
Choose joinery tools based on project requirements and skill level. For beginners, start with basic tools like chisels and saws. Experienced woodworkers might invest in specialized tools for complex joints. Consider tool quality and ergonomics for better results and comfort.
Why Are Dovetail Joints Popular In Woodworking?
Dovetail joints are popular due to their strength and aesthetics. They provide excellent mechanical strength, making them ideal for drawers and cabinets. The interlocking design ensures durability, while the intricate pattern adds visual appeal to furniture. Mastering dovetail joints enhances your woodworking craftsmanship.
How To Maintain Woodworking Joinery Tools?
Maintain woodworking joinery tools by regular cleaning and sharpening. Clean tools after each use to prevent rust and buildup. Sharpen chisels and saws frequently for precise cuts. Store tools in a dry place to avoid moisture damage. Proper maintenance extends tool lifespan and ensures optimal performance.
Conclusion
Choosing the right woodworking joinery tools makes a big difference. Good tools help create strong, neat joints. They save time and reduce mistakes. Start with basic tools and add more as you grow. Practice often to improve your skills. Remember, patience and care bring the best results.
With the right tools, your projects will look better and last longer. Keep learning and enjoy the craft of woodworking joinery.