If you want your wood projects to look smooth and professional, sanding and finishing are key steps you can’t skip. But getting that perfect finish isn’t always easy.
You might wonder which grit sandpaper to use or how to apply the finish without streaks. Don’t worry—this guide will give you simple, clear tips that make the process easier and help your wood shine like never before. Ready to take your woodworking skills to the next level?
Keep reading, and you’ll learn how to transform rough wood into a stunning masterpiece.
Choosing The Right Sandpaper
Sanding wood smooths its surface before finishing. Picking the right sandpaper helps you get good results.
Different sandpapers fit different jobs. This guide explains how to choose the best one for your woodwork.
Grit Levels And Their Uses
Sandpaper grit shows how rough or smooth the paper is. Lower numbers mean rougher grit. Higher numbers mean finer grit.
Use coarse grit to remove big marks. Use fine grit to smooth the wood before finishing.
- 40-60 grit:Removes old paint and rough wood quickly.
- 80-120 grit:Smooths wood after rough sanding.
- 150-180 grit:Prepares wood for staining or sealing.
- 220 grit and above:Final smooth sanding before finishing.
Material Types For Sandpaper
Sandpaper comes in different materials. Each type works better on certain woods and tasks.
Choosing the right material helps sanding last longer and work well.
- Aluminum Oxide:Good for hardwoods and general sanding. Durable and affordable.
- Garnet:Works well on soft woods. Gives a smooth finish but wears faster.
- Silicon Carbide:Best for sanding finishes and wet sanding. Sharp and long-lasting.
- Ceramic:Very tough and used for heavy sanding jobs. Lasts a long time.
When To Replace Sandpaper
Sandpaper gets dull after use. Dull sandpaper does not smooth well and can damage wood.
Replace sandpaper when it stops cutting or clogs with dust.
- If sanding takes longer than usual, change the sandpaper.
- When you see scratches instead of smoothness, replace it.
- Clogged sandpaper needs cleaning or replacement.
- Use new sandpaper for each grit level to get good results.
Preparing Wood Surfaces
Preparing wood surfaces is key to a smooth finish. Good preparation helps the wood look its best.
Start by cleaning, then remove old finishes and fill any flaws. These steps make sanding easier.
Cleaning And Inspecting The Wood
Clean the wood to remove dust, dirt, and grease. Use a soft cloth or brush to wipe the surface.
Look closely for cracks, knots, or damage. This helps find areas needing extra attention before sanding.
- Remove dust with a tack cloth
- Use mild soap and water if greasy
- Dry the wood completely before next steps
- Mark any damage or rough spots
Removing Old Finishes
Old paint, varnish, or stain can stop new finishes from sticking. Remove them carefully.
Use a chemical stripper or sand the surface to get rid of old layers. Work in a well-ventilated area.
- Apply chemical stripper with a brush
- Let it sit as the instructions say
- Scrape off softened finish gently
- Sand rough areas to smooth the wood
- Wear gloves and protect your eyes
Filling Imperfections
Fill holes, cracks, and dents before sanding. This makes the surface even and ready for finish.
Use wood filler that matches the wood color. Apply with a putty knife and let it dry fully.
- Choose filler for interior or exterior use
- Press filler firmly into gaps
- Remove excess with a putty knife
- Sand the filled spots smooth after drying
- Repeat if needed for deep holes
Sanding Techniques
Sanding is a key step to prepare wood for finishing. It smooths the surface and removes old paint or stains.
Using the right sanding technique improves the wood’s look and helps finishes stick better.
Sanding With The Grain
Always sand along the wood grain. This avoids scratches that show up after finishing.
Start with coarse grit sandpaper and move to finer grits for a smooth finish. Keep your strokes even and gentle.
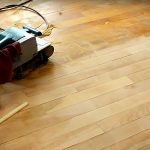
Using Power Sanders
Power sanders save time but need careful handling. Choose the right sander for your project.
- Orbital sanders are good for flat surfaces.
- Belt sanders remove material fast but can leave marks if not used correctly.
- Detail sanders work well on corners and curves.
- Keep the sander moving to avoid gouges.
- Use dust collection to keep your workspace clean.
Hand Sanding Tips
| Tip | Reason |
|---|---|
| Use a sanding block | Keeps pressure even and prevents uneven spots |
| Sand in small areas | Makes it easier to control and finish thoroughly |
| Change sandpaper often | Prevents clogging and maintains effectiveness |
| Wear a mask | Protects lungs from dust |
| Wipe dust between grits | Ensures smooth surface for next sanding stage |

Credit: www.familyhandyman.com
Choosing The Right Finish
Selecting the right finish is key for wood projects. It protects wood and shows its beauty.
This guide helps you understand finishes, factors to consider, and how to apply them well.
Types Of Wood Finishes
Wood finishes come in different types. Each offers a unique look and level of protection.
- Oil Finishes:Penetrate wood to highlight grain with a natural look.
- Lacquer:Dries fast and gives a shiny, smooth surface.
- Shellac:Made from natural resin, adds warmth and shine.
- Varnish:Offers strong protection and a glossy finish.
- Polyurethane:Very durable and water-resistant, good for floors.
- Wax:Adds a soft sheen but less protection.
Factors To Consider For Selection
| Factor | What to Think About |
| Wood Type | Some finishes suit softwood; others suit hardwood better. |
| Use | Choose durable finishes for high-traffic or outdoor wood. |
| Appearance | Decide if you want matte, glossy, or natural look. |
| Drying Time | Fast-drying finishes save time; slow-drying offer smooth coats. |
| Safety | Check if finishes have strong odors or toxic chemicals. |
Application Methods
How you apply finish affects the final result. Good technique helps wood look its best.
- Brush:Best for varnishes and oil finishes on flat surfaces.
- Cloth:Use for rubbing oils or waxes into wood.
- Spray:Quick and even coverage, ideal for lacquer and shellac.
- Pad:Foam pads work well for smooth and thin layers.
- Sand Between Coats:Light sanding improves smoothness and adhesion.
Applying The Finish
Applying the finish is the final step in making wood look great and last longer. This process protects the wood and shows off its natural beauty.
Using the right tools and techniques helps you get a smooth, even coat. Take your time to prepare and apply the finish carefully.
Preparing The Surface
Start by sanding the wood to remove rough spots and old finishes. Use fine-grit sandpaper for a smooth surface.
Clean the wood with a tack cloth or damp rag to remove dust and dirt. A clean surface helps the finish stick better.
Brush Vs. Cloth Application
Brushes are good for thick finishes like varnish or polyurethane. They help spread the finish evenly over large areas.
Cloths work well for oils and stains. They let you control the amount and create a smooth, thin coat without brush marks.
- Brush: use natural or synthetic bristles
- Cloth: use lint-free and soft fabric
- Brush for thick finishes; cloth for thin finishes
Multiple Coats And Drying Times
Apply several thin coats instead of one thick coat. Thin coats dry faster and create a better finish.
Let each coat dry fully before adding the next. Follow the finish maker’s instructions for drying times.
- Lightly sand between coats with fine-grit sandpaper
- Remove dust before applying the next coat
- Patience improves the final wood finish

Credit: www.familyhandyman.com
Final Touches
After sanding and applying finish to your wood, the final touches bring out its true beauty. These steps help protect the wood and keep it looking good for years.
Let’s explore how to buff and polish, maintain finished wood, and fix common issues you might face.
Buffing And Polishing
Buffing smooths the finish and removes minor scratches. Polishing adds shine and a protective layer to the wood surface.
- Use a soft cloth or buffing pad for gentle rubbing.
- Apply a small amount of polishing wax or paste.
- Work in circular motions until the surface gleams.
- Remove excess polish to avoid buildup.
Maintaining Finished Wood
Proper care keeps your wood looking fresh. Dust regularly and avoid harsh cleaners that can damage the finish.
| Care Tip | Details |
| Dusting | Use a soft, dry cloth weekly |
| Cleaning | Use mild soap and water sparingly |
| Humidity | Keep wood in 40-60% humidity range |
| Sunlight | Limit direct sun exposure to prevent fading |
Troubleshooting Common Issues
Sometimes finishes develop problems like cloudy spots, sticky areas, or scratches. Knowing how to fix these saves time and effort.
- Cloudy finish:Buff lightly with a fine abrasive pad.
- Sticky surface:Allow more drying time or apply thin coats.
- Scratches:Use a matching stain or touch-up marker before polishing.

Credit: fastplus.eu
Frequently Asked Questions
What Grit Sandpaper Is Best For Wood Sanding?
Start with 80-120 grit sandpaper for rough surfaces. Progress to 180-220 grit for smooth finishing. Using finer grits avoids scratches and prepares wood for finishing.
How To Prepare Wood Before Applying Finish?
Clean wood surface of dust and debris. Sand progressively with finer grit sandpaper. Wipe surface with a tack cloth to remove residue before finishing.
Which Wood Finish Provides Best Durability?
Polyurethane offers excellent durability and water resistance. It protects wood from scratches and moisture. Ideal for high-traffic or frequently used wood surfaces.
Can Sanding Damage Wood Surfaces?
Yes, excessive or coarse sanding can damage wood. Always sand gently and follow grain direction. Use proper grit sequence to avoid scratches or uneven surfaces.
Conclusion
Sanding and finishing wood takes time and care. Choose the right sandpaper grit for smooth results. Always sand with the grain to avoid scratches. Apply finish evenly to protect and highlight the wood’s beauty. Let each coat dry completely before the next.
Patience makes a big difference in your project’s look. Follow these tips for strong, lasting wood finishes. Enjoy the process and the lovely results you create.