If you’ve ever struggled with bending EMT conduit and ended up with crooked angles or damaged pipes, you’re not alone. Getting those bends just right can be tricky, but it’s a skill that saves you time, effort, and money.
Imagine how much smoother your projects would go if every bend was precise and clean. You’ll discover simple, step-by-step techniques to bend EMT conduit accurately—no guesswork, no frustration. Keep reading, and you’ll gain the confidence to handle your conduit like a pro.
Credit: www.acmetools.com
Tools Needed For Emt Bending
Bending EMT conduit requires the right tools to get smooth, accurate bends. Using proper tools helps avoid kinks and keeps the conduit strong.
Before starting your bending work, gather the tools that will make the job easier and safer. These tools help measure and shape the conduit correctly.
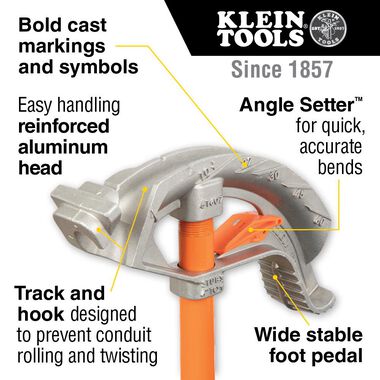
Types Of Benders
There are different benders made for EMT conduit. Each type offers control for various bend shapes and sizes.
- Hand Benders:Simple tools for small jobs and light bends.
- Hydraulic Benders:Use hydraulic force for tight or large bends.
- Electric Benders:Powered tools that bend quickly and with less effort.
- Spring Benders:Flexible tools for gentle curves and custom shapes.
Measuring Tools
Accurate measurement is key to bending EMT correctly. The right measuring tools help you mark the conduit precisely.
- Tape Measure:For measuring length and bend points.
- Angle Finder:Helps check the bend angle during and after bending.
- Marker or Pencil:Marks where to bend on the conduit.
- Level:Ensures bends are straight and even.
Safety Gear
Safety gear protects you while bending EMT conduit. It keeps you safe from sharp edges and heavy tools.
- Safety Glasses:Protect your eyes from debris and metal shards.
- Gloves:Prevent cuts and improve grip on tools and conduit.
- Work Boots:Protect your feet from falling tools or conduit.
- Long Sleeves:Shield your arms from scratches and burns.
Basic Bending Techniques
Bending EMT conduit correctly is key for a clean and safe electrical installation. Using the right tools and methods helps you get smooth bends without damage.
Focus on accuracy to ensure the conduit fits well in tight spaces and meets code requirements. The three main steps are marking, positioning, and applying the bend.
Marking The Bend Point
Start by measuring where the bend should begin on the conduit. Use a marker to make a clear line at this point. This mark guides the placement of the conduit in the bender.
- Measure the exact length needed before the bend
- Mark the conduit clearly with a permanent marker
- Double-check measurements to avoid errors
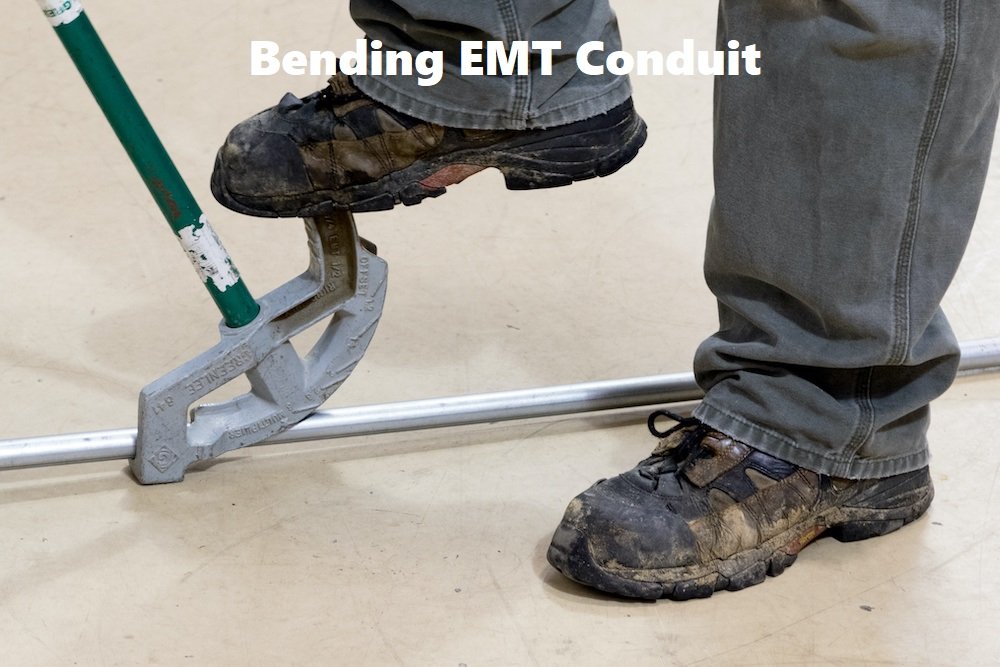
Positioning The Conduit
Place the conduit into the bender so the mark aligns with the bender’s arrow or stop point. Holding the conduit firmly ensures the bend forms in the right spot.
| Position Part | Description |
| Bend Arrow | Aligns with the mark on the conduit |
| Foot Stop | Helps keep conduit steady during bending |
| Handle | Use to apply even pressure for the bend |
Applying The Bend
Pull the handle slowly and steadily to bend the conduit. Avoid quick or jerky movements to keep the bend smooth and accurate. Stop when the desired angle is reached.
- Grip the handle firmly
- Pull the handle with steady pressure
- Check the angle frequently during bending
- Release the handle gently once done
Common Bends And Their Uses
Bending EMT conduit is a key skill for electricians. It helps guide wires around corners and obstacles.
There are several common bends used to fit conduit properly. Each bend serves a specific purpose.
90-degree Bend
The 90-degree bend turns the conduit at a right angle. It is used to change the direction of the conduit path.
This bend is useful when running conduit along walls or ceilings. It helps avoid obstacles.
Offset Bend
An offset bend moves the conduit over an obstacle. It uses two bends to shift the line sideways.
Electricians use this bend to avoid pipes, beams, or other obstructions in the way.
- First bend angles the conduit away from the obstacle
- Second bend returns it parallel to the original line
- The distance between bends equals the width of the obstacle
Saddle Bend
The saddle bend helps the conduit go over or under an obstacle smoothly. It uses three bends.
This bend is good for crossing pipes or wires without touching them. It creates a small hump in the conduit.
- First bend lifts the conduit up
- Second bend keeps the conduit straight above the obstacle
- Third bend lowers the conduit back to original height
Avoiding Common Mistakes
Bending EMT conduit can be tricky without the right technique. Mistakes can cause damage and waste materials.
Follow simple tips to bend conduit accurately and prevent common errors during the process.
Preventing Kinks
Kinks weaken the conduit and make it hard to pull wires through. They often happen when you bend too fast.
Use slow, steady pressure with the bender. Let the tool do the work without forcing it.
- Check the conduit for dents before bending
- Keep the conduit straight before starting
- Apply smooth, even force during the bend
- Use a proper bender designed for EMT conduit
Maintaining Bend Radius
The bend radius affects the strength and flow inside the conduit. Too tight bends cause damage and wire problems.
Follow the manufacturer’s guide for the minimum bend radius. Keep the conduit from bending too sharply.
- Mark the bend location clearly
- Use the right bender size for the conduit diameter
- Measure the radius with a template or tool
- Adjust the bend angle carefully to keep the radius
Ensuring Accurate Angles
Accurate angles help fit conduit into tight spaces and meet code requirements. Wrong angles cause extra work and waste.
Use a level or angle finder to check each bend. Mark the conduit before bending to guide your work.
- Measure twice before bending
- Use bend marks to align the bender
- Check the angle after each bend
- Practice on scrap conduit to improve accuracy
Advanced Bending Tips
Bending EMT conduit accurately can save time and improve your work quality. Using the right techniques helps prevent mistakes.
These advanced tips focus on using pipe benders, bending multiple conduits, and fixing common errors.
Using A Pipe Bender
Choose a pipe bender that fits the conduit size. Mark the conduit where the bend starts. Align the conduit properly in the bender’s shoe to get the right angle.
Apply steady pressure while bending. Avoid quick or jerky moves to keep the bend smooth and even. Check the angle frequently with a level or angle finder.
Bending Multiple Conduits
Bending multiple EMT conduits together saves time but needs care to avoid uneven bends. Clamp the conduits tightly to keep them aligned.
- Use a strong clamp to hold conduits firmly
- Check that all conduits start bending at the same mark
- Bend slowly and evenly to prevent gaps
- Measure the angles on each conduit after bending
Correcting Bend Errors
Small mistakes in bends happen. Fix them carefully to avoid damaging the conduit. Slightly heat the bend area to soften the metal before adjusting.
| Error Type | Correction Method |
| Overbent angle | Reheat and slowly straighten |
| Underbent angle | Use bender to increase bend carefully |
| Flattened conduit | Roll gently on a round surface |
| Uneven bend | Rebent using proper alignment |

Credit: www.youtube.com
Maintenance And Storage Of Bending Tools
To bend EMT conduit accurately, you need well-maintained bending tools. Proper care keeps them working smoothly and lasting longer.
Storing tools correctly prevents damage and helps you find them easily. This guide covers cleaning, lubrication, and storage tips.
Cleaning And Lubrication
Clean your bending tools after each use. Dirt and debris can cause wear and affect bending accuracy.
Lubricate moving parts to reduce friction. This helps the tools work smoothly and prevents rust.
- Use a dry cloth to wipe off dust and dirt.
- Remove any metal shavings or residue.
- Apply light machine oil to joints and hinges.
- Wipe off excess oil to avoid attracting more dirt.
- Check for rust spots and treat them promptly.
Proper Storage Methods
Store bending tools in a dry, clean place. This prevents rust and damage.
Keep tools organized to find them quickly and avoid dropping or knocking them around.
- Use a tool rack or pegboard for easy access.
- Store tools away from moisture and direct sunlight.
- Keep tools in a toolbox with compartments.
- Avoid stacking heavy items on top of bending tools.
- Inspect tools regularly and clean before storage.

Credit: www.amazon.com
Frequently Asked Questions
How Do You Measure Emt Conduit Bends Accurately?
Measure the bend length using a conduit bender’s marks. Mark the conduit at the correct distance for precise bends. This ensures accurate angles and prevents errors during installation.
What Tools Are Needed For Bending Emt Conduit?
You need a conduit bender, a tape measure, and a marker. A level helps check bend accuracy. These tools help create clean, accurate bends in EMT conduit.
How To Avoid Kinks When Bending Emt Conduit?
Bend slowly and steadily using a proper conduit bender. Support the conduit firmly to prevent crushing. This technique avoids kinks and maintains conduit integrity.
What Angle Is Standard For Emt Conduit Bends?
The standard bend angle is 90 degrees for most installations. You can also make 45-degree and 22. 5-degree bends for offsets. Accurate angles ensure proper conduit alignment.
Conclusion
Bending EMT conduit takes practice and patience. Use the right tools and measure carefully. Mark the bend points clearly before you start. Bend slowly to avoid kinks or cracks. Check your angles often to stay accurate. Keep your workspace clean and safe.
With steady hands and focus, you can make smooth bends every time. This skill saves time and helps your projects look professional. Keep practicing, and your confidence will grow. Simple steps lead to great results.