Are you tired of slow internet or messy cables cluttering your workspace? Knowing how to crimp network cables yourself can save you time, money, and frustration.
Whether you’re setting up a home network or fixing a connection at work, mastering this simple skill puts you in control. In this guide, you’ll discover clear, step-by-step instructions that anyone can follow—even if you’ve never done it before. Ready to get your network running smoothly and efficiently?
Let’s dive in and make your cables work perfectly every time.
Tools And Materials Needed
Crimping network cables requires specific tools and materials. Using the right items ensures a strong connection and proper cable function.
This guide covers the types of cables, the correct crimping tools, and extra accessories you might need.
Types Of Network Cables
There are different network cables used for various connections. Each type needs specific handling and tools.
| Cable Type | Description | Common Use |
|---|---|---|
| Cat5e | Twisted pair cable for Ethernet | Home and office networks |
| Cat6 | Improved twisted pair with higher speed | Faster Ethernet and Gigabit networks |
| Fiber Optic | Uses light signals for data transfer | Long-distance and high-speed data |
Choosing The Right Crimping Tool
A crimping tool connects cable ends to connectors. Picking the right one is key for a solid link.
- Standard RJ45 crimpers for Ethernet cables
- Modular crimpers for phone cables
- Multi-function tools with wire cutters and strippers
- Tools matching the cable type and connector size
Additional Accessories
Extra items help prepare and test cables. They make the job easier and ensure quality.
- Wire strippers to remove cable jackets
- Cable testers to check connections
- Heat shrink tubing for insulation
- Label tags to mark cables
- Crimping dies for different connectors
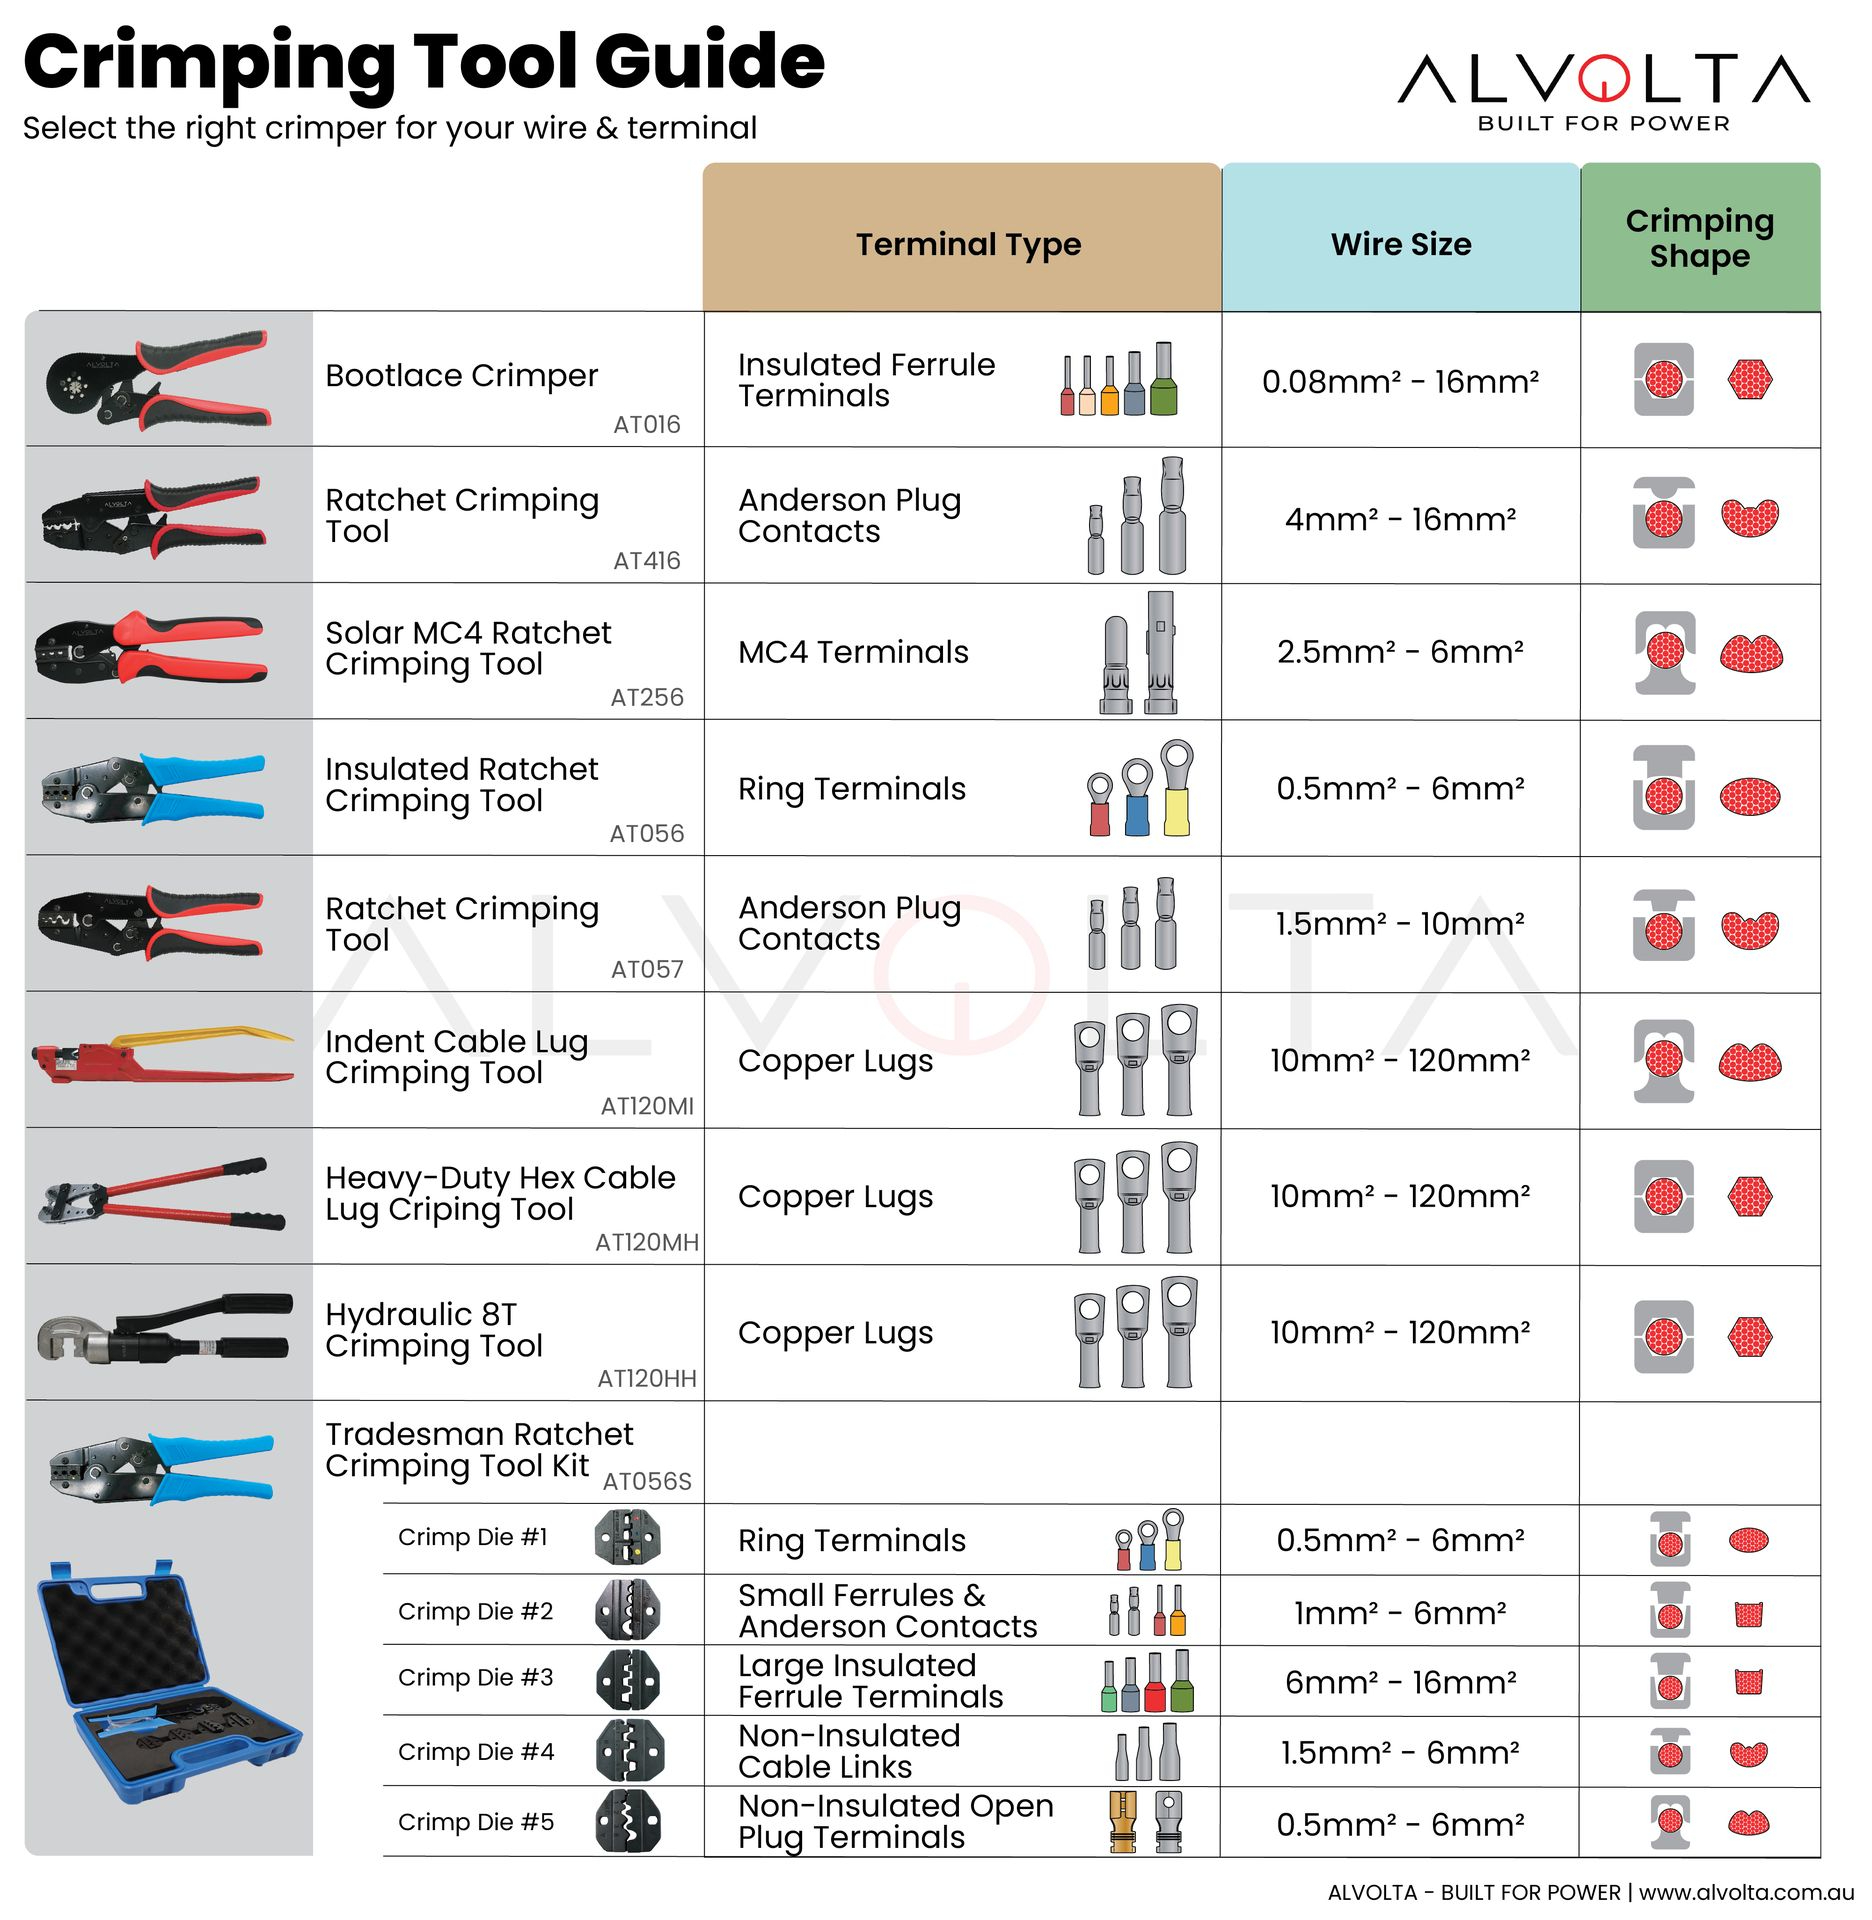
Credit: www.alvolta.com.au
Preparing The Cable
Preparing a network cable correctly is important for a strong connection. It helps the cable fit well inside the connector. This guide explains how to prepare the cable before crimping.
Follow these simple steps to get your cable ready. Each step helps make sure the wires connect properly inside the plug.
Stripping The Outer Jacket
Start by removing the outer jacket of the cable. Use a cable stripper or a sharp knife. Be careful not to cut the inner wires.
Strip about 1 to 1.5 inches of the jacket. This gives enough space to work with the inner wires.
- Hold the cable firmly
- Score the jacket lightly around the cable
- Pull off the jacket to expose the wires
Arranging The Wire Pairs
Inside the cable, you will see four twisted pairs of wires. Untwist the pairs gently. Straighten the wires so they are easy to arrange.
Arrange the wires in the order needed for your network type. The most common order is T568B or T568A.
- White-orange
- Orange
- White-green
- Blue
- White-blue
- Green
- White-brown
- Brown
Trimming The Wires
Hold the wires straight and trim them evenly. Cut about half an inch from where the jacket ends. This makes sure all wires fit inside the connector.
Use a wire cutter to make a clean, straight cut. Avoid leaving wires too long or uneven.
Wiring Standards
Wiring standards tell us how to arrange wires in network cables. Following these rules helps devices talk to each other.
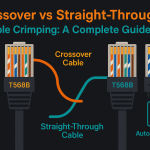
Two main wiring standards are T568A and T568B. Both work well but use different wire orders.
T568a Vs T568b
T568A and T568B are two ways to order the wires inside a cable. They both connect devices but use different color orders.
T568A is often used in new installations and government projects. T568B is more common in business and commercial networks.
- T568A wiring: white/green, green, white/orange, blue, white/blue, orange, white/brown, brown
- T568B wiring: white/orange, orange, white/green, blue, white/blue, green, white/brown, brown
Color Coding And Order
Each wire in a cable has a color to show its position. The order is important to send data correctly.
The cable has four twisted pairs of wires. Each pair has one solid color and one white-striped wire.
| Pair | Wire 1 | Wire 2 |
|---|---|---|
| 1 | White/Green | Green |
| 2 | White/Orange | Orange |
| 3 | White/Blue | Blue |
| 4 | White/Brown | Brown |
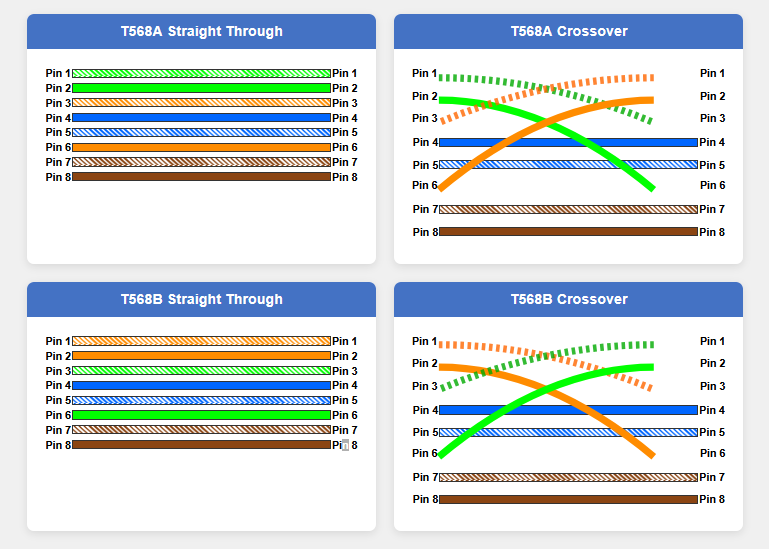
Credit: thamizhelango.medium.com
Crimping Process
Crimping network cables joins wires to connectors securely. This step ensures good signal transmission. Careful work prevents connection problems later.
The process needs clean wires and the right tools. Follow each part carefully for a strong link.
Inserting Wires Into The Connector
Arrange wires in the right order before inserting them. Each wire must reach the end of the connector slot. This stops loose connections.
- Strip about half an inch of insulation from each wire.
- Untwist the wire pairs gently and straighten them.
- Follow the wiring standard (T568A or T568B) for order.
- Insert wires fully into the connector, ensuring each fits into its channel.
- Check that no wire slips out or is too short inside the connector.
Using The Crimping Tool Correctly
Hold the connector with wires firmly inside. Place it into the crimping tool’s correct slot. Squeeze the handles steadily until the tool clicks or feels tight.
| Tool Position | Action |
|---|---|
| Connector slot | Insert connector fully |
| Handle grip | Hold handles with firm pressure |
| Squeeze action | Press handles until crimp is secure |
| Release | Open handles and remove connector |
Checking The Connection
Look at the connector after crimping. Wires should stay in place and touch the connector pins. No wires should be loose or outside.
- Inspect the cable end for even wire lengths inside the connector.
- Use a cable tester to verify the signal path is correct.
- Check for any visible damage or bent pins.
- Retest the cable if connection issues appear during use.
Testing The Cable
Testing network cables is important to ensure they work correctly. It helps find wiring mistakes before use.
Proper testing saves time and stops network problems later. Use tools like cable testers to check your work.
Using A Cable Tester
A cable tester checks if each wire inside the cable is connected properly. It also finds shorts or breaks.
- Plug one end of the cable into the tester’s main unit.
- Connect the other end to the remote unit.
- Turn on the tester to run the test.
- Watch the indicator lights or display for results.
- Check that each wire pairs match and are in order.
Troubleshooting Common Issues
If the tester shows errors, check these common problems. Fixing them ensures the cable works well.
| Issue | Cause | Solution |
|---|---|---|
| No Signal | Loose connection or broken wire | Re-crimp connectors and test again |
| Open Circuit | Wire break inside cable | Cut cable end, strip wire, and re-crimp |
| Short Circuit | Wires touching inside connector | Check wiring and separate touching wires |
| Miswiring | Wrong wire order in connector | Rearrange wires to correct order before crimping |
Advanced Tips
Crimping network cables needs care to get good connections. Advanced tips help make cables last longer and work better.
These tips cover handling different cables, making strong connections, and keeping your tools in good shape.
Handling Different Cable Types
Each cable type has its own way to crimp. Know if you use Cat5e, Cat6, or coaxial cables.
Some cables have thicker wires or shielding. This changes how you strip and place wires in the connector.
- For Cat6, use connectors made for thicker wires.
- Keep shielding intact for shielded cables.
- Strip just the right length of cable jacket.
- Align wires in the right order before crimping.
Ensuring Durable Connections
Strong connections stop data loss and cable damage. Check each cable after crimping.
Use quality connectors and crimps. Press firmly but do not break the wires.
- Test cables with a cable tester after crimping.
- Make sure wires do not slip out of the connector.
- Check that the connector grips the cable jacket tightly.
- Avoid bending cables sharply near the connector.
Maintaining Your Tools
Good tools make crimping easier and better. Clean and check your tools often.
Keep crimpers free from rust and dirt. Replace worn parts on time.
- Wipe tools after use to remove debris.
- Lubricate moving parts with light oil.
- Store tools in a dry, safe place.
- Inspect cutting and crimping edges regularly.

Credit: www.docusnap.com
Frequently Asked Questions
What Tools Are Needed For Crimping Network Cables?
You need a crimping tool, cable stripper, and RJ45 connectors. These tools ensure clean cuts and secure cable terminations. Using proper tools improves connection quality and reduces signal loss. Always choose tools designed for Ethernet cables.
How Do You Prepare Cables For Crimping?
Strip about one inch of the cable jacket carefully. Untwist and align the wires according to the wiring standard. Trim wires evenly before inserting into the connector. Proper preparation ensures a strong, reliable connection.
What Wiring Standards Should I Follow For Crimping?
Use T568A or T568B wiring standards for Ethernet cables. Both ensure proper pairing and signal integrity. T568B is more common in the US. Consistency in wiring standards avoids network issues.
How To Test Network Cables After Crimping?
Use a cable tester to check continuity and wiring correctness. It identifies miswires, shorts, or open circuits. Testing ensures your cable works perfectly before installation. Always test cables after crimping.
Conclusion
Crimping network cables can seem tricky at first. Practice helps improve your skills quickly. Use the right tools for clean, strong connections. Double-check each step to avoid mistakes. Good cable crimps ensure fast and stable internet. Keep your workspace organized for better results.
Soon, making your own cables will feel easy. Start with simple projects and build confidence. This guide gives you a solid foundation. Enjoy better network setups with your new skills.