If you’re working on woodworking projects, mastering how to mark wood for tenon and mortise joints is a game-changer. These joints are strong, reliable, and give your work a professional finish.
But getting the measurements right can be tricky. In this guide, you’ll discover simple steps to mark your wood accurately, so your joints fit perfectly every time. Whether you’re a beginner or want to sharpen your skills, this article will help you build stronger, cleaner joints with confidence.
Keep reading to transform your woodworking with precision and ease.

Credit: www.familyhandyman.com
Tools Needed
Marking wood accurately is key for strong tenon and mortise joints. You need the right tools to make precise marks.
This guide covers the basic tools used for marking wood in this woodworking method.
Marking Gauges
Marking gauges help you draw consistent lines parallel to the wood edge. They have a sharp point or blade to scratch the surface.
- Adjust the gauge to the desired measurement
- Hold it firmly against the wood edge
- Slide the gauge along the wood to create a clear line
Pencils And Knives
Pencils and knives mark the wood with different levels of detail. Pencils are good for rough marks. Knives give sharp, precise lines.
| Tool | Use | Advantage |
| Pencil | Mark large areas or guides | Easy to erase or adjust |
| Marking Knife | Cut fine lines for accuracy | Prevents wood fibers from tearing |
Squares And Calipers
Squares and calipers check measurements and angles. They ensure your marks line up perfectly for the joint fit.
Common uses of these tools include:
- Squares: Confirm 90-degree angles on tenon shoulders
- Calipers: Measure thickness and depth precisely
- Transfer measurements from one piece to another
Preparing The Wood
Marking wood for tenon and mortise joints needs careful preparation. This process helps create strong and accurate joints.
Good preparation starts with choosing the right wood, smoothing the surface, and planning measurements. These steps ensure the joints fit well.
Selecting The Right Wood
Pick wood that is strong and stable for tenon and mortise joints. Avoid wood with knots or cracks. Hardwoods like oak or maple work well.
- Check for straight grain to prevent splitting
- Use dry wood to avoid shrinking later
- Choose wood with uniform thickness
- Avoid wood with visible defects
Surface Preparation
Prepare the wood surface by sanding it smooth. A clean surface helps you mark lines clearly and cut precisely.
| Tool | Purpose |
| Sandpaper (120-220 grit) | Smooth rough surfaces |
| Hand plane | Flatten and level the wood |
| Cloth | Remove dust after sanding |
| Square | Check for flatness and right angles |
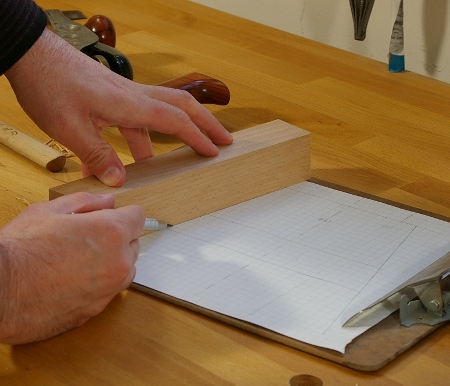
Measuring And Planning
Plan your joint size and layout carefully. Measure twice before marking to avoid mistakes.
- Decide the tenon width and length based on wood thickness
- Mark the mortise position on the wood piece
- Use a marking gauge for consistent lines
- Double-check measurements with a ruler or tape
- Sketch the joint layout on paper before marking the wood
Marking The Mortise
Marking the mortise accurately is key for strong tenon and mortise joints. It helps the parts fit well without gaps.
Using the right tools and careful measuring makes marking easier. This guide shows how to mark the mortise properly.
Setting The Gauge
The marking gauge sets the width of the mortise. Adjust it to match the tenon size for a tight fit.
Lock the gauge so it does not move while marking. This keeps lines consistent and straight.
- Measure the tenon thickness
- Set the gauge to this measurement
- Lock the gauge firmly
Transferring Measurements
Use a pencil or marking knife to transfer the gauge lines onto the wood. Mark both sides of the mortise area.
Mark the length of the mortise by measuring from the shoulder line. Draw clear lines for cutting guides.
- Place the wood flat on a stable surface
- Run the gauge along the wood edge to mark depth
- Use a square to mark the mortise length
Checking Accuracy
Double-check all lines before cutting. Measure twice to avoid mistakes that weaken the joint.
Compare the marks to the tenon size. Make sure the mortise lines match the tenon exactly.
- Re-measure mortise width and length
- Compare with the tenon measurements
- Adjust markings if needed
- Keep all lines sharp and clear
Marking The Tenon
Marking the tenon is a key part of making strong tenon and mortise joints. It helps you cut the wood pieces to fit well together. Clear marks guide your saw and chisel work.
This guide explains how to mark the tenon properly. You will learn how to set the size, draw the shoulders, and mark the cheeks.
Establishing Tenon Dimensions
Start by deciding the size of your tenon. Its width and thickness must match the mortise for a tight fit. The length depends on your project.
Use a ruler or measuring tape to mark the tenon size on the wood. Mark both the thickness and the width on all sides clearly.
- Measure the mortise size before marking the tenon
- Mark the tenon width on the end grain
- Mark the tenon thickness on the face and edges
- Use a pencil for clear lines
Scribing The Shoulders
The shoulders define where the tenon ends and the wood surface begins. They help the joint fit flush. Mark the shoulders by scribing lines across the wood.
Use a marking knife or pencil and a square to draw sharp shoulder lines. These lines show where to stop cutting the tenon cheeks.
- Place the square on the wood face
- Draw a line across the grain for the shoulder
- Make sure lines are straight and clear
- Mark all four sides of the wood piece
Marking The Cheeks
The cheeks are the flat sides of the tenon. Marking them guides your cuts to make the tenon fit the mortise well. Mark the cheeks between the shoulder lines.
Use a pencil and a square to draw vertical lines on the wood edges. These lines show where to saw or chisel away the wood for the cheeks.
- Mark cheek lines on both sides of the tenon
- Keep lines parallel and straight
- Double-check measurements before cutting
- Use a sharp pencil or marking knife for accuracy
Tips For Precision
Marking wood accurately is key for strong tenon and mortise joints. Good marks help you cut the wood right the first time.
Use sharp tools and steady hands to get clear, precise lines. This makes your joints fit tight and last longer.
Avoiding Common Mistakes
One common mistake is marking on the wrong face of the wood. Always mark on the face that will be visible or aligned.
Another error is using dull pencils or tools. This creates thick or uneven lines that confuse your cuts.
- Mark on the correct face or edge
- Use a sharp pencil or marking knife
- Keep your hand steady while marking
- Do not rush the marking process
Using Reference Lines
Draw reference lines to guide your marks. These lines help you keep the layout straight and balanced.
Use a combination square or marking gauge for even lines. These tools keep marks consistent across pieces.
- Set the marking gauge to the joint size
- Draw baseline and shoulder lines clearly
- Check that lines are parallel and square
Double-checking Layouts
Always check your marks before cutting wood. Measure twice and mark once to avoid mistakes.
Compare marks on both joint parts. They must match perfectly to fit together well.
- Use a ruler or tape measure to confirm lengths
- Align tenon and mortise marks side by side
- Adjust any marks that seem off before cutting

Credit: www.bigsandwoodworking.com
Advanced Techniques
Marking wood accurately is key for strong tenon and mortise joints. Using advanced methods helps ensure tight fits and smooth assembly.
This guide covers using templates, marking complex joints, and incorporating layout tools to improve your woodworking precision.
Using Templates
Templates save time and increase consistency when marking multiple joints. You can create a reusable template from plywood or hardboard.
- Trace the exact shape of the tenon or mortise on the template.
- Clamp the template to the workpiece before marking.
- Use a marking knife or pencil to transfer the shape accurately.
- Double-check alignment before cutting.
Marking Complex Joints
Complex joints may include angled tenons or multiple mortises. Marking these requires careful measurement and clear lines.
| Joint Type | Key Marking Tips |
| Angled Tenon | Use a protractor to mark angles precisely |
| Double Mortise | Mark each mortise separately, then check spacing |
| Through Tenon | Extend marks through the wood thickness |
Incorporating Layout Tools
Layout tools help improve accuracy and reduce errors. Common tools include marking gauges, squares, and bevels.
Follow these tips to use layout tools effectively:
- Set marking gauges to the exact width of the tenon or mortise.
- Use a combination square to check right angles and mark shoulders.
- Adjust bevel gauges to transfer angles for angled joints.
- Keep all tools sharp and clean for crisp marking lines.
Credit: galoototron.com
Frequently Asked Questions
How Do You Mark Wood For Tenon And Mortise Joints?
Mark wood by measuring and marking shoulder and cheek lines accurately. Use a marking gauge and square for precise lines.
What Tools Are Best For Marking Tenon And Mortise Joints?
Use a marking gauge, pencil, marking knife, and try square. These tools ensure accurate and clean markings for joinery.
How To Ensure Accurate Measurements For Tenon And Mortise?
Measure twice before marking. Use a sharp marking gauge and square to maintain consistent and clear lines on wood.
Why Is Precise Marking Important In Tenon And Mortise Joints?
Precise marking ensures tight-fitting joints, structural strength, and clean appearance. It reduces errors during cutting and assembly.
Conclusion
Marking wood for tenon and mortise joints takes care and focus. Clear, accurate marks help pieces fit well and stay strong. Use simple tools like pencils and rulers for best results. Take your time to measure twice and mark once.
Practice makes your joints tighter and your work neater. Keep these tips in mind for better woodworking projects. Your joints will look clean and last longer with good marking. Simple steps lead to great results.