Are you struggling to get that perfectly smooth finish when sanding flat surfaces? Uneven sanding can ruin the look of your project and waste your time and effort.
But don’t worry—your next sanding job can be easier and more precise. You’ll discover simple yet powerful tips that will help you sand flat surfaces evenly every time. Whether you’re working on wood, metal, or drywall, these tricks will save you frustration and give your work a professional touch.
Keep reading to transform your sanding skills and achieve flawless results.
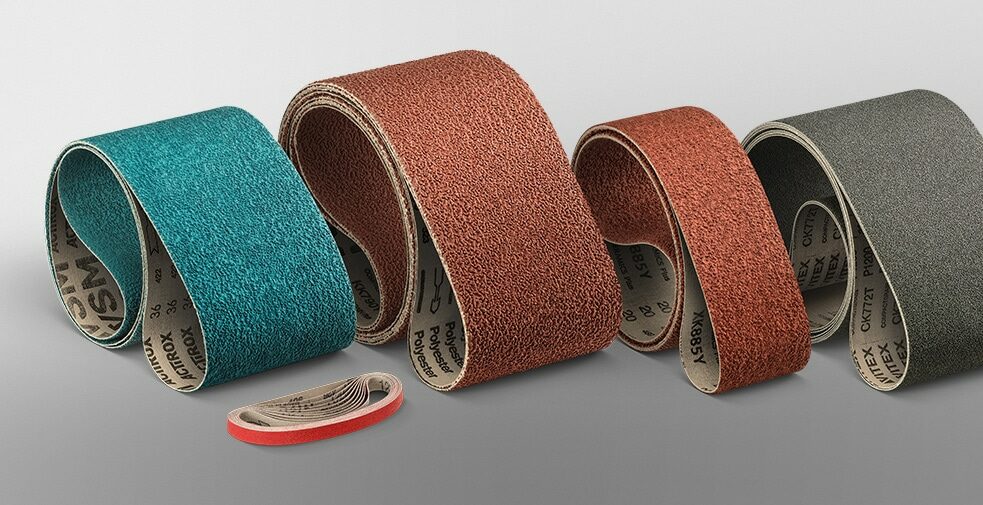
Choosing The Right Sandpaper
Choosing the right sandpaper is key to sanding flat surfaces evenly. It affects how smooth and clean your finish will be.
Different sandpapers work better for different tasks. Knowing which grit and material to use saves time and effort.
Grit Selection For Smooth Finishes
Sandpaper grit means the size of the abrasive particles. Lower numbers are rougher, and higher numbers are finer.
- Start with coarse grit like 60 or 80 to remove rough spots.
- Use medium grit like 120 to smooth the surface.
- Finish with fine grit like 220 or higher for a smooth touch.
Types Of Sandpaper Materials
Sandpaper comes in several materials. Each type works best on certain surfaces and tasks.
| Material | Best For | Durability |
| Aluminum Oxide | Wood and metal | Long-lasting |
| Garnet | Wood sanding | Medium |
| Silicon Carbide | Plastic and metal | Very durable |
| Ceramic | Heavy sanding and grinding | Highest |
Preparing The Surface
Preparing the surface is important for sanding flat surfaces evenly. A clean and smooth base helps sandpaper work better.
Taking time to prepare the surface can make your sanding easier and give better results.
Cleaning And Inspecting
Clean the surface well before sanding. Dirt and dust can clog sandpaper and cause scratches.
Look closely for any dents, cracks, or bumps. These spots need extra attention to sand evenly.
- Use a soft brush or cloth to remove dust and debris
- Check the surface under good light for damage
- Mark rough spots to sand more carefully
- Make sure the surface is dry before sanding
Removing Old Finishes
Old paint, varnish, or stain can block the sandpaper. Remove these finishes for smooth sanding.
Use a scraper or chemical stripper to clear old finishes. This helps the sanding process go faster.
- Apply chemical stripper carefully, following instructions
- Use a plastic scraper to avoid surface damage
- Sand lightly after stripping to remove residue
- Wear protective gear when using chemicals
Hand Sanding Techniques
Sanding flat surfaces evenly is important for a smooth finish. Hand sanding helps control the process carefully.
Use simple tools and steady movements to avoid uneven spots. This guide explains key hand sanding tips.
Maintaining Consistent Pressure
Keep your hand pressure steady while sanding. Pressing too hard can create dips and rough areas.
Light, even pressure helps remove material smoothly. Use your whole hand, not just fingers, to spread pressure.
- Hold the sandpaper flat against the surface
- Move your hand in slow, even strokes
- Avoid pausing too long in one spot
- Check the surface often for evenness
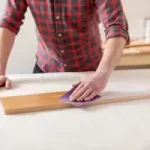
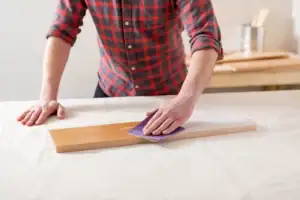
Using A Sanding Block
A sanding block keeps sandpaper flat and helps apply equal pressure. It also reduces hand fatigue.
Wrap the sandpaper around the block tightly. Hold the block firmly and move it in straight lines or circles.
- Choose a block size that fits your surface
- Replace sandpaper when it wears out
- Use light pressure to avoid gouges
- Keep the block flat to the surface

Credit: hammerroo.com.au
Power Sanding Tips
Power sanding helps you smooth flat surfaces quickly and evenly. Using the right tools and techniques makes a big difference in the final result.
These tips focus on choosing the right sander and controlling speed and movement for the best finish.
Choosing The Right Tool
Different sanders work better for different jobs. Knowing which tool to use keeps the surface even and avoids damage.
- Orbital sanders are good for general sanding on flat surfaces.
- Belt sanders remove material fast but can leave marks if not used carefully.
- Detail sanders reach tight spots but are slower for large areas.
- Use sandpaper grit that fits your sanding stage: coarse for rough, fine for finishing.
Controlling Speed And Movement
Speed and motion control help avoid uneven sanding and swirl marks.
| Tip | Explanation |
| Keep the sander moving | Do not stay in one spot to avoid dips. |
| Use moderate speed | High speed can burn the wood or damage finish. |
| Apply even pressure | Press lightly and evenly for smooth sanding. |
| Sand with the grain | Follow the wood grain to prevent scratches. |
Avoiding Common Mistakes
Sanding flat surfaces can be tricky if you do not follow the right steps. Many people make simple errors that cause uneven surfaces and damage. Learning how to avoid these mistakes will save time and improve your results.
This guide covers key tips to keep your sanding smooth and even. It focuses on how to prevent uneven surfaces and how to handle gouges and scratches properly.
Preventing Uneven Surfaces
Uneven sanding can ruin a project. It often happens if you press too hard or use the wrong grit sandpaper. Keep your sanding even by moving the tool in steady, overlapping strokes.
- Use a sanding block to keep pressure steady.
- Sand with the grain of the wood, not against it.
- Change sandpaper regularly to avoid clogging.
- Keep your sanding tool moving; do not stay in one spot too long.
- Check your work often by touch and sight.
Dealing With Gouges And Scratches
Gouges and deep scratches need special care. Sanding too hard can make them worse. Use finer sandpaper to smooth these areas carefully without damaging the surface more.
| Problem | Solution |
| Deep Gouges | Fill with wood filler then sand smooth with fine grit |
| Light Scratches | Sand gently with fine-grit sandpaper following the grain |
| Uneven Edges | Use a sanding block and check frequently for level surface |

Credit: www.roepaint.com
Final Touches
Sanding flat surfaces takes care and patience. The final touches make your work smooth and clean.
Pay attention to removing dust and checking smoothness. These steps prepare the surface for painting or finishing.
Cleaning Dust Residue
Dust from sanding sticks to the surface and can ruin finishes. Clean it well before moving on.
- Use a soft brush or vacuum to remove loose dust.
- Wipe the surface with a damp cloth to pick up finer particles.
- Let the surface dry completely before the next step.
- A tack cloth works well to catch tiny dust bits.
Checking For Smoothness
Check the surface by touch and sight. Look for bumps or rough spots that need more sanding.
| Check Method | What to Look For |
| Touch | Feel for rough patches or raised grain |
| Light | Shine a light at a low angle to see uneven spots |
| Visual | Look for scratches or dull areas |
Credit: mrsander.co.uk
Frequently Asked Questions
How Do I Sand Flat Surfaces Evenly Without Scratches?
Use fine-grit sandpaper and sand in a consistent, circular motion. Apply even pressure to avoid gouges. Clean the surface frequently to check progress and prevent buildup.
What Grit Sandpaper Is Best For Flat Surface Sanding?
Start with medium grit (120-150) for initial smoothing. Finish with fine grit (220-320) for a smooth, even surface. Adjust grit based on the material and desired finish.
How Can I Avoid Uneven Sanding Marks On Flat Surfaces?
Sand using a sanding block or flat tool to maintain pressure. Keep sanding strokes consistent and overlap each pass. Regularly check the surface for uneven spots to correct them immediately.
Should I Wet Sand Or Dry Sand Flat Surfaces?
Wet sanding reduces dust and helps achieve a smoother finish. It is ideal for fine finishing on metal, paint, or wood. Dry sanding is faster but creates more dust and may cause scratches.
Conclusion
Sanding flat surfaces requires patience and the right tools. Start with coarse sandpaper for rough areas. Progress to finer grits for smooth finishes. Keep your hand steady and apply even pressure. Sand in the direction of the grain for best results.
Remember, practice makes perfect. Wear protective gear to stay safe. Regularly check your progress to ensure even sanding. Clean the surface after sanding to remove dust. These simple tips help achieve a smooth and even finish. Enjoy your well-sanded surface!