Are you working on a woodworking project and wondering how to get the perfect fit? Knowing how to measure wood thickness accurately is key to making your work look professional and sturdy.
Whether you’re building furniture, crafting decorations, or just fixing something around the house, the right thickness can make all the difference. You’ll learn simple, step-by-step methods to measure wood thickness with tools you might already have. Keep reading to avoid costly mistakes and take your woodworking skills to the next level.
Tools For Measuring Wood Thickness
Measuring wood thickness is key for many woodworking tasks. Using the right tools helps get accurate results.
Different tools fit different needs. Some are simple, while others give very precise measurements.
Calipers
Calipers measure wood thickness by holding the wood between two jaws. They come in digital, dial, and vernier types.
Digital calipers show easy-to-read numbers. Vernier calipers need you to read scales manually. Dial calipers use a dial for measurement.
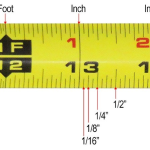
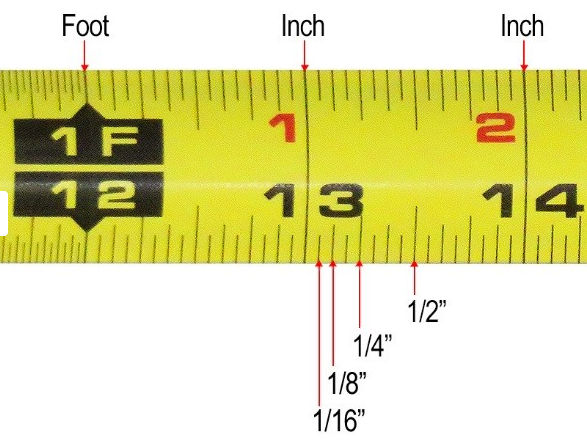
Rulers And Tape Measures
Rulers and tape measures are simple tools for rough thickness checks. They work best with thicker wood pieces.
- Rulers are straight and rigid for flat surfaces.
- Tape measures bend to wrap around curves.
- Both are easy to carry and use on site.
Thickness Gauges
Thickness gauges are tools with fixed thickness blades. You insert blades between wood layers to find thickness.
| Gauge Type | Use | Thickness Range |
| Feeler Gauge | Measure gaps and thickness | 0.001 to 0.04 inches |
| Gap Gauge | Check small spaces | Varies by set |
Micrometers
Micrometers give very precise thickness readings. They have a spindle that moves to touch the wood.
They are best for thin wood and fine work. Micrometers show measurements in small units like thousandths of an inch.
Preparing Wood For Measurement
Measuring wood thickness accurately begins with proper preparation. Getting the wood ready helps ensure reliable results.
Focus on picking the right spot, cleaning the surface, and stabilizing the wood before taking measurements.
Selecting The Measurement Spot
Choose a flat and smooth area on the wood for measuring. Avoid knots, cracks, and warps, as they can change thickness readings.
- Look for a clean, flat surface
- Avoid edges or rough patches
- Pick a spot away from defects
- Use multiple spots for better accuracy
Ensuring Wood Surface Cleanliness
Clean the wood surface to remove dust, dirt, and debris. These particles add extra thickness and cause wrong measurements.
| Cleaning Method | Details |
| Dry Cloth | Wipe surface gently to remove dust |
| Soft Brush | Brush off dirt from grooves and corners |
| Damp Cloth | Use lightly dampened cloth for sticky residue |
| Let Dry | Allow wood to dry fully before measuring |
Stabilizing The Wood Piece
Keep the wood steady and flat during measurement. Movement or bending can cause errors in thickness readings.
- Place wood on a flat, stable surface
- Use clamps to hold the wood in place
- Avoid flexing or twisting the piece
- Measure near the center to reduce edge effects
Measuring Techniques
Measuring wood thickness is important for many woodworking projects. Different tools give different accuracy and ease.
This guide explains four common ways to measure wood thickness clearly and simply.
Using Calipers Correctly
Calipers can measure wood thickness quickly and with good accuracy. Use either digital or manual calipers.
Open the calipers and place the wood between the jaws. Close gently until they touch the wood without squeezing it.
- Clean caliper jaws before use
- Hold the calipers steady to avoid errors
- Read measurement from the scale or digital display
- Repeat measurement at different points for accuracy
Reading Thickness With A Ruler
A ruler is simple but less precise for measuring wood thickness. Use a metal ruler with clear markings.
Place the wood on a flat surface. Hold the ruler vertically against the edge of the wood. Read the thickness at eye level.
- Use a ruler with millimeter marks for better detail
- Keep your eyes straight with the ruler to avoid parallax error
- Measure at several spots to check consistency
Employing Thickness Gauges
Thickness gauges, or feeler gauges, help measure thin gaps and wood thickness in tight spots.
Insert different gauge blades between two surfaces or against the wood. Find the blade that fits snugly without forcing.
- Use clean, flat blades for accurate readings
- Combine blades for thickness not covered by a single blade
- Keep blades dry to prevent rust and damage
Micrometer Measurement Steps
A micrometer gives very precise wood thickness measurements. Use it carefully for best results.
Place the wood between the spindle and anvil. Turn the ratchet until the wood is held firmly but not crushed. Read the measurement on the scale.
- Zero the micrometer before measuring
- Turn the ratchet slowly for a smooth grip
- Read the main scale and thimble scale together
- Take multiple readings for accuracy

Credit: www.timbersource.co.uk
Tips For Accurate Measurement
Measuring wood thickness correctly is important for good results. Small mistakes can cause big problems in your project.
Use the right tools and methods to get exact measurements every time. This guide helps you avoid errors and record data well.
Avoiding Common Errors
Errors happen when you rush or use wrong tools. Keep the wood clean and dry before measuring. Dirt or moisture can change the size.
- Do not measure over knots or cracks
- Avoid bending the measuring tool
- Check the tool’s zero point before use
- Measure at right angles to the wood surface
Calibrating Your Tools
Tools like calipers and rulers must be checked for accuracy. Calibration keeps your measurements true and reliable.
| Tool | How to Calibrate |
| Caliper | Close jaws and set to zero on display |
| Ruler | Check zero mark aligns with edge |
| Micrometer | Turn spindle to touch anvil and zero |
Measuring Multiple Points
Wood thickness can vary across a board. Measure at several places to get a good average.
- Measure near each end of the board
- Measure at the center of the board
- Take measurements on different faces if possible
- Note down each value separately
Recording Measurements Properly
Keep clear records to avoid confusion. Write down numbers with units and date. Use a table to organize data.
| Location | Thickness (mm) | Date |
| Left End | 18.5 | 2024-06-10 |
| Center | 18.7 | 2024-06-10 |
| Right End | 18.6 | 2024-06-10 |
Dealing With Irregular Wood Surfaces
Measuring wood thickness can be tricky when the wood surface is not flat. Irregular surfaces need special care to get accurate readings.
Using the right tools and techniques helps measure curved, warped, or rough wood correctly.
Measuring Curved Or Warped Wood
Curved or warped wood does not lay flat, so a straight ruler will not give good thickness measurements. Use a flexible tape measure to follow the wood’s shape.
Clamp the tape measure gently along the curve to see the thickness at the thickest point. Repeat measurements in several spots to find the average thickness.
- Use a flexible tape or caliper for curves
- Measure at multiple points along the curve
- Note the thickest and thinnest areas
Handling Rough Or Uneven Edges
Rough or uneven edges make it hard for tools to get close to the wood surface. Use calipers with flat jaws to measure these edges more accurately.
If the edges are jagged, gently press the caliper jaws to avoid gaps. Take several readings and use the smallest number for thickness.
- Use calipers with flat, wide jaws
- Press gently to avoid gaps from rough edges
- Take multiple measurements for accuracy
- Choose the smallest value to represent thickness

Credit: paulsellers.com
Comparing Measurement Methods
Measuring wood thickness is key for many woodworking tasks. Different tools and methods offer various results.
This guide compares common measurement methods to help you pick the right one for your needs.
Speed Vs. Precision
Some tools give quick results but less detail. Others take time but are more exact.
- Tape Measure:Fast but can be less precise on thin wood.
- Calipers:Slower but very accurate for small thicknesses.
- Micrometer:Most precise but needs careful use and more time.
Cost And Availability
Price and how easy a tool is to find matter for many woodworkers.
| Method | Approximate Cost | Availability |
|---|---|---|
| Tape Measure | Low ($5–$15) | Very common |
| Calipers | Medium ($15–$50) | Common in hardware stores |
| Micrometer | High ($40–$150) | Less common, specialty shops |
Best Method For Different Projects
Choose a method based on project type and needed accuracy.
- Rough carpentry:Tape measure is usually enough.
- Furniture making:Calipers balance speed and precision well.
- Fine woodworking:Micrometers give the best accuracy.
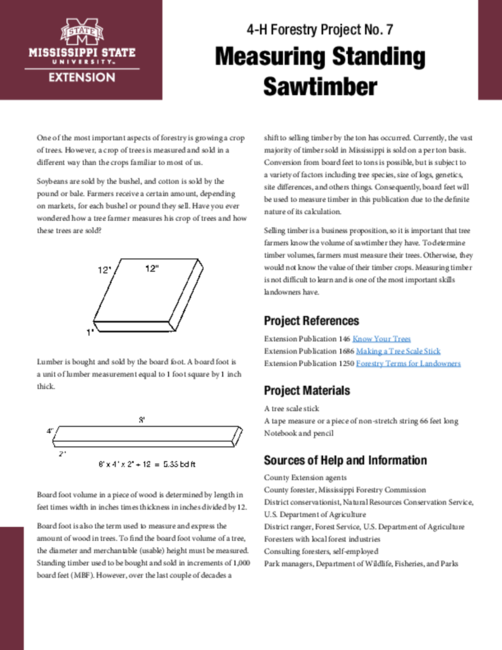
Credit: extension.msstate.edu
Frequently Asked Questions
How Do You Measure Wood Thickness Accurately?
Use a caliper or micrometer for precise measurements. Place the tool on the wood edge. Read the measurement in millimeters or inches for accuracy.
What Tools Are Best For Measuring Wood Thickness?
Calipers, micrometers, and thickness gauges are ideal. They provide exact readings and are easy to use. Choose based on the wood size and detail needed.
Can A Ruler Measure Wood Thickness Effectively?
A ruler can measure thickness but may lack precision. For rough estimates, it works fine. Use calipers for accurate and consistent results.
Why Is Measuring Wood Thickness Important?
Accurate thickness ensures proper fitting in projects. It affects strength, appearance, and material use. Precise measurement prevents costly mistakes and improves quality.
Conclusion
Measuring wood thickness is essential for woodworking projects. Proper measurements ensure better results. Always use the right tool for accurate readings. Calipers, rulers, and tape measures work well. Practice makes perfect, so keep measuring. Safety is crucial when using tools.
Wear protective gear to prevent injuries. Double-check measurements to avoid mistakes. Patience leads to more precise work. Over time, measuring becomes easier. Understanding wood thickness helps in creating sturdy designs. With practice, you’ll gain confidence. Keep learning and improving your skills.
Your woodworking projects will benefit greatly.