If you want to create strong, lasting joints in your woodworking projects, mastering how to cut tenons and mortises is essential. These classic joints hold pieces together without nails or screws, giving your work a professional look and unmatched durability.
In this guide, you’ll discover simple, step-by-step techniques that make cutting tenons and mortises easier than you might think. Whether you’re a beginner or looking to sharpen your skills, understanding these basics will transform the way you build. Ready to take your woodworking to the next level?
Keep reading and unlock the secrets to perfect joints every time.

Credit: www.familyhandyman.com
Tools For Tenons And Mortises
Cutting tenons and mortises requires the right tools. Using proper tools makes the work easier and accurate.
This guide explains essential hand tools, power tools, and measuring instruments used for tenons and mortises.
Essential Hand Tools
Hand tools help you create clean and precise joints. They give you full control during the cutting process.
Common hand tools include chisels, saws, and mallets. Sharp chisels cut wood cleanly. Saws cut tenon shoulders and cheeks. Mallets help drive chisels safely.
- Chisels: For cleaning and shaping joints
- Tenon saw: For cutting tenon shoulders and cheeks
- Mallet: To tap chisels without damage
- Marking knife: For precise cutting lines
- Hand drill or brace: To start mortise holes
Power Tools And Machines
Power tools speed up the cutting of tenons and mortises. They save time and reduce effort.
Popular power tools include routers, mortising machines, and table saws. Routers cut smooth mortises and tenons. Mortising machines make square holes fast. Table saws help cut tenon shoulders with precision.
- Router: For clean and precise mortises and tenons
- Mortising machine: Cuts square mortises quickly
- Table saw with tenoning jig: For accurate tenon cuts
- Drill press: To make starter holes for mortises
Measuring And Marking Instruments
Accurate measurement and marking are key for good joints. These tools help you mark exact cuts.
Marking tools include rulers, marking gauges, and squares. They ensure your tenons and mortises fit well together.
- Combination square: Checks angles and marks lines
- Marking gauge: Marks consistent tenon and mortise depths
- Steel ruler or tape measure: Measures lengths accurately
- Marking knife or pencil: For clear cutting lines

Credit: www.familyhandyman.com
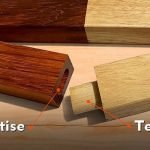
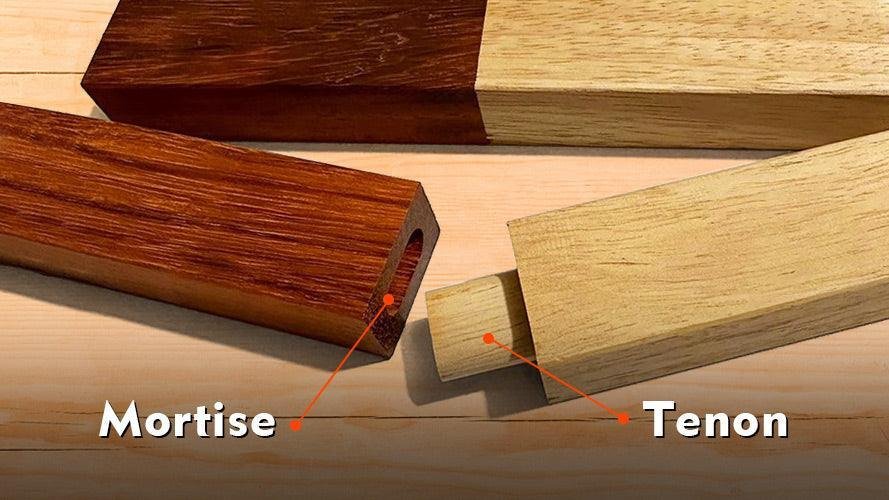
Types Of Tenons And Mortises
Tenons and mortises are key parts of wood joints. They fit together to make strong frames and furniture. Knowing different types helps you pick the right joint for your project.
This guide covers common tenon and mortise types. You will learn basic tenon shapes, popular mortise styles, and some specialty joints for unique uses.
Basic Tenon Varieties
Tenons are shaped ends of wood that fit into mortises. They come in many forms to suit different needs. Some are simple, while others add strength or style.
Here are common tenon types used in woodworking:
- Square Tenon:The most basic type, rectangular and fits into a matching mortise.
- Shouldered Tenon:Has a wider edge or shoulder for extra support and neat joints.
- Stub Tenon:A short tenon that does not go deep into the mortise, used for light joints.
- Blind Tenon:Does not pass through the mortised piece, keeping the joint hidden.
- Loose Tenon:A separate piece fits into mortises on both parts, like a floating tenon.
Common Mortise Styles
Mortises are slots cut into wood to accept tenons. They match the shape and size of the tenon for a tight fit. Mortises can be simple or more complex.
These are popular mortise styles found in woodworking:
- Through Mortise:Goes all the way through the wood, visible from both sides.
- Blind Mortise:A pocket cut that stops inside the wood, hiding the joint.
- Wedged Mortise:Has a slot for a wedge to lock the tenon in place tightly.
- Haunched Mortise:Includes a small extra shoulder to strengthen the joint.
- Double Mortise:Two mortises side by side for a wider or stronger tenon.
Specialty Joint Types
Some joints use special tenons and mortises for unique strength or style. These joints often combine features from basic types.
Here are a few specialty joint types to know:
- Fox Tenon:A tenon with angled cuts that lock into the mortise.
- Through Wedged Tenon:A tenon that passes through and is locked by wedges on both sides.
- Dovetail Tenon:Shaped like a dovetail for strong resistance to pulling apart.
- Domino Joint:Uses a loose tenon shaped like a small domino piece for quick assembly.
- Haunched Tenon:A tenon with a small extra shoulder for better load distribution.
Preparing Wood For Joinery
Cutting tenons and mortises needs good preparation of wood. Proper preparation helps make strong joints.
This guide covers how to prepare wood before cutting joinery parts. It focuses on choosing wood, marking, and setting up workpieces.
Selecting Suitable Wood
Choose wood that is straight and free of cracks. Avoid wood with knots in the joint area.
Hardwoods like oak and maple work well for strong joinery. Softwoods can be used but may wear faster.
- Pick wood with even grain
- Avoid warped or twisted boards
- Check for moisture content below 12%
Marking Layouts Accurately
Mark your wood carefully before cutting. Use sharp pencils or marking knives for clear lines.
Measure twice to ensure accuracy. Mark all parts of the tenon and mortise on the wood surface.
- Use a square to keep lines straight
- Mark both faces and edges
- Label each part to avoid confusion
Setting Up Workpieces
Secure the wood firmly before cutting. Use clamps or a vise to hold the workpiece steady.
Check that the wood is flat and supported. This helps keep cuts clean and even.
- Position the workpiece at a comfortable height
- Double-check alignment before starting
- Use protective gear for safety
Credit: www.starhilltimberworks.com
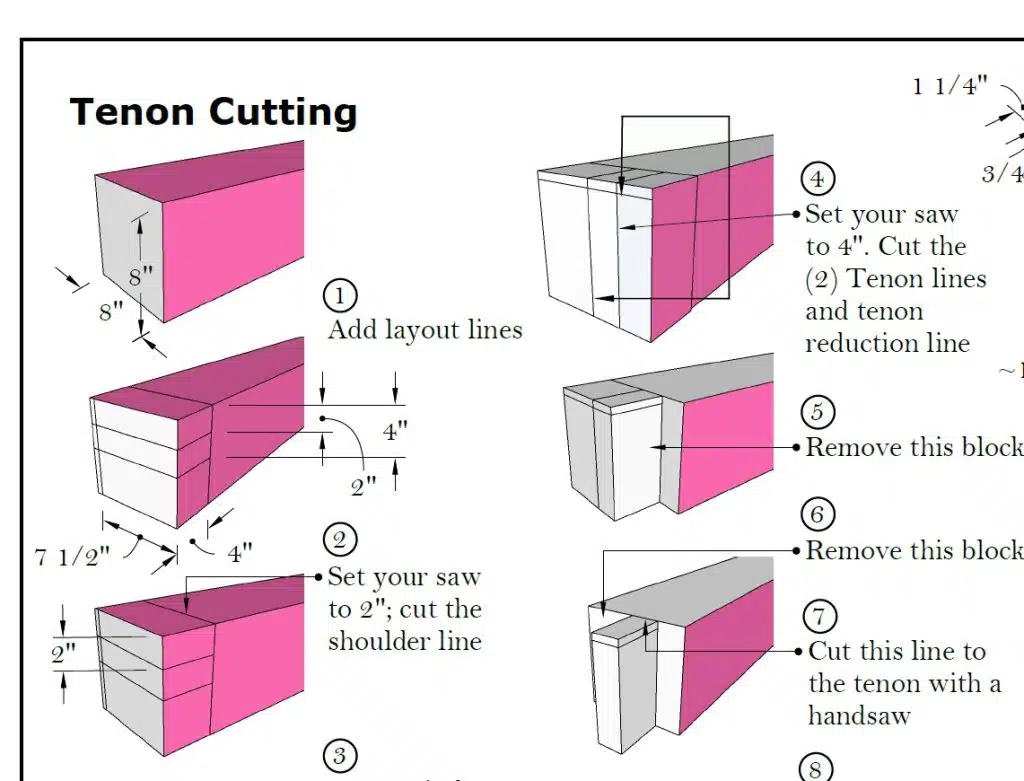
Cutting Tenons Step-by-step
Cutting tenons is a key skill in woodworking. It helps join two pieces of wood firmly.
This guide shows how to cut tenons in easy steps. Follow each part carefully for best results.
Marking Tenon Dimensions
Start by measuring the wood pieces you want to join. Mark the length, width, and shoulder lines clearly.
- Measure the thickness of the wood for tenon width.
- Mark the tenon length based on the mortise depth.
- Draw shoulder lines square to the wood face.
- Use a marking gauge for clean, accurate lines.
Sawing The Shoulders And Cheeks
Use a backsaw to cut the shoulders first. Cut just outside the shoulder lines.
Next, saw the cheeks down to the shoulder cuts. Keep the saw vertical to get straight cuts.
| Cut Type | Tool | Tip |
| Shoulders | Backsaw | Cut just outside the lines |
| Cheeks | Backsaw | Keep saw vertical and steady |
Refining With Chisels
After sawing, clean the tenon with a sharp chisel. Remove any rough spots and shape edges.
Follow this chisel process:
- Hold the tenon steady on the workbench.
- Use a sharp chisel to pare down high spots.
- Chisel along the grain for smooth cuts.
- Test fit the tenon into the mortise often.
Crafting Mortises Efficiently
Cutting mortises is a key skill in woodworking. It creates strong joints by fitting tenons tightly.
Working efficiently saves time and makes your joints fit better. Focus on clear marking and clean cuts.
Marking Mortise Boundaries
Start by marking the mortise area on your wood piece. Use a marking gauge or pencil for clear lines.
Mark the width and length carefully. Check measurements twice to avoid mistakes during cutting.
- Use a marking gauge for consistent width
- Mark the length on all sides
- Double-check measurements with a ruler
- Make clear, sharp lines for guidance
Drilling And Removing Waste
Drill holes inside the marked mortise to remove most waste wood. Use a drill bit that matches mortise width.
Drill holes closely together for easy waste removal. Stop drilling just before reaching the mortise depth.
- Choose a drill bit slightly smaller than mortise width
- Drill holes side by side inside boundaries
- Control depth with a stop or tape on bit
- Clear out wood chips after drilling
Chiseling To Final Size
Use a sharp chisel to clean and square the mortise walls. Remove wood left after drilling for a smooth fit.
Work slowly and check the mortise size often. Keep the chisel vertical for straight edges and flat surfaces.
- Start by paring the ends of the mortise
- Chisel along the sides to straighten walls
- Remove small amounts of wood each time
- Test fit the tenon frequently
Achieving Perfect Fit
Cutting tenons and mortises requires care to get a tight fit. A perfect joint holds wood firmly without gaps.
This guide covers test fitting, adjusting tightness, and fixing common problems in joinery.
Test Fitting Techniques
Test fitting helps check if the tenon fits the mortise well. Try dry assembling before glueing.
- Insert the tenon gently into the mortise.
- Check for even contact on all sides.
- Look for any gaps or tight spots.
- Tap lightly with a mallet if needed.
- Remove and inspect the joint surfaces.
Adjusting For Tightness
If the tenon is too tight, shave it down slightly. If it is loose, add thin glue lines or wood shims.
| Fit Issue | Adjustment Method |
| Too tight | Use a shoulder plane or sandpaper to reduce size |
| Too loose | Apply thin glue or add small wood pieces |
| Uneven fit | File or chisel high spots |
Troubleshooting Common Issues
Sometimes tenons or mortises do not fit well even after adjustments. Check these causes.
- Wrong measurements:Double-check your tools and marks.
- Uneven cutting:Use sharp chisels and steady hands.
- Wood movement:Account for wood swelling or shrinking.
- Tool wear:Replace or sharpen dull blades and chisels.
Finishing And Assembly Tips
Cutting tenons and mortises is just the start of a strong joint. Finishing and assembly ensure the joint holds well and looks good. Careful work at this stage improves the final product.
Follow these tips to get smooth joints, strong glue bonds, and a clean finish. Pay attention to detail for lasting results.
Sanding And Smoothing Joints
Sanding helps remove rough edges and makes the joint fit better. Use fine-grit sandpaper to avoid changing the shape of the tenon or mortise.
Lightly sand the inside surfaces and edges. This makes the glue bond stronger and the joint cleaner.
- Use 150 to 220 grit sandpaper for smoothing
- Sand by hand for control and precision
- Check fit often while sanding
- Remove dust with a brush or cloth before gluing
Applying Glue And Clamping
Apply glue evenly on both the tenon and mortise surfaces. Avoid too much glue to prevent mess and weak bonds.
Clamp the joint firmly but not too tight. Proper clamping keeps the parts aligned and helps the glue cure well.
- Use wood glue designed for joinery
- Spread glue with a small brush or finger
- Clamp for at least 30 minutes, then let dry fully
- Wipe off excess glue before it dries
Final Inspection And Touch-ups
Check the joint for gaps, misalignment, or glue spots. Fix small issues before the glue fully hardens.
Lightly sand any dried glue and smooth the joint area. This prepares the wood for finishing like paint or stain.
- Look for tight, even joints
- Remove glue squeeze-out with a scraper or sandpaper
- Fill small gaps with wood filler if needed
- Sand edges smooth for a clean look
Safety Practices In Joinery
Cutting tenons and mortises requires focus and care. Safety is important to avoid injuries.
Use the right safety steps to protect yourself. This helps you work with confidence.
Protective Gear Recommendations
Wear protective gear to keep safe from dust and sharp tools. Good gear lowers risks.
- Safety glasses protect your eyes from wood chips
- Hearing protection reduces noise damage
- Dust masks stop breathing in sawdust
- Gloves protect hands but avoid loose ones near machines
- Wear tight-fitting clothes to prevent catching on tools
Safe Tool Handling
Handle tools carefully to prevent accidents. Always check tools before use.
Use sharp blades and bits to cut cleanly. Dull tools need more force and cause slips.
- Keep hands away from cutting edges
- Use clamps to hold wood firmly
- Turn off power tools before adjusting
- Follow the tool’s instructions every time
- Keep cords clear of cutting paths
Workspace Organization
Keep your workspace clean and tidy. A neat area helps you work safely and fast.
Put tools in their places after use. Clear the floor to avoid tripping hazards.
- Store sharp tools in covers or boxes
- Keep work surfaces clear of clutter
- Use good lighting to see details clearly
- Have a first aid kit nearby
- Mark emergency exits and keep them clear
Frequently Asked Questions
What Tools Are Essential For Cutting Tenons And Mortises?
Essential tools include a marking gauge, chisels, tenon saw, mortise chisel, and a router or drill. These tools ensure precise, clean cuts for strong joints. Quality tools improve accuracy and efficiency in woodworking projects involving tenons and mortises.
How Do You Measure Tenons For Perfect Fit?
Measure the mortise width and depth carefully to size the tenon. Use a marking gauge and square for accuracy. A snug fit is crucial for joint strength without gaps or looseness, enhancing the durability of the woodwork.
What Is The Best Method For Cutting Mortises?
Using a mortise chisel or a drill with a chisel cleanup is effective. Start by marking the mortise location precisely. Remove waste wood gradually for a clean, accurate mortise that matches the tenon size perfectly.
How Can I Ensure Strong Tenon And Mortise Joints?
Ensure tight fitting by precise measuring and careful cutting. Use sharp tools and test fit frequently. Apply wood glue and clamp joints firmly until dry for maximum joint strength and stability.
Conclusion
Mastering tenons and mortises enhances your woodworking skills. These techniques offer strong joints for various projects. Practice helps in achieving precision. Start with simple cuts. Gradually, try more complex designs. Always ensure tools are sharp and well-maintained. Safety should be your priority.
Proper measurements make a significant difference. Enjoy the satisfaction of creating durable and beautiful furniture. Share your creations with friends and family. Keep learning and improving your craft. Woodworking can be both relaxing and rewarding. Happy woodworking!