Measuring wood thickness accurately might seem simple, but even a small mistake can ruin your project. Whether you’re building furniture, crafting a model, or working on home repairs, knowing the exact thickness of your wood is crucial.
If you’ve ever struggled with uneven cuts or pieces that don’t fit right, this guide is for you. Keep reading, and you’ll discover easy, reliable methods to get perfect measurements every time—saving you time, money, and frustration. Your next project deserves precision, and you’re about to learn how to achieve it.

Credit: www.pubs.ext.vt.edu
Tools For Measuring Wood Thickness
Measuring wood thickness is important for many woodworking projects. Using the right tools helps get accurate results. This guide explains common tools used to measure wood thickness.
Each tool works best for different situations. Choose the right tool based on the wood piece and how precise you need the measurement to be.
Calipers And Micrometers
Calipers and micrometers are precise tools for measuring wood thickness. They can measure small differences and give exact readings.
Calipers can measure outside, inside, and depth dimensions. Micrometers are best for very thin or small wood pieces.
- Calipers have two jaws that clamp the wood.
- Micrometers have a spindle that screws down on the wood.
- Both show measurements in millimeters or inches.
- Digital versions provide easy-to-read numbers.
Thickness Gauges
Thickness gauges are simple tools used to check wood thickness quickly. They come in fixed sizes or adjustable types.
These gauges slide between the wood pieces or against the surface to see how thick the wood is. They are handy for rough checks or repetitive measurements.
- Feeler gauges have thin metal blades of different sizes.
- Adjustable thickness gauges can be set to a target size.
- They are easy to carry and use on site.
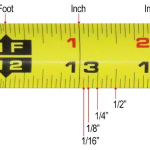
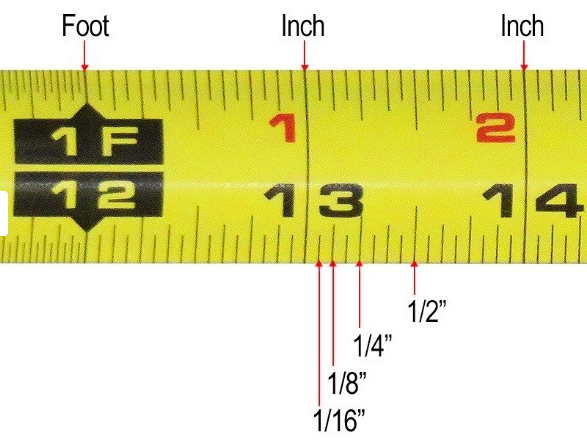
Measuring Tapes And Rulers
Measuring tapes and rulers are common tools for wood thickness. They are best for larger pieces where precision is less critical.
Use a ruler or tape to measure the wood’s edge or surface. Keep the tape or ruler straight to avoid mistakes.
- Metal rulers provide a straight edge and clear markings.
- Measuring tapes are flexible and work on curved wood.
- Both tools are easy to use and widely available.
Choosing The Right Tool
Measuring wood thickness accurately is important for quality work. Picking the right tool helps you get exact results.
Different tools work best depending on the type of wood and the project size. This guide explains how to choose your tool.
Precision Requirements
Some projects need very exact thickness measurements. Small errors can cause big problems in fitting or strength.
Use tools that measure in small units, like calipers, for high precision. Rulers or tape measures are less precise.
- Calipers measure thickness in thousandths of an inch or millimeters
- Micrometers offer even finer measurement for small pieces
- Tape measures and rulers are okay for rough estimates
Wood Type Considerations
Different woods have different textures and hardness. These affect how easy it is to measure thickness.
Soft woods can compress under the tool. Hard woods need stronger tools that do not damage the surface.
- Use calipers with flat jaws for smooth, hard wood
- Choose tools with gentle pressure for soft wood
- Check if the tool can handle rough or uneven surfaces
Project Scale
Small projects need very detailed thickness checks. Large projects can use quicker, less detailed tools.
For big wood pieces, tape measures or thickness gauges work well. Small parts need precise tools like micrometers.
- Small projects: calipers or micrometers
- Medium projects: thickness gauges or rulers
- Large projects: tape measures or depth gauges
Preparing Wood For Measurement
Measuring wood thickness needs care and attention. Preparing the wood properly helps get the right numbers. This saves time and avoids mistakes.
Clean, flat, and marked wood pieces give the best results. Use simple tools and follow easy steps for preparation.
Surface Cleaning
Clean the wood surface before measuring. Dust, dirt, and grease can cause wrong readings. Use a soft brush or cloth to wipe the wood well.
- Remove dust with a dry cloth
- Use mild soap and water for sticky spots
- Let the wood dry completely before measuring
- Avoid harsh chemicals that can damage the wood
Avoiding Warps And Bends
Wood may bend or warp, which changes its thickness. Lay the wood flat on a clean surface to check for bends. Support it well to keep it steady.
| Warp Type | Description | How to Check |
| Bow | Wood curves along its length | Place on a flat surface and look for gaps |
| Cup | Wood edges curl up or down | Look at the wood edges from the side |
| Twist | Wood twists along its length | Hold ends and see if corners line up |
Marking Measurement Points
Mark where you will measure the wood thickness. This helps keep measurements consistent and clear. Use a pencil or chalk to make small marks.
- Mark points evenly across the wood surface
- Use a ruler to space marks properly
- Write numbers next to marks if needed
- Double-check marks before measuring

Credit: paulsellers.com
Step-by-step Measurement Techniques
Measuring wood thickness accurately is important for many woodworking projects. It helps ensure parts fit well and the final product looks good.
This guide shows simple steps to measure wood thickness correctly. Use the right tools and methods for the best results.
Using Calipers Correctly
Calipers are great tools for precise wood thickness measurement. Hold the caliper firmly and place the jaws around the wood.
Close the jaws gently until they touch the wood without pressing hard. Read the scale or digital display carefully.
- Clean the caliper jaws before use
- Zero the caliper before measuring
- Measure at several points for accuracy
- Avoid tilting the caliper while measuring
Measuring Thick Vs Thin Wood
Thick and thin wood need different handling when measuring thickness. Thick wood may require wider caliper jaws or multiple measurements.
Thin wood is delicate, so use light pressure to avoid damage. Use sharp caliper jaws or a micrometer for better results.
- For thick wood, measure at the center and edges
- Thin wood needs gentle handling to prevent bending
- Use a micrometer for very thin pieces
- Take several readings to find an average thickness
Recording Consistent Readings
Keep your measurements consistent by using the same tool and method each time. Note any changes in wood shape or moisture.
Write down measurements clearly and check for mistakes. Use a notebook or digital app to track all readings for your project.
- Measure the same spot on each piece
- Record numbers immediately after measuring
- Double-check readings for accuracy
- Use averages if measurements vary
Common Measurement Mistakes
Measuring wood thickness seems simple but can have many mistakes. These errors cause wrong cuts and wasted wood.
Knowing common errors helps you get exact measurements every time. Avoid these mistakes to save time and materials.
Misreading Tools
Using measuring tools incorrectly leads to wrong numbers. For example, reading a ruler upside down or not starting at zero.
Some tools have small marks that are easy to miss. Make sure to read the tool carefully and double-check your numbers.
- Always start measuring at zero on the tool
- Check if your caliper or ruler is damaged
- Use the right tool for the thickness size
- Hold tools steady and flat against the wood
Ignoring Wood Grain Direction
Wood grain affects thickness measurements. Measuring across the grain can give different results than along the grain.
Swelling or shrinking happens more across the grain. Always measure in the same direction as you will cut or join the wood.
- Identify the grain direction before measuring
- Measure several spots along the grain
- Note any grain irregularities that affect thickness
Not Accounting For Moisture
Wood changes size with moisture. Wet wood is thicker than dry wood. Measuring wet wood gives false thickness.
Check the wood’s moisture level before measuring. Let wood dry if needed to get an accurate number.
- Use a moisture meter to check wood moisture
- Measure wood in a stable, dry environment
- Expect small size changes as wood dries or absorbs water
Advanced Tips For Precision
Measuring wood thickness accurately is important for good woodworking. Small errors can cause problems later.
Use precise methods to get the best results. This guide shares tips to improve your measurements.
Calibrating Tools Regularly
Calibrating your measuring tools keeps them accurate. Over time, tools can lose their precision.
Check your tools before each use. Adjust them if the measurements do not match a known standard.
- Use a calibration block with a known thickness
- Adjust the tool to match the standard
- Repeat checks to confirm accuracy
Using Digital Measuring Devices
Digital devices show measurements clearly and reduce reading errors. They are easy to use for precise thickness checks.
Keep batteries fresh and clean the sensors. This keeps digital tools working well and accurate.
- Turn on the device and zero it before measuring
- Place the sensor flat on the wood surface
- Read the digital display carefully
- Record measurements immediately
Cross-checking Measurements
Checking measurements with more than one tool improves accuracy. It helps catch mistakes early.
Use a tape measure, caliper, or micrometer to compare results. Differences show where you need to check again.
- Measure the same spot with different tools
- Note any differences between readings
- Re-measure if results do not match
- Use the most accurate tool as the final check
Adapting Techniques For Different Wood Types
Measuring wood thickness accurately is important for any project. Different wood types need different approaches. Softwoods, hardwoods, veneers, and plywood vary in texture and layers.
Using the right tools and methods helps get precise measurements. This guide explains how to adjust your technique for each wood type.
Softwoods Vs Hardwoods
Softwoods are lighter and less dense than hardwoods. They are easier to compress, so you must be gentle when measuring thickness. Hardwoods are denser and tougher. You need a firm, steady grip to avoid errors.
Use calipers or a micrometer for both types. For softwoods, avoid squeezing too hard. For hardwoods, ensure the tool touches the surface firmly.
- Softwoods: Handle gently to avoid compression.
- Hardwoods: Apply firm pressure for accuracy.
- Use calibrated measuring tools like calipers.
Measuring Veneers And Plywood
Veneers are thin layers of wood, often glued to other materials. Plywood consists of several wood layers glued together. Both require careful measurement to avoid damage.
Use a digital caliper for precise readings. Measure at several points because thickness can vary. Avoid deep pressure that can crush thin veneers.
- Measure at multiple spots for consistency.
- Use digital calipers for thin layers.
- Be gentle to prevent layer damage.
Handling Irregular Surfaces
Some wood pieces have uneven or rough surfaces. This makes measuring thickness tricky. Use a measuring tool with flat jaws to get a better grip.
Take several measurements around the piece. Average the values to find the true thickness. Sanding rough spots can help get more accurate results.
- Use flat-jaw calipers for uneven surfaces.
- Take multiple measurements and average them.
- Smooth rough areas before measuring if possible.

Credit: www.instructables.com
Frequently Asked Questions
What Tools Help Measure Wood Thickness Accurately?
Calipers, micrometers, and thickness gauges are ideal tools. They provide precise readings and reduce human error. Choose based on wood size and detail needed for your project.
How To Measure Wood Thickness Without Specialized Tools?
Use a ruler or tape measure for rough estimates. Measure multiple points for consistency. This method is less precise but works for basic needs.
Why Is Accurate Wood Thickness Measurement Important?
Precise thickness ensures proper fit and structural integrity. It prevents project errors and material waste. Accurate measurement enhances woodworking quality and durability.
Can Moisture Affect Wood Thickness Measurements?
Yes, wood expands or contracts with moisture changes. Measure in stable, dry conditions for accuracy. Consider acclimating wood before measuring.
Conclusion
Measuring wood thickness needs care and the right tools. Use a ruler, caliper, or micrometer for best results. Always check measurements twice to avoid mistakes. Keep your tools clean and in good shape. Practice makes you better and faster at measuring.
Accurate measurements help your projects fit and look great. Take your time and focus on each step. With patience, you will get precise wood thickness every time. This skill improves your woodworking and saves materials. Simple steps lead to strong, neat work.