If you want your drawers to last longer and look professionally made, using a dovetail jig is the secret tool you need. Imagine creating strong, precise joints that fit perfectly every time—without the guesswork or frustration.
This simple device can transform your woodworking projects, making your drawers not just functional but beautiful. You’ll discover how a dovetail jig works and how it can help you build drawer joints that impress. Ready to take your skills to the next level?
Keep reading and see how easy it can be.

Credit: www.youtube.com
Choosing The Right Dovetail Jig
Using a dovetail jig makes joining drawer parts easier and more precise. Picking the right jig is important for good results.
This guide explains types of dovetail jigs, what materials work best, and how to fit your budget.
Types Of Dovetail Jigs
Dovetail jigs come in many styles. Each type fits different skill levels and project needs.
- Manual jigs require hand clamping and guide placement.
- Template jigs use fixed patterns to shape the wood.
- Pin and tail jigs cut either the pins or tails first.
- Adjustable jigs allow changing the size and angle of joints.
- Professional jigs may include fine-tuning for perfect fit.
Material Compatibility
Different dovetail jigs work better with certain wood types and thicknesses. Check the jig’s limits before buying.
| Material Type | Recommended Jig Type | Maximum Thickness |
| Softwood | Manual or Template | 1 inch |
| Hardwood | Adjustable or Professional | 1.5 inches |
| Plywood | Template or Adjustable | 0.75 inch |
| MDF | Manual or Adjustable | 1 inch |
Budget Considerations
Prices for dovetail jigs vary widely. Choose a jig that fits your budget but meets your needs.
- Entry-level jigs cost less but may have fewer features.
- Mid-range jigs offer more adjustability and durability.
- High-end jigs provide precision and more options.
- Consider extra costs for router bits and clamps.
- Read reviews to find good value for your money.
Essential Tools And Materials
Using a dovetail jig for drawer joints requires specific tools and materials. These help create strong, precise joints for your woodworking projects.
This guide covers the key tools you need, including the router, bits, and wood preparation tips. Each part plays a role in making your joints fit perfectly.
Router Selection
Choose a router that fits your dovetail jig well. A compact router with variable speed works best. It gives control and accuracy while cutting joints.
Look for a router with a comfortable grip and easy adjustments. This will help you make clean cuts without straining your hands.
Router Bits For Dovetails
- Dovetail router bits come in different angles like 7°, 14°, or 1:6 ratio.
- Choose bits made of carbide for durability and sharp cuts.
- Use the correct size bit that matches your jig’s guide pins.
- Keep bits clean and sharp to avoid burning the wood.
Wood Preparation Tips
| Preparation Step | Reason |
| Use dry, flat wood | Prevents warping and fits joints tightly |
| Cut wood to exact thickness | Ensures joint parts match well |
| Smooth edges with sandpaper | Makes clean cuts and better glue adhesion |
| Mark wood pieces clearly | Aids in correct assembly of joints |
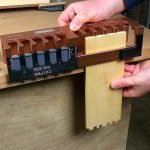
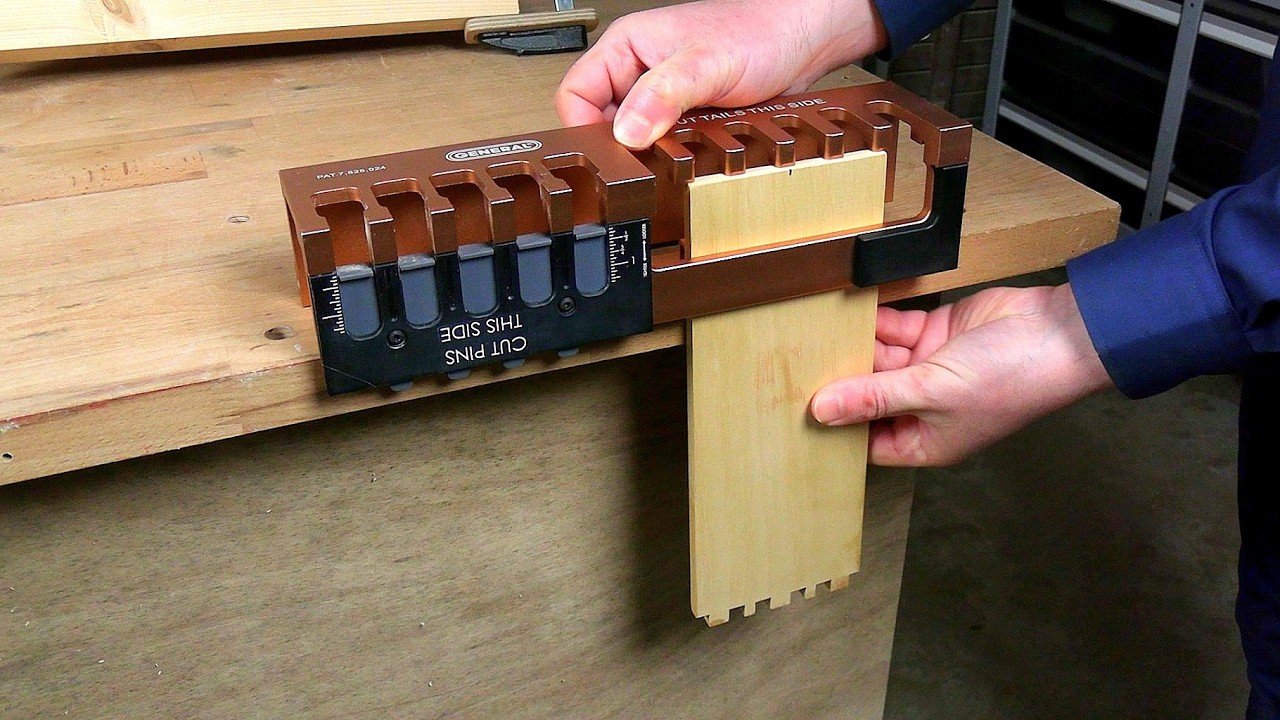
Setting Up The Jig
Using a dovetail jig helps create strong drawer joints. Proper setup of the jig is important for accurate cuts. This guide covers the key steps to prepare your jig.
Focus on aligning the workpieces, adjusting the template, and using the right clamping methods. Each step ensures your joints fit well and look professional.
Aligning The Workpieces
Place the drawer sides and front pieces flat and flush. The edges must line up perfectly to make tight joints. Check that the wood surfaces are clean and smooth before positioning.
Mark the thickness of the workpieces on the jig guides. This helps position the wood at the correct height. Proper alignment avoids gaps and weak joints.
Adjusting The Template
The template controls the shape and size of the dovetails. Adjust it to match your workpiece thickness. Use the template’s adjustment screws or sliders for fine tuning.
- Loosen the template clamps to allow movement.
- Slide the template until it matches your wood thickness marks.
- Tighten the clamps to lock the template in place.
- Double-check measurements before cutting.
Clamping Techniques
Secure the workpieces firmly in the jig. Proper clamping prevents shifting and ensures clean cuts. Use clamps that apply even pressure without damaging the wood.
| Clamp Type | Use | Tips |
| Bar Clamp | Hold large pieces | Use pads to protect wood |
| C-Clamp | Apply strong pressure | Check for even tightening |
| Quick-Release Clamp | Fast adjustments | Ideal for light to medium pressure |

Credit: www.reddit.com
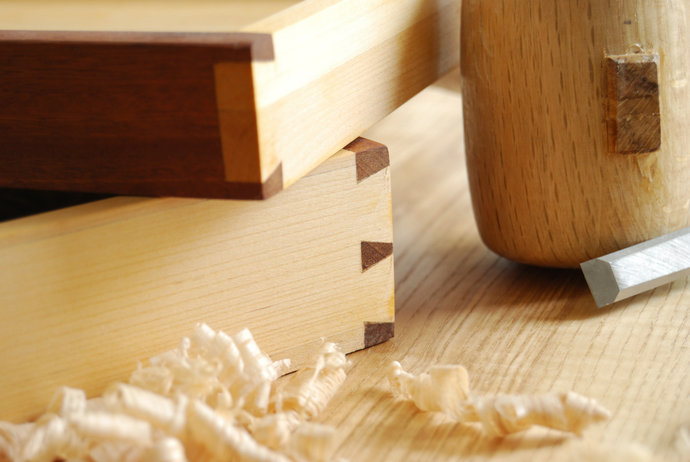
Cutting Dovetail Joints
Dovetail joints are strong and look great in drawer construction. Using a dovetail jig helps cut these joints precisely. The process involves routing the tails and pins carefully. Cleaning and finishing the cuts ensures a perfect fit.
Let’s explore how to cut dovetail joints using a jig. Each step matters to get tight, neat joints for your drawers.
Routing The Tails
Start by clamping the board for the tails in the jig. Attach the correct template for tail shapes. Use a router with a dovetail bit to cut the tails. Move the router smoothly along the guide to avoid mistakes.
- Secure the board firmly in the jig.
- Select the correct template for tails.
- Use a sharp dovetail bit on the router.
- Follow the template guide carefully.
- Keep a steady speed for clean cuts.
Routing The Pins
After cutting tails, clamp the mating board for pins. Change the jig template to the pin pattern. Align the board carefully to match the tails. Route the pins slowly to keep the joint tight.
| Tool | Purpose | Tip |
|---|---|---|
| Dovetail Jig | Hold the board and guide the router | Check tight clamping |
| Router with dovetail bit | Cut tails and pins | Use sharp bits for clean cuts |
| Clamps | Secure boards in jig | Avoid movement during routing |
Cleaning And Finishing Cuts
Once routing is done, remove the boards from the jig. Use a chisel to clean any rough edges or small chips. Sand the joint surfaces lightly for a smooth fit. Test assemble the joint and adjust if needed.
Cleaning tips:
- Trim leftover wood fibers with a sharp chisel.
- Use fine-grit sandpaper to smooth edges.
- Check fit by dry-assembling before glue-up.
- Adjust with a chisel or sandpaper if the joint is too tight.
Assembling Drawer Joints
Using a dovetail jig helps you create strong and precise drawer joints. Assembling these joints correctly ensures the drawer is sturdy and lasts longer.
This guide covers dry fitting, applying glue, and clamping for strong bonds. Follow these steps carefully for the best results.
Dry Fitting The Pieces
Dry fitting means assembling the joint without glue first. This step checks if all parts fit together tightly and align well.
- Insert the tails into the pins gently.
- Check for gaps or loose fits.
- Make small adjustments if needed.
- Ensure the drawer front and sides meet flush.
Applying Glue
Use glue to secure the joint once dry fitting is perfect. Apply glue evenly on all joint surfaces to avoid weak spots.
| Area | Glue Application |
| Tails | Apply a thin, even coat |
| Pins | Cover all contact areas |
| End grain | Use sparingly to prevent swelling |
Clamping For Strong Bonds
Clamp the joint immediately after gluing to hold parts firmly. Proper clamping prevents gaps and ensures a tight fit.
- Use corner clamps for right angles.
- Tighten clamps evenly to avoid warping.
- Leave clamps on until glue dries fully.
- Clean excess glue before it hardens.
Credit: hoolnn.com
Troubleshooting Common Issues
Using a dovetail jig for drawer joints can be tricky at first. Small mistakes cause poor fits or weak joints.
This guide helps you fix common problems and get better results with your jig.
Misaligned Joints
Misalignment happens when the tails and pins do not match up well. It makes the joint look uneven and weak.
Check these points to avoid misalignment:
- Ensure the wood pieces are clamped tightly in the jig.
- Double-check the jig settings before cutting.
- Use sharp router bits to get clean cuts.
- Mark your boards clearly for orientation.
- Test on scrap wood before final cuts.
Tear-out Prevention
Tear-out happens when wood fibers lift or splinter during cutting. It spoils the look and weakens the joint.
| Cause | How to Prevent |
|---|---|
| Dull router bit | Use a sharp bit for clean cuts |
| Cutting against wood grain | Adjust feed direction or use backer board |
| Cutting too fast | Slow down the router speed |
| Lack of support under cut area | Use scrap wood as backing |
Adjusting For Fit
Sometimes joints fit too tight or too loose. Adjusting fit ensures strong and neat drawers.
- Remove small amounts of wood with sandpaper to loosen a tight joint.
- Use a chisel carefully to clean out tight spots in the tails or pins.
- For loose joints, add a thin layer of wood glue or veneer tape.
- Make test cuts on scrap wood to dial in perfect settings.
Tips For Mastering Precision
Using a dovetail jig helps make strong drawer joints. Precision is key to get tight and clean fits.
This guide shares tips to improve your accuracy with a dovetail jig. Small details make big differences.
Consistent Measurements
Always use the same measurements for each piece. This keeps your joints uniform and fits well.
Mark your wood carefully. Use a ruler or caliper to check sizes twice before cutting.
- Measure twice, cut once
- Use a sharp pencil or marking knife
- Keep jig settings fixed for all parts
Practice Techniques
Practice on scrap wood before working on your final pieces. This helps you get used to the jig.
Try making several test joints. Check how the pins and tails fit together and adjust as needed.
- Cut practice joints with the same settings
- Check for gaps or tight spots
- Adjust depth or spacing on the jig if needed
Maintaining Equipment
Keep your dovetail jig clean and in good shape. Dust and debris can cause mistakes.
Check your router bits and replace them if dull. Sharp bits cut cleaner and more precise joints.
- Clean the jig after each use
- Lubricate moving parts if needed
- Store bits safely and dry
Frequently Asked Questions
What Is A Dovetail Jig Used For In Woodworking?
A dovetail jig helps create precise, interlocking joints for drawers. It ensures accuracy and strengthens the joint. This tool simplifies complex cuts and improves the overall quality of drawer construction.
How Does A Dovetail Jig Improve Drawer Joint Strength?
The jig guides the router to cut tight-fitting pins and tails. These interlocking shapes increase joint durability. This method prevents drawer separation and withstands daily use effectively.
Can Beginners Use A Dovetail Jig Easily?
Yes, dovetail jigs are beginner-friendly with clear instructions. They help novices achieve professional-looking joints without advanced skills. Practice and patience improve results quickly.
What Materials Work Best With A Dovetail Jig?
Hardwoods like oak, maple, and cherry work best. These woods hold joints tightly and look attractive. Softwoods can be used but may not hold as well.
Conclusion
Mastering dovetail joints isn’t difficult with the right tools. A dovetail jig simplifies the process. It ensures accuracy in drawer construction. No more guessing or complex measurements. Just follow the steps. Enjoy strong, attractive joints in your projects. Even beginners can achieve professional results.
With practice, your skills will improve. Create durable and stunning drawers. A dovetail jig offers consistency and precision. Keep experimenting and learning. Your woodworking projects will benefit. Happy crafting!