Are you ready to make your woodworking projects easier and safer? Installing a miter saw stand can transform your workspace, giving you stability and convenience every time you cut.
But if you’re not sure how to set it up, don’t worry—you’re in the right place. In this guide, you’ll learn simple, step-by-step instructions to install your miter saw stand quickly and correctly. By the end, you’ll have a solid foundation that makes every cut precise and stress-free.
Keep reading to get started and take your skills to the next level!

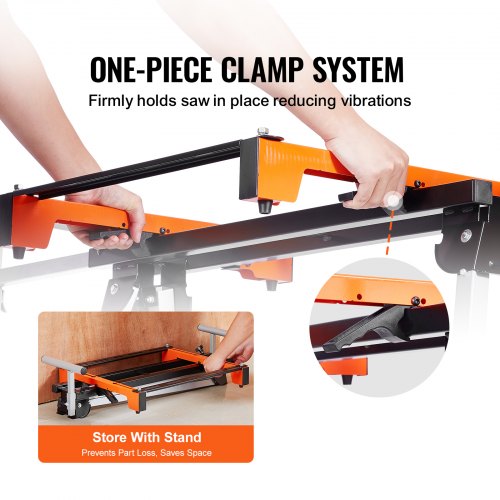
Credit: www.vevor.com
Choosing The Right Miter Saw Stand
Picking the right miter saw stand helps you work safely and easily. It holds your saw steady while cutting wood or other materials.
Different stands fit different needs. Knowing the types and features helps you find the best one for your projects.
Types Of Miter Saw Stands
Miter saw stands come in several styles. Each type offers different benefits for your workspace and tasks.
- Fixed Stands:Basic stands that stay in one place. They are strong but not portable.
- Folding Stands:These fold flat for easy storage and transport. Good for small workshops.
- Rolling Stands:Stands with wheels for moving the saw easily around the job site.
- Adjustable Stands:These let you change height and angle for comfort and better cuts.
Key Features To Consider
Look for features that make your work easier and safer. Good stands have smart designs and helpful parts.
- Ease of Setup:Choose a stand that you can set up fast without tools.
- Portability:If you move a lot, pick a lightweight or folding stand.
- Extension Arms:These support longer pieces of wood for cutting.
- Compatibility:Make sure the stand fits your miter saw brand and size.
- Durability:Look for strong materials like steel for long use.
Weight Capacity And Stability
Your miter saw and materials can be heavy. The stand must hold the weight without tipping or shaking.
Check the maximum weight limit before buying. A stable stand keeps your cuts accurate and your work safe.
- Choose a stand with a weight capacity higher than your saw and material weight combined.
- Look for wide legs or rubber feet to prevent slipping.
- Heavy-duty stands are best for larger saws and heavy projects.

Credit: www.reddit.com
Preparing Your Workspace
Setting up a miter saw stand needs a clean and safe workspace. Preparing your area helps the process go smoothly.
Take time to get tools and space ready before starting. This saves time and avoids mistakes.
Clearing And Leveling The Area
Clear the workspace of all clutter. Remove boxes, tools, and other objects that block your work.
Make sure the floor is flat and firm. Level ground keeps the stand steady and safe to use.
- Move furniture and equipment away
- Sweep or vacuum the floor
- Check for bumps or slopes
- Use shims or boards if floor is uneven
Gathering Necessary Tools
Collect all tools needed before you start. This keeps you from stopping mid-installation to find items.
Common tools for installing a miter saw stand include screwdrivers, wrenches, and a level.
- Screwdrivers (Phillips and flathead)
- Adjustable wrench or socket set
- Carpenter’s level
- Measuring tape
- Rubber mallet (optional)
- Safety glasses and gloves
Safety Precautions
Wear safety gear to protect yourself during installation. Use gloves to avoid cuts and glasses for eye safety.
Work in a well-lit area and keep children and pets away from the workspace.
- Wear safety glasses and gloves
- Keep area dry to avoid slips
- Follow manufacturer’s instructions
- Do not rush the setup process
- Ensure tools are in good condition
Unboxing And Inspecting The Stand
Before you start building your miter saw stand, you need to unbox it carefully. Check all items inside the box to make sure nothing is damaged.
Inspect the stand parts to confirm they match the product description. This helps avoid problems during assembly.
Checking For Missing Parts
Look through the box and spread out all parts on a clean surface. Use the parts list to check each item.
Make sure small pieces like screws, bolts, and washers are included. Missing parts can stop the assembly process.
- Compare parts to the included list
- Count fasteners like nuts and bolts
- Check for any damaged or bent pieces
- Set aside all parts neatly before starting
Reading The Manufacturer’s Instructions
Read the instruction manual fully before assembly. It helps you understand the steps and tools needed.
Follow the order of steps in the guide. This prevents mistakes and ensures a safe setup.
- Note all safety warnings
- Identify required tools
- Understand each assembly step
- Keep the manual handy during installation
Step-by-step Assembly Process
Installing a miter saw stand is easy with clear instructions. Follow each part carefully to ensure safety and stability.
This guide breaks down the assembly into four main sections. Take your time and check each step as you go.
Setting Up The Base
Start by placing the base frame on a flat surface. Make sure it is stable and level before moving forward.
Align all parts of the base according to the instructions that came with your stand. Tighten bolts but do not fully secure them yet.
Attaching The Legs
Attach each leg to the base frame using the provided screws and bolts. Confirm the legs face the right direction.
- Place the leg onto the base bracket.
- Insert bolts through the holes.
- Tighten bolts with a wrench but leave some flexibility.
- Repeat for all legs.
- Check that the stand stands firmly on the ground.
Mounting The Miter Saw
Position the miter saw on the mounting plate of the stand. Align the holes on the saw base with the holes on the stand.
| Tool | Purpose |
|---|---|
| Drill | Secure screws quickly |
| Socket wrench | Tighten bolts firmly |
| Level | Check saw alignment |
Use the right tools to secure the saw. Double-check the saw is stable and does not move during use.
Adjusting The Height And Angle
Adjust the stand height by loosening the adjustment knobs. Raise or lower the stand to your preferred level.
- Loosen the height adjustment knobs.
- Move the stand legs up or down evenly.
- Retighten the knobs securely.
- Set the miter saw angle using the saw’s control.
- Test the angle with a scrap piece of wood.
Securing And Testing The Stand
After assembling your miter saw stand, securing it properly is key for safety. Testing ensures the stand works well and stays steady during use.
This guide covers tightening bolts and screws, checking stability, and performing a test cut to confirm everything is set up correctly.
Tightening Bolts And Screws
Use the right tools to tighten all bolts and screws on the stand. Loose fasteners can cause wobbling or failure while cutting.
- Check each bolt and screw for tightness with a wrench or screwdriver.
- Do not overtighten to avoid damaging threads or wood parts.
- Use a torque wrench if your stand’s instructions provide torque values.
- Retighten fasteners after the first use, as parts may settle.
Ensuring Stability
Make sure the stand sits flat on the floor with no rocking. Stability is important for safe and accurate cuts.
| Check Point | What to Look For | Action Needed |
|---|---|---|
| Legs | All legs touch the floor evenly | Adjust leg height or add shims |
| Locking Mechanisms | Locks hold firmly without movement | Tighten or replace faulty locks |
| Surface Level | Stand surface is level horizontally | Use a level tool and adjust supports |
Performing A Test Cut
Make a simple test cut to confirm the stand holds the saw securely and the cut is smooth and accurate.
- Place a scrap piece of wood on the stand.
- Turn on the saw and make a straight cut.
- Watch for any movement or instability during the cut.
- Check the cut for precision and smoothness.
- If the stand shifts, stop and adjust bolts or supports.
Credit: www.vevor.ca
Maintaining Your Miter Saw Stand
Keeping your miter saw stand in good shape helps it last longer. Regular care makes your work safer and easier. Small tasks can prevent big problems.
This guide covers cleaning, lubrication, and storage tips. Follow these steps to maintain your stand well.
Regular Cleaning Tips
Cleaning your miter saw stand removes dust and debris. This keeps the stand stable and parts moving smoothly. Use a brush or cloth for best results.
- Wipe down the stand after each use.
- Remove sawdust from joints and hinges.
- Check and clean the locking mechanisms.
- Use a mild cleaner to remove grease spots.
- Dry the stand completely before storing.
Lubricating Moving Parts
Lubrication stops parts from sticking and wearing out. Use light machine oil or spray lubricant on hinges and joints. Avoid over-oiling to prevent dirt buildup.
| Part | Lubrication Type | Frequency |
| Hinges | Light machine oil | Monthly |
| Locking pins | Spray lubricant | Every 2 months |
| Sliding rails | Dry lubricant | Monthly |
Storage Recommendations
Store your miter saw stand in a dry place. Keep it away from moisture and dust. Cover it with a cloth or plastic cover to protect from dirt.
Tips for Better Storage:
- Fold the stand to save space.
- Keep it upright to avoid damage.
- Check the stand for damage before each use.
- Store in a garage or shed with good ventilation.
Frequently Asked Questions
What Tools Do I Need To Install A Miter Saw Stand?
You need basic tools like a screwdriver, wrench, and possibly a drill. Some stands come with specific hardware for assembly. Always check the manufacturer’s instructions to ensure you have the right tools before starting installation.
How Do I Ensure My Miter Saw Stand Is Stable?
Place the stand on a flat, level surface. Tighten all bolts and locks securely. Use adjustable feet or clamps if available to prevent wobbling during use.
Can I Install A Miter Saw Stand Outdoors?
Yes, but ensure the stand is weather-resistant or treated for outdoor use. Avoid placing it on uneven or soft ground. Cover it when not in use to protect from moisture and rust.
How Long Does It Take To Install A Miter Saw Stand?
Installation usually takes 20 to 40 minutes. Time depends on your experience and the stand’s complexity. Following the instruction manual can speed up the process.
Conclusion
Installing a miter saw stand is simple. Follow the steps carefully. Use the right tools for safety. Always secure your stand firmly. Make sure every part fits well. Test the stability before use. Check the manual for specific details. Practice makes perfect.
With time, setup gets easier. Remember to work in a safe area. Protect your hands and eyes. A well-installed stand boosts efficiency. It also ensures precise cuts. Happy woodworking! Enjoy your projects.