
Are you sure your circuit breakers will protect your home or workplace when it really matters? Testing them regularly is the key to keeping your electrical system safe and reliable.
In this guide, you’ll learn simple, practical steps to test your circuit breakers with confidence. By the end, you’ll know exactly how to spot problems before they become dangerous—and ensure your electrical setup runs smoothly every day. Keep reading to take control of your safety and avoid costly repairs down the line.
Types Of Circuit Breakers
Circuit breakers protect electrical circuits from damage. They stop power flow during faults or overloads. Different types serve different needs in homes and industries.
Understanding circuit breaker types helps in choosing the right one. This guide covers three common types and their features.
Miniature Circuit Breakers
Miniature circuit breakers (MCBs) protect small electrical circuits. They trip quickly if current exceeds safe limits. MCBs are common in homes and offices for lighting and appliances.
- Protect low current circuits
- Resettable after tripping
- Easy to install and replace
- Respond fast to short circuits
Molded Case Circuit Breakers
Molded case circuit breakers (MCCBs) handle higher currents. They protect industrial machines and large electrical panels. MCCBs can be adjusted for different current ratings.
| Feature | Miniature Circuit Breaker | Molded Case Circuit Breaker |
| Current Range | Up to 100 amps | Up to 2500 amps |
| Use | Residential, small circuits | Industrial, large circuits |
| Adjustable Trip | No | Yes |
| Size | Small | Large |
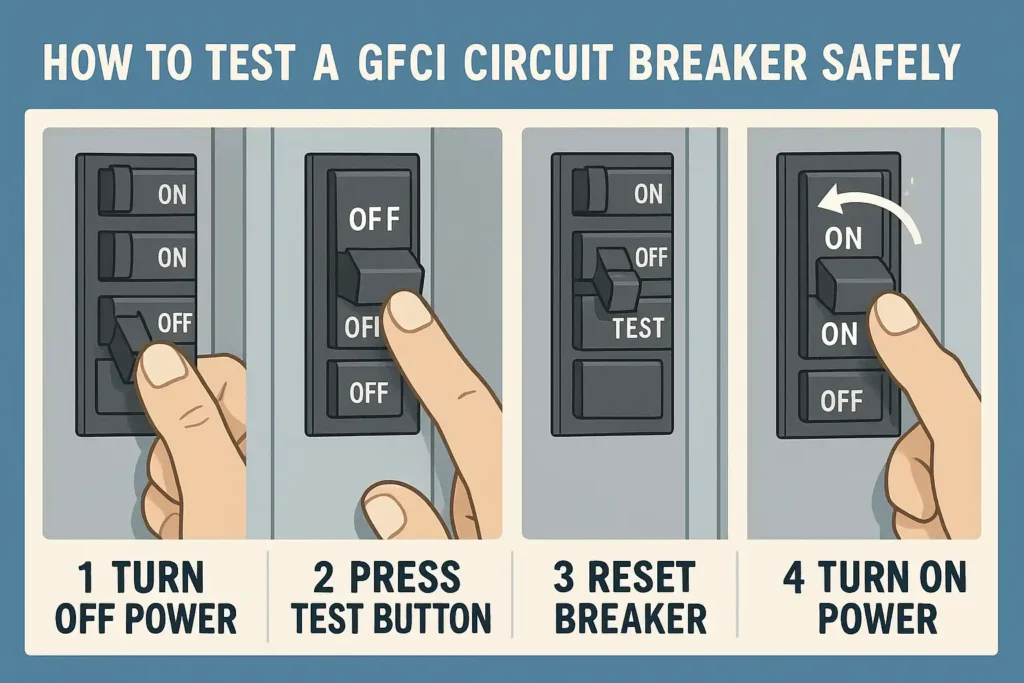
Ground Fault Circuit Breakers
Ground fault circuit breakers (GFCIs) protect against electric shocks. They detect small current leaks to the ground and trip fast. GFCIs are often used in wet areas like bathrooms and kitchens.
Key features of GFCIs include:
- Protect people from electric shock
- Trip within milliseconds
- Used near water sources
- Require regular testing
Credit: www.onesto-ep.com
Safety Precautions Before Testing
Testing circuit breakers is important to keep electrical systems safe. You must follow safety rules before starting any test.
Taking precautions helps prevent accidents and damage. Always prepare carefully before working on electrical equipment.
Personal Protective Equipment
Wear the right protective gear to stay safe. This equipment protects you from electric shocks and injuries.
- Insulated gloves to prevent electric shock
- Safety goggles to protect your eyes
- Flame-resistant clothing in case of sparks
- Hard hats to protect your head
- Non-slip safety boots for secure footing
Power Isolation Procedures
Always turn off the power before testing. Isolate the circuit to avoid accidental current flow.
Use lockout and tagout devices to keep the power off. Check twice to make sure no voltage is present.
- Switch off the main breaker or disconnect switch
- Apply lockout devices to prevent re-energizing
- Tag the equipment with warning signs
- Use a voltage tester to confirm power is off
Testing Environment Setup
Prepare the area before testing. A clean and organized space reduces risks and improves focus.
Keep the work area dry and well-lit. Remove any tools or objects that can cause trips or falls.
- Clear the workspace of unnecessary items
- Ensure good lighting to see clearly
- Keep water and liquids away from electrical parts
- Have a fire extinguisher nearby for emergencies
Tools Required For Testing
Testing circuit breakers needs the right tools to check if they work well. Using these tools helps find problems early.
Each tool has a special job in testing. Knowing how to use them makes testing safe and accurate.
Multimeter Usage
A multimeter measures electrical values like voltage, current, and resistance. It helps check if the circuit breaker is working properly.
To use a multimeter, connect its probes to the circuit breaker terminals. Read the displayed values to see if they are normal.
- Set the multimeter to the right measurement mode
- Check for voltage to confirm power flow
- Measure resistance to spot breaks or shorts
- Test continuity to ensure connections are good
Insulation Resistance Tester
This tester checks the insulation quality inside the circuit breaker. Good insulation stops electrical leaks and short circuits.
Connect the tester to the breaker’s terminals and run the test. A high resistance value shows strong insulation. Low values mean damage or wear.
- Use the tester to find insulation faults
- Test under recommended voltage levels
- Record resistance values for future checks
- Repeat tests after repairs or replacements
Circuit Breaker Analyzer
This tool tests the full function of the circuit breaker. It checks timing, trip settings, and mechanical parts.
Connect the analyzer to the breaker and run the test program. It shows detailed results on how the breaker reacts under different conditions.
- Check trip times for fast response
- Test mechanical operations for smooth action
- Verify settings meet safety standards
- Use the analyzer to plan maintenance

Credit: dadaoenergy.com
Visual Inspection Steps
Visual inspection is the first step in testing circuit breakers. It helps find obvious problems before testing electrical functions.
Look carefully at the breaker and its parts. Check for any damage, dirt, or signs of wear that can cause failure.
Checking For Physical Damage
Inspect the circuit breaker for cracks, breaks, or loose parts. Physical damage can stop the breaker from working properly.
Check the casing and handle for any signs of impact or wear. Make sure all screws and mounts are tight and secure.
- Look for cracks or chips on the breaker body
- Check if the handle moves smoothly without sticking
- Ensure no parts are loose or missing
- Verify mounting brackets are firmly attached
Signs Of Overheating
Overheating can damage a circuit breaker and cause it to fail. Look for discoloration or melted parts as signs of heat damage.
Check for a burnt smell near the breaker. Overheating may also cause the plastic parts to warp or become soft.
- Look for dark or brown spots on the breaker
- Check for melted or warped plastic components
- Notice any unusual smells like burning or smoke
- Inspect terminals for discoloration or damage
Corrosion And Dirt Assessment
Dirt and corrosion can block electrical connections in a breaker. Clean parts work better and last longer.
Look for rust or white powder on metal parts. Remove dust and debris to keep the breaker in good condition.
- Check terminals and contacts for rust or corrosion
- Remove dust, dirt, and debris from the breaker surface
- Use a soft brush to clean hard-to-reach areas
- Ensure the breaker is dry before testing or reinstalling
Manual Trip Testing
Manual trip testing checks if a circuit breaker works properly. It helps find problems before they cause damage.
This test involves triggering the breaker by hand to see if it trips and resets correctly.
Testing The Trip Mechanism
Start by turning off all power to the circuit breaker panel. Use the manual trip lever or button to trip the breaker. Listen for a clear click sound.
- Ensure the breaker trips smoothly without sticking
- Check that the trip lever moves fully to the tripped position
- Note any unusual noises or resistance during the trip
Resetting The Breaker
After tripping, reset the breaker by moving the switch back to the ON position. It should reset easily without force.
| Condition | Expected Result |
| Breaker tripped manually | Trips with a loud click |
| Reset handle moved ON | Breaker resets without sticking |
| Handle resistance | Should be smooth and firm |
Assessing Trip Consistency
Repeat the manual trip test several times to check for consistent operation. The breaker should trip and reset the same way every time.
- Trip the breaker manually
- Reset the breaker to ON
- Observe the trip and reset actions
- Record any irregular behavior
- Confirm consistent smooth operation

Credit: electricaltrader.com
Electrical Testing Procedures
Testing circuit breakers ensures they work safely and correctly. Electrical tests check if the breaker can handle faults.
These tests help find problems before they cause damage or power loss. Each test checks a different part of the breaker.
Continuity Testing
Continuity testing checks if the circuit breaker’s path is complete. It shows if current can flow through the breaker.
Use a multimeter to test continuity. If the breaker is good, the meter will beep or show low resistance.
- Turn off power before testing
- Set the multimeter to continuity mode
- Place probes on breaker terminals
- Look for a beep or low reading
- No beep means an open circuit
Contact Resistance Measurement
Contact resistance measures how much the breaker resists electric flow at its contacts. Low resistance means good contact.
Use a micro-ohmmeter for accurate readings. High resistance can cause heat and failure.
- Turn off and isolate the breaker
- Connect micro-ohmmeter probes to contacts
- Apply test current as per device specs
- Read resistance value on the meter
- Compare results to manufacturer limits
Trip Time Evaluation
Trip time evaluation tests how fast the breaker opens during a fault. Quick trips protect equipment and people.
Use a test set that can simulate fault currents. Measure time from fault to breaker opening.
- Set test current according to breaker rating
- Start test and record trip time
- Repeat to confirm consistent results
- Check if trip time meets standards
Interpreting Test Results
Testing circuit breakers is important for safety. It helps find problems before they cause damage.
Understanding test results lets you know if a breaker works well or needs fixing.
Normal Vs Faulty Indicators
Normal test results show the breaker trips at the right current and time. The breaker resets easily after tripping.
Faulty indicators include breakers that do not trip when they should or trip too soon without cause.
- Normal: Trips at rated current
- Normal: Resets smoothly
- Faulty: No trip at overload
- Faulty: Trips during normal load
- Faulty: Stuck or slow reset
Common Fault Patterns
Some faults happen often in breakers. These patterns help identify common problems quickly.
- Worn contacts causing failure to trip
- Corroded parts leading to high resistance
- Mechanical wear stopping proper reset
- Internal short circuits triggering false trips
- Calibration drift causing wrong trip points
When To Replace Breakers
Replace breakers if tests show they fail to protect circuits. Also replace if they trip too often or reset poorly.
Old breakers with worn parts or damaged mechanisms need replacement to ensure safety.
- Breaker does not trip at overload
- Breaker trips without cause
- Breaker cannot reset properly
- Visible damage or corrosion
- Breaker is older than recommended service life
Maintenance Tips After Testing
Testing circuit breakers is important to ensure safety. After testing, proper maintenance keeps breakers working well.
Follow simple steps to clean, tighten, and schedule tests. These help avoid failures and extend breaker life.
Cleaning And Lubrication
Dust and dirt can cause circuit breaker problems. Clean the breaker gently with a dry cloth. Avoid water or harsh chemicals.
- Use a soft brush to remove dust from contacts.
- Apply approved lubricant on moving parts to reduce wear.
- Do not over-lubricate as it can attract more dirt.
Tightening Connections
Loose connections cause heat and failure. After testing, check all connections for tightness. Use a torque wrench if possible.
| Connection Point | Recommended Torque (Nm) |
|---|---|
| Line Terminals | 15-20 |
| Load Terminals | 15-20 |
| Ground Connections | 10-15 |
Scheduling Regular Tests
Regular testing helps find issues early. Set a test schedule based on breaker type and usage.
- Test low-voltage breakers every 6 months.
- Test high-voltage breakers yearly.
- Keep records of all tests and maintenance.
Frequently Asked Questions
What Is The Purpose Of Testing Circuit Breakers?
Testing circuit breakers ensures they function properly to protect electrical systems. It helps identify faults and prevents electrical fires or damage.
How Often Should Circuit Breakers Be Tested?
Circuit breakers should be tested at least once a year. Regular testing maintains safety and ensures reliable operation in emergencies.
What Tools Are Needed For Circuit Breaker Testing?
Common tools include a multimeter, insulation resistance tester, and a circuit breaker analyzer. These help measure voltage, current, and breaker response.
Can I Test Circuit Breakers Myself Safely?
Yes, if you follow safety guidelines and use proper tools. However, hiring a professional is recommended for complex or high-voltage systems.
Conclusion
Testing circuit breakers ensures electrical safety and system reliability. Regular checks prevent unexpected failures. Use the right tools for accurate results. Follow guidelines carefully to avoid mistakes. Remember, safety comes first in every inspection. Seek professional help if unsure. Circuit breakers are vital for protecting electrical systems.
Proper testing extends their lifespan. It also saves money on repairs. Stay informed about testing procedures. Knowledge empowers safe handling of electrical components. Keep this guide handy for future reference. Ensure your electrical systems function smoothly and safely.
