When you’re working on a project that requires gluing, getting a strong, clean bond is key. But how do you make sure your glued pieces stay perfectly in place while drying?
That’s where clamps come in. Using clamps for precise gluing can save you time, avoid messy mistakes, and give your work a professional finish. If you want your glued joints to hold tight and look great, understanding how to use clamps correctly is a game-changer.
Keep reading to discover simple tips that will make your gluing projects easier and more successful than ever.
Types Of Clamps For Woodworking
Clamps hold wood pieces tightly while glue dries. They keep joints strong and prevent gaps.
Different clamps fit different jobs. Choosing the right clamp helps you work faster and cleaner.
Bar Clamps
Bar clamps have a long metal bar and adjustable arms. They slide to fit wide or narrow workpieces.
These clamps give strong, even pressure. They are good for large panels and frames.
C-clamps
C-clamps have a C-shaped frame with a screw. Turn the screw to tighten and hold wood pieces.
They are strong but small. C-clamps work well on small projects or metal parts.
Pipe Clamps
Pipe clamps use a metal pipe as the bar. You add or remove pipe length for different sizes.
These clamps are good for very wide boards. They are strong and easy to adjust.
Spring Clamps
Spring clamps use a strong spring to hold pieces quickly. They open and close like clothespins.
They work well for light holds and small parts. They are fast to use but not very strong.
Corner Clamps
Corner clamps hold two pieces at a 90-degree angle. They keep corners square while gluing.
These clamps help with frames and boxes. They make sure corners fit tightly and straight.
Choosing The Right Clamp
Using clamps helps hold pieces tightly while glue dries. Picking the right clamp makes your work neat and strong.
Different clamps suit different jobs. Knowing how to choose the best clamp is key for good results.
Size And Pressure Considerations
Choose a clamp size that fits your project. Too small clamps may not hold well. Too large clamps can damage your work.
Pressure is also important. Clamps should press firmly but not crush the wood or material.
- Use small clamps for delicate or thin pieces
- Large clamps work best for big or thick parts
- Adjust pressure to avoid marks or dents
Clamp Material And Durability
Clamp materials affect their strength and lifespan. Metal clamps last longer and hold better. Plastic clamps are light but weaker.
Look for clamps with strong, rust-resistant parts. Durable clamps save money over time and work well on many projects.
- Steel clamps are strong and last long
- Aluminum clamps are lighter and rust-resistant
- Plastic clamps are affordable for light jobs
Specialty Clamps For Specific Joints
Some clamps fit special joints better. Corner clamps hold right angles firmly. Spring clamps work well for quick holds.
Using the right specialty clamp makes gluing easier and the joint stronger.
- Corner clamps secure 90-degree joints
- Spring clamps are good for small or light pieces
- Pipe clamps adjust to large or odd shapes
Preparing Wood Surfaces For Gluing
Good preparation is key to strong wood joints. Clean and smooth surfaces help glue stick well. Careful alignment keeps pieces tight and even.
This guide shows how to prepare wood before gluing. Follow simple steps for better results.
Cleaning And Sanding
Remove dust, dirt, and grease from the wood. Use a clean cloth or brush to wipe the surfaces. Sand the wood with fine-grit paper to make it smooth. This helps the glue stick better.
- Use a dry cloth to remove loose dust.
- Wipe with a damp cloth to clear dirt and grease.
- Sand with 120-150 grit sandpaper for best results.
- Clean sanding dust before applying glue.
Applying Glue Evenly
Spread glue in a thin, even layer on both surfaces. Avoid too much glue to prevent mess and weak joints. Use a brush or roller for better coverage.
| Glue Amount | Effect |
| Too Little | Weak bond, gaps |
| Even Layer | Strong, clean joint |
| Too Much | Messy, longer drying |
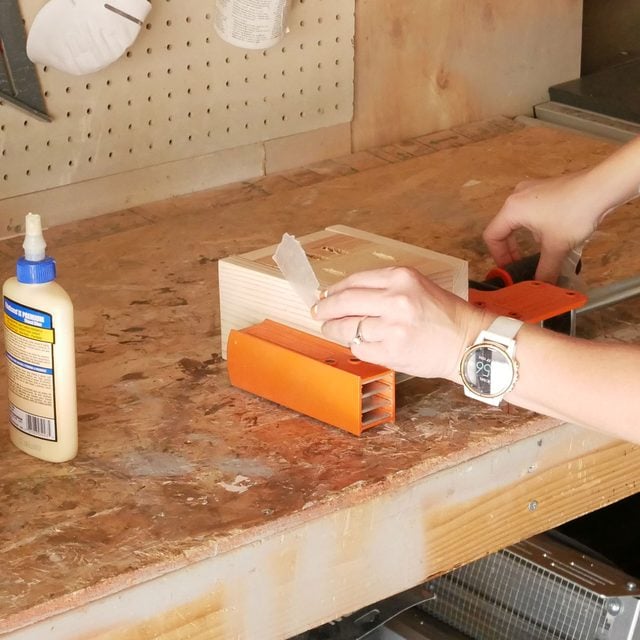
Aligning Pieces Accurately
Place wood pieces carefully to match edges and surfaces. Use clamps to hold parts tightly. Check alignment before glue sets to avoid mistakes.
- Dry-fit pieces before gluing to check fit.
- Use clamps to keep pieces steady during drying.
- Adjust pieces quickly if they shift out of place.
- Remove excess glue immediately to keep surfaces clean.
Credit: www.familyhandyman.com
Clamp Placement Techniques
Using clamps correctly helps you glue pieces together with care. Good clamp placement keeps things tight and even.
Knowing how to place clamps makes your glued joints stronger and cleaner. It also stops damage to your wood.
Even Pressure Distribution
Place clamps evenly along the glued surface. This spreads pressure and avoids weak spots.
Too much pressure in one area can cause dents or gaps elsewhere. Use enough clamps to cover the whole joint.
- Space clamps about 6 to 8 inches apart
- Alternate clamp sides for balanced force
- Use cauls to spread pressure on soft wood
Avoiding Glue Squeeze-out
Clamp placement affects how glue escapes the joint. Too much force pushes glue out and wastes it.
Apply moderate pressure and keep clamps steady. This holds parts firmly without excess glue mess.
- Clean glue squeeze-out quickly with a damp cloth
- Use clamps that fit the joint size well
- Don’t overtighten; snug is enough
Securing Corners And Edges
Clamp corners and edges carefully to keep them aligned. Uneven pressure can cause gaps or misalignment.
Use corner clamps or add padding to protect edges from damage. Check alignment before the glue sets.
- Use right-angle clamps for corners
- Place clamps close to edges but not on them
- Use scrap wood as pads to protect surfaces
Timing And Pressure Control
Using clamps correctly helps make strong and neat glued joints. Timing and pressure control are key factors for good results.
This guide covers how long to keep clamps on, how to adjust pressure for different woods, and how to watch glue drying.
Optimal Clamping Duration
Clamping time depends on the glue type and temperature. Most wood glues need about 30 minutes to set.
Leaving clamps on too long can make the wood swell or marks appear. Too short can cause weak joints.
- Check glue instructions for drying time.
- Keep clamps on until glue firms up.
- Remove clamps carefully after set time.
Adjusting Pressure For Different Woods
Softwoods need less clamp pressure than hardwoods. Too much pressure can squeeze out glue and weaken the bond.
| Wood Type | Pressure Level | Notes |
| Pine (Softwood) | Low to Medium | Avoid dents and squeeze out |
| Oak (Hardwood) | Medium to High | Strong hold without damage |
| Maple (Hardwood) | Medium | Even pressure for firm joints |
Monitoring Glue Drying
Watch the glue while drying to ensure it stays in place. Use these tips to monitor the process.
- Look for glue squeeze-out along the joint edges.
- Feel the clamp pressure to avoid over-tightening.
- Keep the workspace at room temperature for even drying.
- Do not move the clamped pieces before glue sets.

Credit: www.reddit.com
Common Clamping Mistakes To Avoid
Using clamps correctly is key for strong glue joints. Mistakes can weaken your work or cause damage.
Learn what to avoid to get tight, clean bonds without harming your project.
Over-tightening Risks
Applying too much pressure with clamps can squeeze out glue. It also can crush wood fibers. This weakens the joint and may leave marks.
- Glue squeeze-out means less glue inside the joint.
- Wood crushed under heavy clamps loses strength.
- Clamp marks can damage the surface finish.
- Over-tightening may cause glue to dry too fast.
Insufficient Pressure Problems
Not using enough clamp pressure can leave gaps in the joint. Glue may not bond well if surfaces are not tight together. This leads to weak or failed joints.
| Problem | Effect | Result |
|---|---|---|
| Too little pressure | Gaps between surfaces | Weak glue bond |
| Uneven pressure | Partial contact | Inconsistent strength |
| Clamps placed too far apart | Joint not held tight | Possible joint failure |
Misaligned Joints
Clamps must hold pieces straight and aligned. Misalignment causes weak joints and poor appearance. It can also make the project hard to assemble or use.
- Check alignment before tightening clamps.
- Use cauls or blocks to keep edges flush.
- Adjust clamps gradually to maintain position.
- Re-check joints after tightening clamps.
Tips For Faster And Cleaner Joints
Using clamps helps hold pieces tightly while glue dries. This makes the joint stronger and cleaner. Knowing how to use clamps well can save time and reduce mess.
Good clamping techniques improve the quality of your woodwork. They help you get neat joints without wasting glue or needing extra sanding.
Using Cauls For Even Clamping
Cauls are flat boards placed between clamps and your workpiece. They spread the clamping pressure evenly across the joint.
Using cauls prevents dents and uneven glue lines. They help keep the surfaces aligned while the glue sets.
- Cut cauls slightly longer than the clamping area
- Wrap cauls with scrap cloth to avoid marks
- Apply clamps over cauls for gentle, even pressure
Quick-release Clamps
Quick-release clamps speed up your work by tightening and loosening fast. They let you adjust pressure quickly without tools.
These clamps are great for projects needing many clamps or quick setup. They save time and reduce frustration during gluing.
- Use quick-release clamps to hold parts firmly in place
- Check that clamps apply enough pressure without squeezing glue out
- Release clamps carefully to avoid shifting glued pieces
Cleaning Excess Glue
Removing extra glue right after clamping keeps joints neat. Dry glue spots are harder to clean and can ruin the finish.
Use a damp cloth or sponge to wipe off glue squeeze-out. Do this gently so you do not move the joint.
- Wipe glue while it is still wet for best results
- Use a small brush for tight corners
- Keep a bucket of water nearby for cleaning cloths often

Credit: www.amazon.com
Frequently Asked Questions
What Types Of Clamps Work Best For Precise Gluing?
Bar clamps, C-clamps, and spring clamps are ideal for precise gluing. They offer firm, even pressure and stability to hold pieces together. Choose clamps based on your project size and material thickness for the best results.
How Do Clamps Improve Glue Joint Strength?
Clamps apply consistent pressure, ensuring tight bonding between glued surfaces. This pressure prevents gaps and weak spots. Proper clamping time allows the glue to cure fully, resulting in a stronger and more durable joint.
Can I Reuse Clamps For Multiple Gluing Projects?
Yes, clamps are reusable tools. Clean off excess glue after each use to maintain their gripping ability. Proper storage and maintenance extend their lifespan, making them a cost-effective choice for woodworking and crafting projects.
How Long Should Clamps Stay On Glued Pieces?
Clamps typically stay on for 20 to 30 minutes, depending on glue type. Some glues may require longer clamping for maximum strength. Always follow the glue manufacturer’s instructions for optimal curing time.
Conclusion
Clamps make gluing projects easier and more accurate. They hold pieces steady, ensuring a strong bond. For best results, choose the right clamp type for your task. Practice proper placement to avoid slips. Remember, patience matters. Allow glue to dry fully before removing clamps.
This prevents weak joints. With careful use, clamps boost your woodworking success. They are a valuable tool in any craftsperson’s kit. Try different clamp styles to find what fits your needs. Happy crafting!