If you want to create strong, beautiful wood joints that last, learning how to cut dovetail joints is a skill you can’t miss. These joints don’t just look impressive—they hold your projects together with incredible strength.
Whether you’re building a drawer, a box, or a piece of fine furniture, mastering dovetail joints will take your woodworking to the next level. In this guide, you’ll discover simple, step-by-step techniques that make cutting dovetail joints easier than you think.
Ready to impress yourself and anyone who sees your work? Let’s get started.
Tools Needed
Cutting dovetail joints requires the right tools for accuracy and clean results. Using good tools helps you make tight and strong joints.
This guide covers the basic hand tools, power tool options, and measuring tools you need for cutting dovetails.
Essential Hand Tools
Hand tools give you control and precision for cutting dovetails. They are simple but effective.
- Dovetail saw – a small backsaw with fine teeth for clean cuts
- Chisels – sharp chisels for cleaning and shaping the joints
- Mallet – to gently tap chisels without damaging them
- Marking knife – to score precise lines on the wood
- Square – to check right angles and keep cuts straight
- Clamps – to hold wood securely while working
Power Tools Options
Power tools speed up the dovetail cutting process and help with repeatable results. They are useful for larger projects.
| Tool | Use |
| Router with dovetail jig | Creates precise and consistent dovetail cuts |
| Bandsaw | Rough cuts before refining with hand tools |
| Scroll saw | Fine detailed cuts for tight joints |
| Power drill | Drill starter holes for chiseling waste |
Measuring And Marking Tools
Accurate measuring and marking help you cut dovetails that fit well. These tools keep your lines straight and even.
- Combination square – measures and marks 90 and 45 degrees
- Marking gauge – marks parallel lines for consistent depth
- Pencil or fine mechanical pencil – for clear visible marks
- Steel ruler – for quick and accurate measurements

Credit: www.youtube.com
Types Of Dovetail Joints
Dovetail joints are strong wood connections used in many projects. They join two pieces at right angles.
There are different types of dovetail joints. Each type has a special use and look.
Through Dovetails
Through dovetails show the tails and pins on both sides. You can see the joint clearly.
This type is strong and often used for boxes and drawers. It gives a classic look.
- Tails and pins visible from both sides
- Very strong and durable
- Common in drawer construction
Half-blind Dovetails
Half-blind dovetails hide the joint on one side. Only the tails show on the front.
This joint is often used in drawer fronts. It looks neat without exposing the joint.
- Joint is hidden on one side
- Visible tails only on one board
- Used for clean drawer fronts
Sliding Dovetails
Sliding dovetails connect two boards along their length. One board slides into the other.
This joint is good for shelves or panels. It adds strength and keeps boards aligned.
- Boards join by sliding together
- Used for shelves and panels
- Strong joint that resists pulling apart
Preparing The Wood
Cutting dovetail joints needs careful preparation of the wood. Good preparation helps the joint fit tightly and look clean.
Focus on choosing the right wood, marking the layout, and setting up your workpieces properly before cutting.
Selecting The Right Wood
Pick wood that is straight and free of defects like knots or cracks. Softwoods are easier to cut but may wear out faster. Hardwoods offer strength and a nice finish.
- Choose wood with tight, even grain for strength.
- Avoid warped or twisted boards.
- Select wood that matches the project’s style and use.
- Check moisture content; wood should be dry to prevent shrinking.
Marking The Layout
Marking the wood correctly guides your cuts and keeps joints accurate. Use sharp pencils or marking knives for clean lines.
| Tool | Purpose |
|---|---|
| Marking Gauge | Set consistent depth for tails and pins |
| Pencil | Draw general outlines |
| Marking Knife | Cut precise lines to stop tear-out |
| Square | Ensure lines are at right angles |
Setting Up Workpieces
Secure your workpieces to keep them steady while cutting. Proper setup prevents mistakes and keeps your hands safe.
- Clamp the wood firmly to your workbench.
- Use a bench hook or stop block for stability.
- Position the wood so you can see the marked lines clearly.
- Make sure the pieces are aligned if cutting multiple joints.

Credit: m.youtube.com
Cutting The Tails
Cutting the tails is a key step in making dovetail joints. The tails lock the joint firmly. Taking your time here ensures a strong, clean fit.
Accurate marking and careful sawing make the process easier. After sawing, cleaning the edges will improve the joint’s appearance and strength.
Marking Tail Angles
Mark the tail angles clearly on the wood before cutting. Use a marking gauge to set the baseline. Then, mark the angled lines with a dovetail marker or bevel gauge.
- Set the marking gauge to the wood thickness
- Draw the baseline across the end grain
- Use a dovetail marker to mark the angle lines
- Mark the waste areas outside the tails
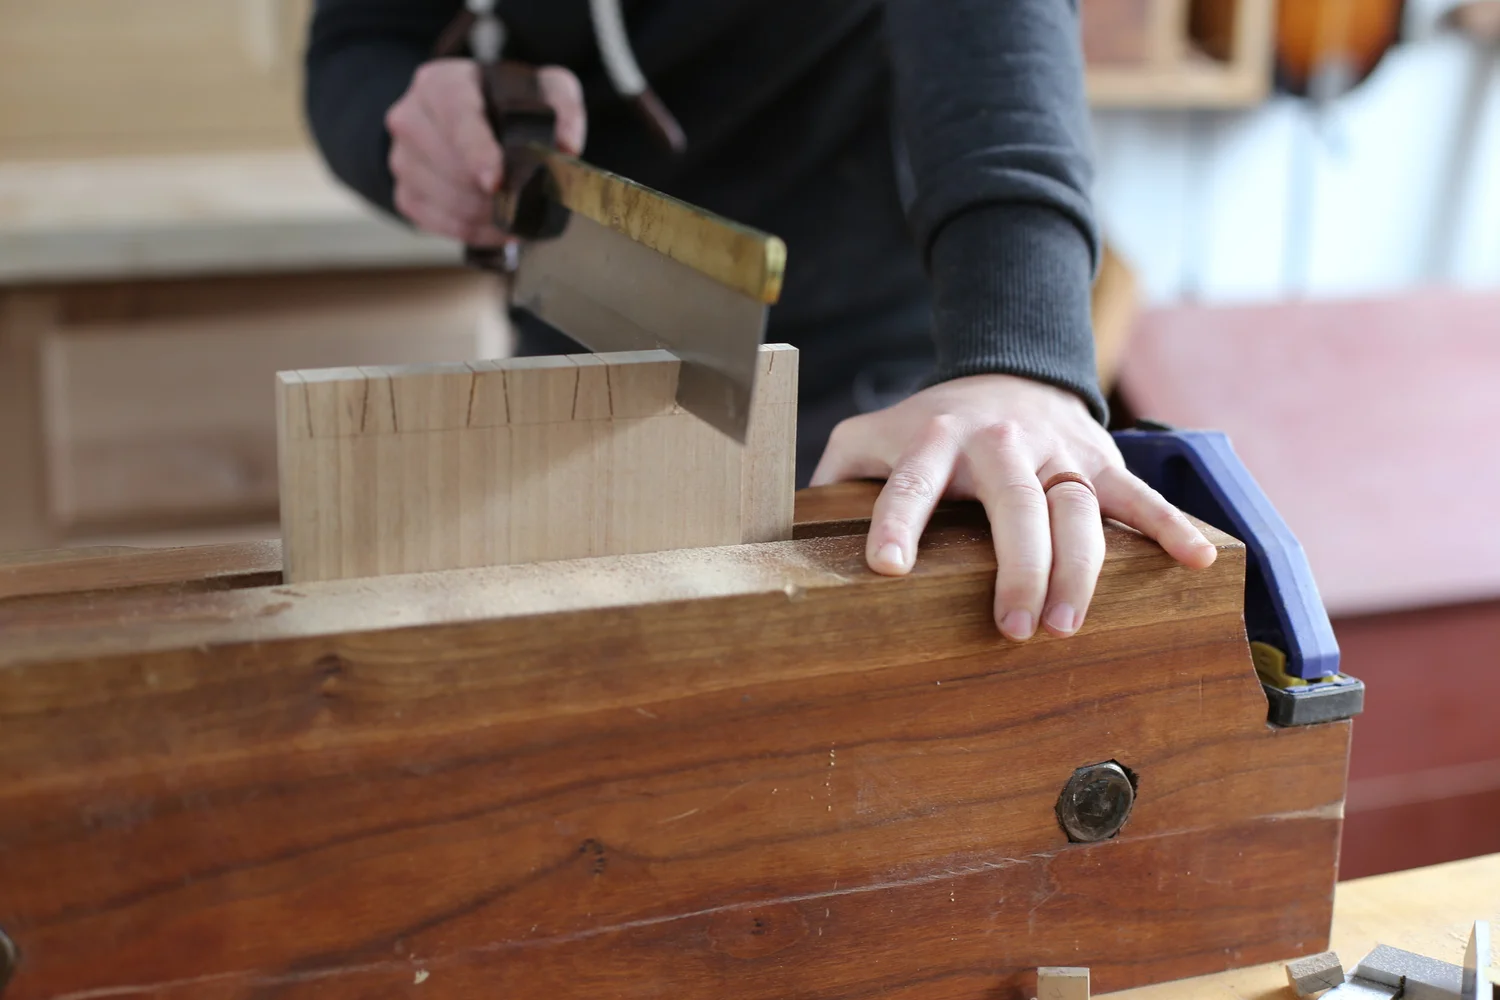
Sawing Techniques
Use a fine-tooth saw to cut along the marked lines. Saw slowly and keep the saw vertical for straight cuts. Start the cut carefully to avoid splintering.
- Hold the wood securely in a vise or clamp
- Align the saw blade on the waste side of the line
- Start the cut with short, controlled strokes
- Saw straight down to the baseline
- Remove the waste between tails with a coping saw
Cleaning Tail Edges
Cleaning the tail edges removes roughness and ensures a tight fit. Use a chisel to pare away any remaining waste. Check the edges for smoothness and straightness.
| Tool | Purpose |
| Sharp chisel | Trim and clean edges |
| Sanding block | Smooth rough surfaces |
| Marking knife | Check for accuracy |
Cutting The Pins
Cutting the pins is an important part of making dovetail joints. Pins fit between the tails to hold the wood pieces together.
Careful cutting ensures the pins match the tails closely for a strong joint.
Transferring Tail Layout
Start by placing the tail board on the pin board. Align them carefully to match edges.
Use a marking knife or pencil to trace the outline of each tail onto the pin board. This shows where to cut.
- Hold boards firmly together
- Mark sharply for clear lines
- Check marks before sawing
Sawing Pin Waste
Cut along the lines you marked, removing the waste wood between the pins. Use a fine saw for control.
Stay just outside the lines to leave room for fitting. Take your time to keep cuts straight.
- Use a dovetail or backsaw
- Cut slowly along waste lines
- Keep saw vertical and steady
Fine Tuning The Fit
After sawing, test fit the pins with the tails. The joint should fit snugly without forcing.
If the fit is tight, use a chisel to remove small amounts of wood. Work gently to avoid gaps.
- Test fit often during trimming
- Remove small amounts gradually
- Avoid making the joint loose

Credit: www.youtube.com
Assembling The Joint
After cutting dovetail joints, the next step is assembly. This process needs care to ensure a strong fit.
Fitting the pieces together correctly helps avoid gaps and weak joints. Follow these steps to assemble your dovetails.
Dry Fitting Pieces
Before gluing, dry fit the tails and pins. This means putting the pieces together without glue.
Check how well the joint fits. Make sure the tails slide into the pins with gentle pressure.
Adjusting For Tightness
If the joint is too tight or loose, adjust it carefully. Use these tips to get a better fit:
- Trim any high spots with a sharp chisel.
- Sand or pare down tight areas slightly.
- Remove small amounts at a time to avoid over-cutting.
- Test fit often to check progress.
- Keep the fit snug but not forced.
Gluing And Clamping
Once the fit is right, apply glue inside the joints. Use a brush or a small stick for even spread.
Assemble the joint and wipe off any glue squeeze-out quickly with a damp cloth.
| Clamping Method | Purpose |
| Bar Clamp | Holds joint tightly without bending |
| Hand Screw Clamp | Provides even pressure on corners |
| Rubber Bands | Useful for small or delicate joints |
Clamp the joint firmly and let the glue dry fully before handling. This ensures a strong, lasting connection.
Common Mistakes To Avoid
Cutting dovetail joints can be tricky. Many woodworkers make mistakes that affect the fit and strength.
Knowing common errors helps you avoid them and create tight, clean joints.
Misaligned Cuts
Misaligned cuts cause the pins and tails not to match well. This makes the joint weak and ugly.
Check your layout marks carefully. Use a sharp pencil and measure twice before cutting.
Overcutting Pins Or Tails
Cutting too deep or too far removes too much wood. This creates gaps and loose joints.
- Cut just to the marked lines, not beyond.
- Use a fine saw for better control.
- Practice on scrap wood to improve accuracy.
- Keep your tools sharp and clean.
Poor Fit And Gaps
Loose fitting joints are weak and look unprofessional. Tight joints need careful cutting and fitting.
| Cause | Effect | Solution |
| Uneven sawing | Unequal pins and tails | Saw slowly and follow lines |
| Wrong chiseling | Gaps between parts | Chisel carefully, remove small amounts |
| Poor measurement | Misfit joint | Double-check measurements before cutting |
Finishing Tips
Finishing dovetail joints well makes your woodworking project look great. It also helps protect the wood and the joint from damage. Use careful sanding, apply the right finish, and keep the joint strong over time.
These tips will guide you through sanding, finishing, and maintaining your dovetail joints to ensure they last and look their best.
Sanding And Smoothing
Start sanding with medium-grit sandpaper to smooth rough edges. Then use fine-grit sandpaper for a clean, even surface. Always sand along the grain to avoid scratches.
- Use 120-grit sandpaper first
- Finish with 220-grit sandpaper
- Remove dust with a soft brush or cloth
- Check for uneven spots and sand again if needed
Applying Finish
Choose a finish that fits your project, such as oil, varnish, or wax. Apply thin coats and let each dry fully before adding the next. This protects the wood and highlights the joint’s detail.
| Finish Type | Best Use | Dry Time |
| Tung Oil | Natural look, easy application | 6–8 hours |
| Polyurethane | Strong protection, shiny finish | 4–6 hours |
| Wax | Soft feel, good for indoor pieces | 1–2 hours |
Maintaining Joint Strength
Keep your dovetail joint strong by avoiding moisture and heavy stress. Regularly check for cracks or looseness. Reapply finish to protect the wood from drying out or swelling.
- Keep the joint dry and clean
- Apply wood glue if the joint loosens
- Use clamps to hold joints tight while glue dries
- Store wood pieces in stable humidity conditions
Frequently Asked Questions
What Tools Are Needed To Cut Dovetail Joints?
To cut dovetail joints, you need a dovetail saw, marking gauge, chisels, and a mallet. A pencil and square help mark precise lines. Optional tools include a dovetail jig for beginners to ensure accuracy and consistency in cuts.
How Do I Mark Dovetail Joint Layouts Accurately?
Use a marking gauge to set consistent depths on both boards. Mark tails first, then transfer their shape to the pins board. Use a sharp pencil for clear lines, and double-check measurements before cutting to ensure precise and snug-fitting joints.
What Is The Best Technique For Cutting Dovetail Joints?
Start by carefully sawing along the marked lines, staying just outside the marks. Remove waste wood with chisels, working slowly for clean edges. Test fit the joint frequently, adjusting with chisels until the tails and pins fit tightly without gaps.
How Long Does It Take To Learn Dovetail Joint Cutting?
Learning dovetail cutting varies, but beginners often need a few practice sessions. With consistent effort, basic proficiency can develop within hours. Mastery requires patience and repeated practice, focusing on accuracy and clean cuts to achieve professional-looking joints.
Conclusion
Mastering dovetail joints takes practice and patience. Start with simple projects first. Use quality wood and sharp tools for best results. Measure accurately to ensure a snug fit. Remember, precision is key. Mistakes happen, but each one teaches something valuable.
Keep your tools well-maintained for smoother cuts. Enjoy the process and watch your skills grow over time. Dovetail joints add strength and beauty to your projects. Keep learning and experimenting. You’ll soon create beautiful, lasting pieces. Happy woodworking!