Stripping wires for terminals might seem tricky at first, but once you know the right steps, it becomes quick and easy. Whether you’re fixing something at home or working on a DIY project, getting this skill right can save you time and frustration.
In this guide, you’ll discover simple techniques that ensure clean, precise wire stripping every time. Keep reading, and you’ll gain the confidence to handle your wiring like a pro.

Credit: www.familyhandyman.com
Tools Needed
Stripping wires for terminals requires the right tools. Using proper tools helps you work safely and cleanly.
Here are the main tools you need to strip wires effectively for terminals.
Wire Strippers
Wire strippers are the main tool for removing insulation from wires. They have different notch sizes for various wire gauges.
Good wire strippers cut insulation without damaging the wire inside. Some models have adjustable tension for better control.
- Choose wire strippers that match your wire size
- Look for comfort grips for long use
- Automatic wire strippers speed up the job
Cutters And Pliers
Cutters are needed to trim wires to the right length before stripping. They make clean cuts without crushing wires.
Pliers help hold wires steady. Needle-nose pliers are useful for bending and placing wires into terminals.
- Use diagonal cutters for clean wire cuts
- Needle-nose pliers hold and bend wires
- Combination pliers offer gripping and cutting
Additional Accessories
Some extra tools make wire stripping easier and safer. They include tools to measure and protect wires.
Examples are wire gauges to check wire size and electrical tape to insulate stripped wires.
- Wire gauge tool helps select the right stripping size
- Electrical tape insulates and secures wire ends
- Heat shrink tubing protects and seals connections
Choosing The Right Wire
Choosing the right wire is important before you strip wires for terminals. The right wire ensures safety and good electrical performance.
This guide covers how to select wire gauge and insulation types for your project.
Wire Gauge Selection
Wire gauge means the thickness of the wire. Thicker wires carry more current safely. Using the wrong gauge can cause overheating or poor connections.
- Use smaller gauge numbers for thicker wires
- Match the wire gauge to the current your device needs
- Check local electrical codes for required wire sizes
- Consider the length of the wire to reduce voltage drop
Insulation Types
Wire insulation protects the wire from damage and prevents electric shocks. Different insulation types suit different environments.
| Insulation Type | Use Case | Temperature Range |
| PVC | General purpose indoors | -20°C to 80°C |
| Rubber | Flexible wiring | -40°C to 90°C |
| Teflon (PTFE) | High heat and chemical resistance | -60°C to 200°C |
| Silicone | High temperature and flexibility | -60°C to 180°C |
Preparing The Wire
Stripping wires properly is key for safe and effective electrical work. This guide helps you prepare the wire before attaching terminals.
Careful preparation prevents damage and ensures a strong connection. Follow the steps below to measure and mark your wire accurately.
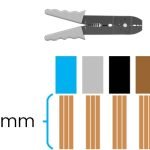
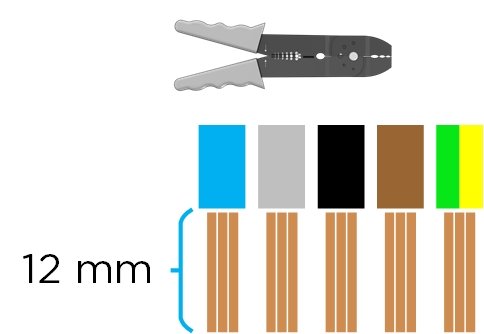
Measuring Strip Length
Measure the length of insulation you need to remove from the wire. This length depends on the terminal size and type.
- Check the terminal specifications for strip length.
- Use a ruler or tape measure for accuracy.
- Mark the length on the wire using a pencil or marker.
- Double-check the measurement before cutting the insulation.
Marking The Wire
Marking the wire clearly helps you strip the correct length. Use visible marks that do not damage the wire strands.
| Tool | Purpose |
| Marker or Pencil | Make clear strip length marks |
| Masking Tape | Wrap around wire to mark strip point without damage |
| Ruler | Measure exact strip length |
Credit: xbcomponents.com
Stripping Techniques
Stripping wires is a key skill for connecting electrical terminals. The right technique helps make strong, safe connections. Learn how to strip wires without damaging them.
There are different ways to strip wire insulation. Each method fits different tools and situations. Choose the best way for your project.
Manual Stripping
Manual stripping uses a simple tool like a wire stripper or a knife. You cut the insulation carefully without harming the wire inside. This method works well for small jobs and thin wires.
- Hold the wire firmly.
- Place the stripper at the right spot on the insulation.
- Squeeze the tool to cut the insulation but not the wire.
- Pull the insulation off gently.
- Check the wire for any nicks or cuts.
Using Automatic Strippers
Automatic strippers speed up the process. They adjust to wire size and remove insulation quickly. These tools are useful for many wires and thicker cables.
| Feature | Manual Stripper | Automatic Stripper |
| Speed | Slower | Faster |
| Skill Needed | More | Less |
| Wire Size Range | Limited | Wide |
| Cost | Lower | Higher |
Avoiding Wire Damage
Wire damage weakens electrical connections. It can cause shorts or failures. Avoid damage by using the right tool and careful technique.
- Do not nick or cut the wire strands.
- Match the tool size to the wire gauge.
- Strip only the needed length of insulation.
- Check the wire after stripping for any damage.
- Practice on scrap wire before working on important cables.
Checking The Stripped Wire
After stripping a wire for terminals, it is important to check the wire carefully. This step helps make sure the wire will connect well and work safely.
Look closely at the stripped part before attaching it to any terminal. This inspection can prevent problems later on.
Inspecting For Cuts And Nicks
Check the stripped wire for any cuts or nicks on the copper conductor. These small damages can weaken the wire and cause failure.
- Look along the entire exposed length of the wire.
- Use good light to see any tiny cuts or scratches.
- Do not use wires with visible damage.
- Cut and strip a new wire if you find any nicks.
Ensuring Clean Exposed Conductors
Make sure the exposed copper strands are clean and free of dirt or corrosion. Dirty conductors reduce electrical contact and can cause heat buildup.
| Check | Reason | Action |
| Clean copper strands | Good electrical contact | Use wire brush or sandpaper if dirty |
| Remove oxidation | Prevents poor connection | Clean with appropriate tools |
| Dry wire | Prevents corrosion | Wipe off moisture before use |

Credit: www.youtube.com
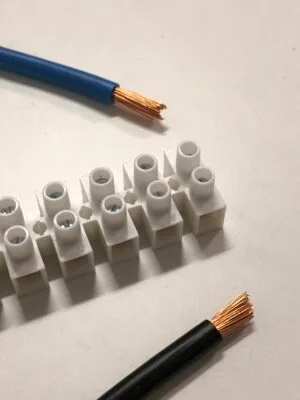
Attaching Terminals
Attaching terminals to wires is a common task in electrical work. Proper attachment ensures a safe and reliable connection.
This guide covers selecting terminals, crimping, and soldering tips for best results.
Selecting Terminal Types
Choose the right terminal type based on wire size and application. Common types include ring, spade, and butt connectors.
- Ring terminals provide a secure connection with screws or bolts.
- Spade terminals allow easy attachment and removal.
- Butt connectors join two wires end-to-end.
- Quick-disconnect terminals enable fast connections.
Crimping Process
Crimping uses a special tool to compress the terminal onto the wire. This creates a strong mechanical and electrical bond.
| Crimp Type | Use | Tool Needed |
| Insulated | Protects wire and terminal | Insulation crimper |
| Non-insulated | Strong electrical contact | Standard crimper |
| Flag | Fits tight spaces | Flag crimper |
Soldering Tips
Soldering strengthens the connection and improves conductivity. Use a clean soldering iron and rosin-core solder.
- Heat the terminal and wire before applying solder.
- Apply solder only to the heated parts, not the iron tip.
- Avoid using too much solder to prevent cold joints.
- Let the solder cool naturally for a solid bond.
Safety Tips
Stripping wires for terminals is a common task in electrical work. Doing it safely protects you and your equipment.
Use the right methods and tools to avoid injury or damage. Follow these tips to stay safe.
Handling Tools Properly
Use wire strippers designed for electrical work. Avoid using knives or scissors as they can slip.
- Inspect tools before use to ensure they are in good condition.
- Hold the wire stripper firmly to prevent slips.
- Cut the insulation gently without nicking the wire strands.
- Keep your fingers away from the cutting edges.
- Store tools safely after use to prevent accidents.
Preventing Electrical Hazards
Always disconnect power before working on any electrical wiring. Live wires can cause shocks or burns.
| Hazard | Prevention |
| Electric shock | Turn off power supply and test wires |
| Short circuit | Strip only needed insulation and avoid wire damage |
| Fire risk | Use proper connectors and secure wiring |
| Tool injury | Wear safety gloves and eye protection |
Common Mistakes To Avoid
Stripping wires for terminals is simple but needs care. Avoid mistakes to keep connections safe and strong.
Learn about common errors so you can strip wires the right way every time.
Over-stripping
Over-stripping means removing too much insulation from the wire. This exposes more wire than needed.
Too much exposed wire can cause shorts or damage the connection.
- Only strip enough to fit the terminal.
- Avoid pulling insulation too far back.
- Check the terminal size before stripping.
Under-stripping
Under-stripping happens when you do not remove enough insulation. The wire won’t connect well inside the terminal.
This can cause poor electrical contact and increase resistance.
- Strip just enough insulation to expose clean wire.
- Make sure the wire fits fully into the terminal.
- Double-check the wire length before crimping or soldering.
Damaging Wire Strands
Wire strands can break if you use the wrong tool or too much force. This weakens the wire’s strength.
Damaged strands reduce current flow and can cause failure over time.
- Use proper wire strippers sized for your wire.
- Do not twist or pull wire too hard.
- Cut insulation cleanly without nicking wire strands.
Frequently Asked Questions
What Tools Do I Need To Strip Wires For Terminals?
You need wire strippers, a utility knife, and sometimes pliers. Wire strippers ensure clean insulation removal without damaging wire strands. A utility knife helps with precise cuts on thicker insulation. Pliers assist in twisting or holding wires for terminal connection.
How Do I Strip Wires Without Damaging The Conductor?
Select the correct wire stripper gauge for your wire size. Gently squeeze the tool to cut insulation without cutting wire strands. Pull the insulation off smoothly. Avoid excessive force to prevent conductor damage and ensure a reliable electrical connection.
What Is The Proper Wire Length To Strip For Terminals?
Strip about 1/4 to 1/2 inch of insulation from the wire end. This length fits most terminal types and ensures good contact. Too short might cause poor connection; too long exposes wire strands, risking short circuits.
Can I Strip Wires Safely Without Professional Tools?
Yes, but it’s riskier. Use a sharp utility knife carefully to score insulation. Avoid cutting deeply to prevent wire damage. Professional wire strippers provide cleaner, safer results and are recommended for regular use.
Conclusion
Stripping wires for terminals is essential for electrical projects. Proper technique ensures safe connections. Start by gathering the right tools like wire strippers and cutters. Practice makes perfect. Cut the insulation carefully to avoid damaging the wire. Always choose the correct gauge for your project.
This prevents any electrical issues. Follow these steps for a smooth process. You’ll gain confidence with each attempt. Remember, safety comes first. Double-check your work before connecting to power. With these skills, your wiring tasks become simpler and safer. Happy wiring!