If you want to create strong, lasting wood joints that hold your projects together like a pro, learning how to carve mortise and tenon joints is a game changer. These joints have been used for centuries because they offer incredible strength and precision.
But don’t worry if you’re new to woodworking—this guide will walk you through every step clearly and simply. By the end, you’ll have the skills to make joints that not only look great but also stand the test of time.
Ready to take your woodworking to the next level? Let’s get started!
Tools For Mortise And Tenon
Carving mortise and tenon joints needs the right tools. Good tools make the job easier and more precise.
Choosing between hand tools and power tools depends on your skill and the project size. Keeping tools sharp is also very important.
Essential Hand Tools
Hand tools give you control and accuracy. They are good for small or detailed work on joints.
- Chisels: Used to cut and clean the mortise and shape the tenon.
- Mallet: Helps drive chisels without damaging them.
- Marking Gauge: Marks precise lines for cutting.
- Try Square: Checks the angles and keeps edges straight.
- Handsaw: Cuts the tenon shoulders and cheeks.
Power Tools Options
Power tools can speed up the process. They work well for larger projects or when many joints are needed.
- Router: Cuts clean mortises quickly with a template.
- Drill Press: Removes most wood inside the mortise before chiseling.
- Band Saw: Shapes tenons with smooth cuts.
- Table Saw: Used to cut tenon shoulders and cheeks accurately.
Sharpening And Maintenance
Sharp tools cut cleanly and safely. Dull tools make mistakes and need more effort.
Keep chisels and saws sharp by using sharpening stones and files. Clean tools after use to stop rust.
- Use oil stones or water stones for chisels.
- Sharpen saw teeth with a small file.
- Apply oil on metal parts to prevent rust.
- Store tools in a dry place.

Credit: www.familyhandyman.com
Selecting The Right Wood
Choosing the right wood is key for strong mortise and tenon joints. The wood must be sturdy and easy to shape. Using the right wood helps the joint hold well over time.
Some woods are better for these joints because they resist splitting and stay tight. Knowing which wood to pick makes carving easier and the joint last longer.
Wood Types For Joints
Hardwoods are best for mortise and tenon joints. They offer strength and resist wear. Softwoods can be easier to carve but may not hold as well.
- Oak: Strong and durable, great for furniture.
- Maple: Hard and smooth, holds detail well.
- Cherry: Easy to work, looks nice when finished.
- Pine: Softer, good for practice or light use.
- Walnut: Tough and stable, dark color.
Grain Direction Importance
Grain direction affects how the wood cuts and holds together. Align the grain along the length of the joint. This prevents splitting and adds strength.
Cutting against the grain can cause rough edges and weak spots. Following the grain makes carving smoother and the joint tighter.
- Cut with the grain for clean edges.
- Check grain direction before marking cuts.
- Align tenon and mortise grain for best fit.
Avoiding Common Wood Flaws
Inspect wood for knots, cracks, and warping before carving. Flaws weaken joints and can cause failure. Choose straight, clear pieces for best results.
Small knots may be okay if not in the joint area. Avoid wood with big cracks or twists. Good wood leads to strong and neat joints.
- Skip wood with large knots near the joint.
- Check for cracks that may spread under pressure.
- Pick flat, straight boards without bends.
Marking The Joint Layout
Carving mortise and tenon joints needs careful marking. Accurate layout helps the pieces fit well.
Marking the joint correctly saves time and avoids mistakes. Use clear lines to guide your cuts.
Measuring And Marking Techniques
Start by measuring the wood pieces with a ruler or tape. Mark the length and width of the joint clearly.
Use a marking knife or pencil to draw sharp lines. Avoid thick lines that can cause confusion.
- Measure twice to ensure accuracy
- Mark the shoulder and cheek lines carefully
- Use a square to keep lines straight and square
- Label parts to avoid mixing up pieces
Transferring Measurements Accurately
Transfer measurements from one piece to another with precision. This keeps the joint tight and strong.
Use a marking gauge or try square to copy lines. Double-check each mark before cutting.
- Set marking gauge to the exact measurement
- Run the gauge firmly along the wood edge
- Use a try square to mark cross lines accurately
- Check marks by comparing both pieces

Credit: www.youtube.com
Cutting The Tenon
Cutting the tenon is a key part of making a strong mortise and tenon joint. You must be precise to ensure a tight fit. This section explains how to saw the shoulders and cheeks and clean up the tenon.
Sawing The Shoulders And Cheeks
Start by marking the tenon carefully on all sides. Use a sharp saw to cut the shoulders first. These cuts define the tenon’s depth. Next, saw the cheeks, which are the flat sides of the tenon. Keep your saw straight and steady to avoid uneven cuts.
- Clamp the workpiece firmly to prevent movement.
- Saw along the marked shoulder lines to the correct depth.
- Turn the piece to saw the cheeks evenly on both sides.
- Keep the saw blade vertical to avoid angled cuts.
- Take your time to make clean, smooth cuts.
Cleaning Up The Tenon
After sawing, check the tenon for rough spots or uneven surfaces. Use a chisel or file to clean the edges and smooth the cheeks. Make small, careful cuts to keep the tenon tight and true. A clean tenon fits better and strengthens the joint.
| Tool | Purpose | Tip |
|---|---|---|
| Chisel | Trim shoulders and cheeks | Work slowly to avoid removing too much wood |
| File | Smooth rough edges | Use gentle strokes along the grain |
| Sandpaper | Final smoothing | Use fine grit for a clean finish |
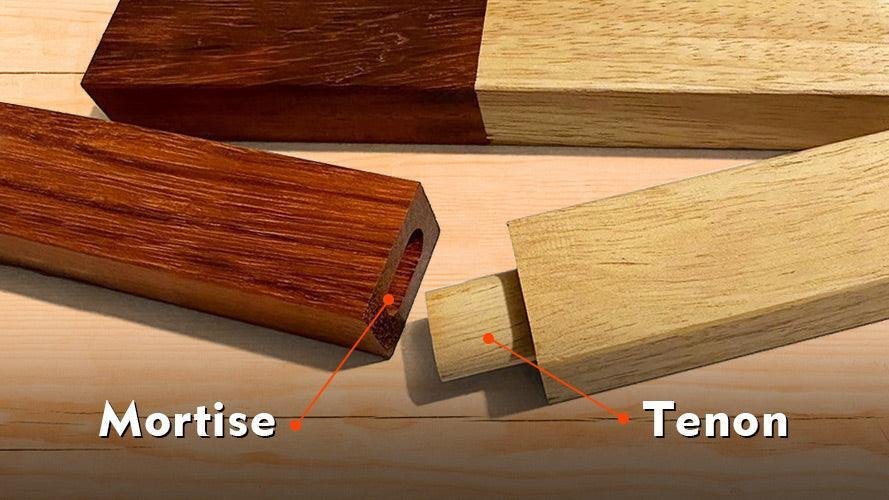
Creating The Mortise
The mortise is a hole or slot cut into wood. It fits the tenon to join two pieces tightly.
Creating a clean mortise is key for a strong joint. This guide explains how to carve it well.
Drilling Techniques
Drilling helps remove most wood inside the mortise quickly. Use a drill bit that matches the mortise width.
Drill holes close together along the mortise length. This makes chiseling easier and faster.
- Mark the mortise outline clearly on wood
- Use a drill press for straight holes if possible
- Drill to the full depth of the mortise
- Keep the drill steady and aligned
Chiseling For Precision
After drilling, use a chisel to clean and square the mortise edges. Sharp chisels make smooth cuts.
Work slowly and remove small wood pieces. Check the mortise walls for flatness and right angles.
- Hold the chisel firmly and tap gently with a mallet
- Start by chopping the waste between drilled holes
- Square the corners by trimming carefully
- Keep checking the mortise shape as you go
Checking Fit And Adjustments
Test the tenon in the mortise to check the fit. It should slide in snugly but not too tight.
Make small chiseling adjustments if the fit is too tight. Remove wood slowly and test often.
- Insert the tenon gently to avoid splitting wood
- Look for any gaps or tight spots
- Trim the mortise or tenon to improve fit
- A good fit holds pieces firmly without forcing

Credit: www.youtube.com
Assembling And Gluing
Carving mortise and tenon joints is a skill that requires patience and care. Assembling and gluing these joints correctly ensures a strong connection between wood pieces.
This guide covers dry fitting, applying adhesives, and clamping to help you get the best results.
Dry Fitting The Joint
Dry fitting means putting the mortise and tenon together without glue. This step checks if the joint fits tightly and aligns correctly. If the joint is too tight, trim the tenon slightly. If it is loose, consider adjusting the mortise.
Applying Adhesives
Use wood glue designed for strong bonds. Apply glue evenly on both the tenon and the inside of the mortise. Avoid using too much glue because it can squeeze out and make a mess.
- Spread a thin layer of glue on the tenon surface.
- Coat the inside walls of the mortise lightly.
- Use a brush or a small stick for even coverage.
- Work quickly before the glue starts to dry.
Clamping Tips For Strong Bonds
Clamping holds the joint tightly while the glue dries. Proper clamping pressure keeps the tenon and mortise in place and removes excess glue.
| Clamping Tip | Reason |
| Use clamps that fit your workpiece | Prevents damage and holds parts evenly |
| Apply even pressure along the joint | Ensures a strong, gap-free bond |
| Do not over-tighten clamps | Avoids crushing the wood fibers |
| Leave clamps on for recommended drying time | Allows glue to cure fully |
Common Mistakes To Avoid
Carving mortise and tenon joints takes care and attention. Many woodworkers make errors that weaken the joint. Knowing common mistakes helps you create stronger joints.
This guide covers three frequent problems and how to avoid them. Focus on alignment, size, and tool use for better results.
Misalignment Issues
Misaligned mortise and tenon joints do not fit properly. This reduces the joint’s strength and makes assembly hard. Check your marks before cutting.
Use a square and clamp pieces when marking. Cut slowly and test fit often. Small errors add up quickly.
Oversized Or Undersized Joints
Size matters in mortise and tenon joints. If the tenon is too big, it will not fit the mortise. If it is too small, the joint will be loose and weak.
- Measure twice before cutting
- Use precise tools like calipers
- Test fit the tenon in the mortise carefully
- Trim small amounts at a time
Poor Tool Handling
Bad tool handling can cause rough cuts and uneven joints. Sharp chisels and steady hands are essential. Use proper grips and control.
| Common Tool Mistakes | How to Avoid |
| Dull blades | Sharpen regularly |
| Rushing cuts | Work slowly and carefully |
| Wrong tool angle | Practice correct blade positioning |
| Loose grip | Hold tools firmly but not tight |
Advanced Tips For Experts
Carving mortise and tenon joints needs skill and care. Experts can improve their joints with advanced tips. This guide helps you perfect your technique.
These tips cover making joints stronger, adding decoration, and using jigs for repeat work. Each section offers clear advice for experts.
Customizing Joint Strength
Adjust the size of the tenon to control the joint’s strength. A thicker tenon adds strength but needs more wood removal.
Use shoulder cuts to increase glue surface. Clean, sharp shoulders keep joints tight and strong.
- Increase tenon length for more glue area
- Cut shoulders square and smooth
- Use hardwood for tenon if possible
- Tight fit reduces movement over time
Decorative Enhancements
Add style to your joints by carving shapes on the tenon cheeks. Simple curves or chamfers improve appearance.
Consider making a haunched tenon to hide gaps and add visual interest. You can also use contrasting wood for the tenon.
- Use a router to add small grooves
- Try angled cuts for unique shapes
- Mix wood colors for contrast
- Sand edges smooth for a clean look
Using Jigs For Repetition
Create or use a jig to make identical mortises and tenons quickly. Jigs save time and keep joints consistent.
Set stops and guides on your jig. This helps control depth and width for every cut you make.
- Use a mortising jig with clamps
- Build a tenon cutting jig for saw or router
- Mark your jig for quick setup
- Check measurements often for accuracy
Frequently Asked Questions
What Tools Are Needed For Carving Mortise And Tenon Joints?
You need chisels, a mallet, a marking gauge, and a saw. A drill or mortising machine helps speed up the mortise carving. Sharp, quality tools ensure clean and precise cuts for strong joints.
How Do I Mark Mortise And Tenon Joints Accurately?
Use a marking gauge to scribe precise lines on the wood. Mark both mortise and tenon parts clearly. Accurate marking prevents gaps and misalignment, ensuring a snug fit for a durable joint.
What Is The Best Wood Type For Mortise And Tenon Joints?
Hardwoods like oak, maple, or walnut are ideal. They provide strength and durability. Softwoods can work but may not hold up as well under stress or over time.
How Can I Ensure A Tight Fit In Mortise And Tenon Joints?
Cut the tenon slightly smaller than the mortise. Test fit frequently and pare the tenon edges carefully. A tight fit prevents wobbling and strengthens the joint without needing excessive glue.
Conclusion
Carving mortise and tenon joints is a valuable skill. It strengthens your woodworking projects. Practice makes perfect. Start with simple designs. Gradually, try more complex joints. Always measure carefully. Precision is crucial for a snug fit. Use sharp tools for clean cuts.
Safety should always be a priority. Wear protective gear to avoid injuries. Patience and persistence lead to success. With time, your skills will grow. Enjoy the process. It’s rewarding to see your progress. Keep learning and refining your techniques. Your craftsmanship will improve with each joint.
Happy woodworking!
