Are you tired of uneven cuts and crooked angles ruining your woodworking projects? Mastering the use of a woodworking square can change that.
This simple tool is key to making precise measurements and perfect right angles every time. Whether you’re a beginner or looking to sharpen your skills, this guide will show you how to use a woodworking square like a pro. Keep reading, and you’ll discover tips that save you time, reduce mistakes, and help your projects look clean and professional.
Your next masterpiece starts with getting your angles just right.
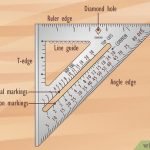
Types Of Woodworking Squares
Woodworking squares help you measure and mark right angles and straight lines. They are essential tools for wood projects.
Different types of squares serve different purposes. Knowing each type helps you pick the right tool for your work.
Try Squares
Try squares are simple tools made of wood or metal. They have a fixed 90-degree angle between the blade and the handle.
They check if edges are square and mark straight lines. Try squares are good for basic woodworking tasks.
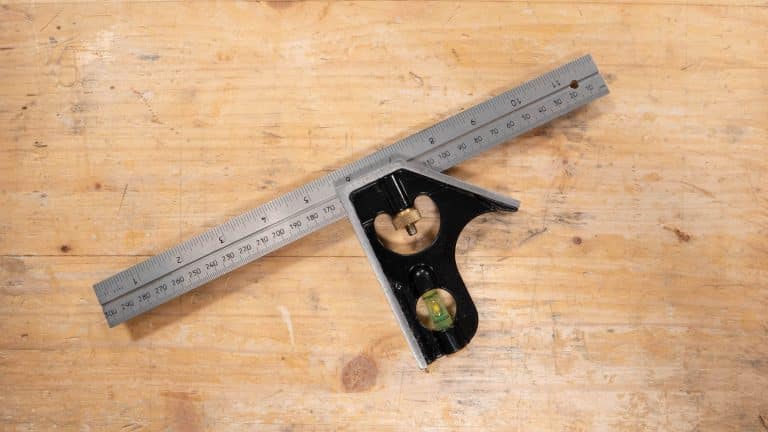
Combination Squares
Combination squares have a ruler with a movable head. The head can measure 90 and 45-degree angles.
They can also check depth and mark lines. Combination squares are versatile and used in many projects.
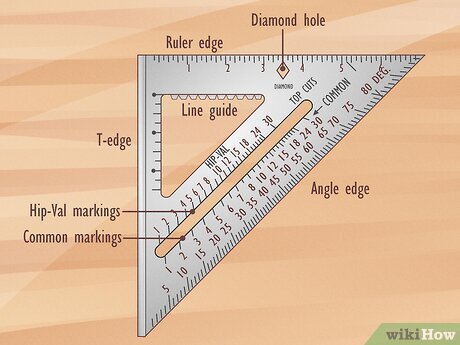
Speed Squares
Speed squares are triangular metal tools. They help mark angles quickly and guide saw cuts.
They are popular for framing and roofing work. Speed squares combine speed and accuracy in one tool.
T-squares
T-squares have a long ruler with a crosspiece forming a T shape. They help draw straight horizontal lines.
They are mostly used in drafting and layout work. T-squares keep lines parallel and angles precise.

Credit: www.wikihow.com
Choosing The Right Square
Picking the right woodworking square helps you get accurate cuts. It makes your work easier and more precise.
There are many types of squares. You should choose one that fits your needs and skill level.
Material And Build Quality
The material affects how long your square lasts. Look for strong metals or hard plastics that resist wear.
A square made from stainless steel or aluminum will not rust easily. This keeps measurements accurate over time.
- Steel squares are heavy but very durable
- Aluminum squares are lightweight and rust-proof
- Plastic squares are cheaper but can wear out fast
Size And Measurement Units
Choose a size that fits your projects. Larger squares help with big pieces, small squares work well for detail.
Check if the square uses inches, centimeters, or both. Pick the units you use most often to avoid confusion.
- 6-inch squares are good for small tasks
- 12-inch squares suit most general woodworking
- 18-inch or larger squares help with big cuts
- Dual measurement units allow flexible use
Special Features
Some squares have extra features that improve use. Look for details that add convenience or accuracy.
Features like built-in levels, adjustable arms, or etched markings can make measuring easier.
- Built-in bubble levels help check flatness
- Adjustable squares can measure different angles
- Etched markings last longer than printed ones
- Magnified scales improve reading accuracy
Basic Techniques For Accurate Measurement
Using a woodworking square correctly helps you make precise cuts and joints. Accurate measurements improve your project’s fit and finish.
Learn simple ways to check squareness, mark lines, and measure angles with your woodworking square.
Checking For Squareness
Place the square’s inside corner against the edge of your wood piece. Look for gaps between the square’s blade and the wood. If you see light or space, the edge is not square.
Flip the square to the other side of the wood and check again. This double check ensures your board is truly square on both sides.
Marking And Scribing Lines
Use the square’s blade as a guide to draw straight lines. Hold the square firmly against the wood edge. Run your pencil or marking knife along the blade to make a clear line.
- Keep the square tight against the wood to avoid slips.
- Use a sharp pencil or fine knife for clean lines.
- Double-check the square’s position before marking.
Measuring Angles
Some woodworking squares include angle measurements. To measure an angle, align the square’s blade with one edge of the workpiece. Read the angle where the blade meets the scale.
| Angle Type | Square Position | Use |
| 90 Degrees | Blade flush at corner | Check corners and joints |
| 45 Degrees | Blade at midpoint | Mark miters and bevels |
| Other Angles | Adjust blade angle | Custom cuts and fits |

Credit: www.wikihow.com
Advanced Uses In Woodworking
A woodworking square is more than a simple tool. It helps with precise work and complex tasks. Using it well improves your woodworking projects.
This guide explains advanced ways to use a woodworking square. Learn to lay out joinery, transfer measurements, and set up other tools.
Layout For Joinery
Use a woodworking square to mark exact angles and lines for joinery. This helps create strong, tight-fitting joints.
Marking mortise and tenon joints or dovetails becomes easier with a square. It ensures your cuts line up perfectly.
- Place the square on the wood edge to draw precise 90-degree lines
- Mark the depth and width of joints accurately
- Use the square to check angles before cutting
Transferring Measurements
A woodworking square helps copy measurements from one piece to another. This keeps parts consistent in size and shape.
Use the square to transfer marks across edges or along the length of boards. This avoids measurement errors.
- Hold the square firmly to the marked point
- Extend the mark across the wood surface using the square’s edge
- Check marks with the square for accuracy
Setting Up Tools
Use a woodworking square to set up other tools like saws and routers. It helps align blades or fences for clean cuts.
Check that tool parts are square to the work surface. This reduces mistakes and improves safety.
- Place the square against the tool’s fence or base
- Adjust the tool until the square fits perfectly without gaps
- Recheck often during use to keep alignment
Common Mistakes And How To Avoid Them
Using a woodworking square correctly is important for accurate cuts and measurements. Many woodworkers make simple mistakes that affect their work.
This guide explains common errors and how to avoid them. Follow these tips to improve your woodworking results.
Misreading Measurements
One common mistake is reading the scale on the square wrong. This can cause pieces to be cut too short or too long.
Always check the measurement marks carefully. Use good lighting and take your time to read the scale correctly.
- Look straight at the scale to avoid parallax errors
- Confirm the zero mark lines up with your material edge
- Double-check measurements before cutting
Improper Square Placement
Placing the square incorrectly on your wood will give wrong angles. The tool must sit flat and tight against the edge.
Keep the square steady and flush against the wood. Avoid gaps or tilting the square during marking or measuring.
- Align the square’s body firmly with the wood edge
- Hold the square in place with one hand to prevent movement
- Check that the blade of the square is flush on the wood surface
Ignoring Tool Calibration
A woodworking square can lose its accuracy over time. Ignoring calibration causes errors in your work.
Test your square regularly to ensure it is true. Fix or replace it if you find any inaccuracy.
- Check the square against a known right angle
- Flip the square and compare markings on both sides
- Adjust or replace the square if it does not match correctly
Maintaining Your Woodworking Square
Keeping your woodworking square in good shape helps you get accurate measurements. Regular care makes the tool last longer and work better.
This guide shows how to clean, store, check, and calibrate your woodworking square for best results.
Cleaning And Storage
Clean your woodworking square after each use. Dirt and dust can cause errors in your work.
Store the square in a dry place. Keep it away from moisture to stop rust and damage.
- Use a soft cloth to wipe off sawdust and dirt
- Apply a light oil layer on metal parts to prevent rust
- Store in a toolbox or hang on a pegboard
- Avoid stacking heavy tools on top of it
Checking For Wear And Damage
Look for signs of wear or damage before each project. Cracks or dents can affect accuracy.
Check the edges and corners for chips. Smooth edges are important for precise measuring.
- Inspect the blade and handle for cracks or splits
- Make sure the edges are straight and not bent
- Replace the square if it has deep dents or warping
- Use a magnifier for a close look at small damage
Calibration Tips
Check the square’s accuracy regularly by testing it on known right angles.
Adjust or replace your square if it does not measure 90 degrees correctly.
- Place the square on a flat surface or wood edge
- Mark a line along one edge of the square
- Flip the square and align with the marked line
- Check if the second line matches the first exactly
- If lines do not match, the square needs adjustment or replacement
Credit: commonwoodworking.com
Frequently Asked Questions
What Is A Woodworking Square Used For?
A woodworking square measures and marks right angles accurately. It ensures precise cuts and proper alignment in projects. This tool helps maintain consistency and quality in woodworking tasks.
How Do I Choose The Right Woodworking Square?
Choose based on project type, material, and size. Common types include try squares, combination squares, and framing squares. Select a square that fits your measurement needs and comfort.
How To Properly Use A Woodworking Square?
Place the square firmly against the wood edge. Align the blade to mark or check 90-degree angles. Ensure the tool is snug to avoid measurement errors.
Can A Woodworking Square Check Angles Besides 90 Degrees?
Yes, combination squares have adjustable blades for various angles. They can measure and mark angles like 45 degrees. This versatility aids complex woodworking projects.
Conclusion
A woodworking square is essential for any woodworker. It ensures precise measurements. Consistency is key in woodworking projects. This tool helps achieve that. Practice using it regularly. Soon it becomes second nature. Remember to keep it clean and well-maintained. This prolongs its life.
Explore different types available. Find one that fits your needs best. With patience, your skills will grow. Each project will improve. Enjoy the process and creativity. Happy woodworking!