Are you ready to take control of your outdoor plumbing project? Installing outdoor plumbing lines might seem tricky, but with the right guide, you can do it yourself and save time and money.
Imagine having a smooth water flow for your garden, sprinkler system, or outdoor kitchen without relying on expensive professionals. This guide will walk you through each step clearly and simply, so you can avoid common mistakes and get the job done right the first time.
Keep reading, and you’ll discover the secrets to a hassle-free outdoor plumbing installation that works perfectly for your home.
Planning Your Outdoor Plumbing
Planning outdoor plumbing is key for a smooth installation. It helps you avoid mistakes and saves time.
Good planning includes picking a location, knowing your water needs, and following local rules.
Choosing The Right Location
Select a spot that is easy to access and safe from damage. Avoid areas where heavy vehicles drive or where roots grow.
Consider sunlight and freezing temperatures. Pipes in shady or cold places may need extra insulation.
Determining Water Needs
Estimate how much water your outdoor plumbing will use. Think about watering plants, washing cars, or filling pools.
- Count how many watering points you will have.
- Decide if you need hot water outside.
- Plan for future water needs or additions.
Checking Local Codes
Local rules often control outdoor plumbing. These rules protect water quality and safety.
| Code Aspect | What to Check |
|---|---|
| Permits | Do you need a permit to install plumbing? |
| Pipe Materials | Which materials are allowed by law? |
| Depth Requirements | How deep must pipes be buried? |
| Backflow Prevention | Is a backflow device required? |
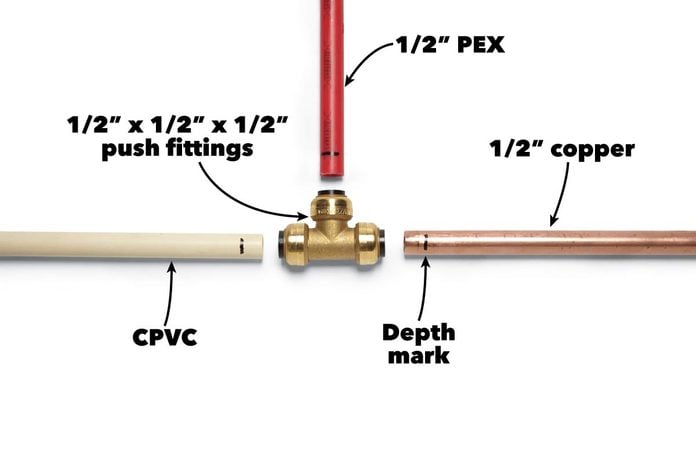
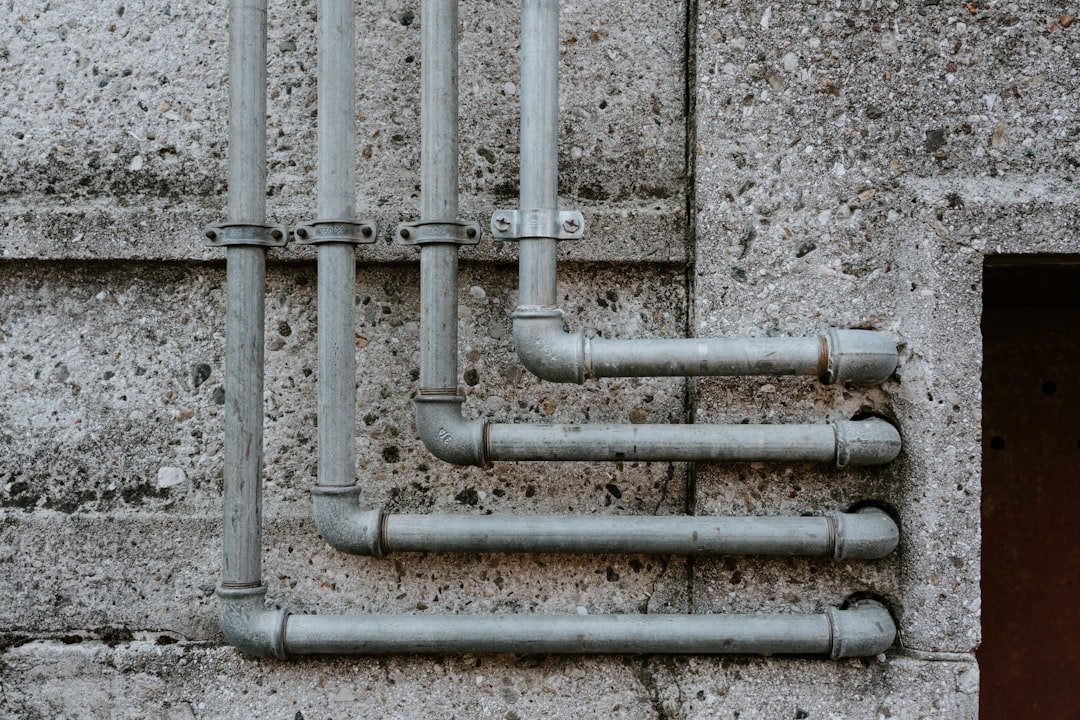
Credit: www.familyhandyman.com
Gathering Tools And Materials
Installing outdoor plumbing lines needs the right tools and materials. Getting these ready makes the job easier and safer.
Before you start, gather all tools, pipes, fittings, and safety gear. This guide helps you know what to collect.
Essential Tools List
You need some basic tools for outdoor plumbing. These help you cut, join, and secure pipes properly.
- Pipe cutter or hacksaw for cutting pipes
- Adjustable wrench for tightening fittings
- Pipe wrench for gripping and turning pipes
- Teflon tape for sealing threaded joints
- Measuring tape to measure pipe lengths
- Shovel for digging trenches
- Deburring tool to smooth pipe edges
- Marker to mark pipe cuts
Selecting Pipes And Fittings
Choose pipes and fittings that fit your outdoor water needs. They must resist weather and pressure.
| Material | Use | Notes |
| PVC | Water supply lines | Lightweight and easy to cut |
| PEX | Flexible water lines | Good for cold and hot water |
| Copper | Durable water lines | More expensive, resists corrosion |
| Galvanized steel | Outdoor water pipes | Strong but can rust over time |
| Brass fittings | Connect pipes | Resist corrosion, long-lasting |
Safety Gear
Wear safety gear to protect yourself during installation. It lowers injury risks from tools and materials.
- Gloves to protect your hands
- Safety glasses to shield your eyes
- Long sleeves and pants to guard skin
- Sturdy boots for foot safety
- Ear protection if using loud tools
Preparing The Site
Installing outdoor plumbing lines starts with good site preparation. A clean and organized area makes the work easier and safer.
Prepare the ground before you dig. This helps avoid problems later on.
Marking The Layout
Mark the exact path for your plumbing lines. Use spray paint or stakes to show the route clearly.
Check local codes and avoid underground utilities before marking. This prevents damage and delays.
- Use bright colors for visibility
- Mark bends and connection points
- Keep marks visible during digging
Digging Trenches
Dig trenches along the marked lines. Make sure they are deep enough to protect pipes from freezing.
Use proper tools like shovels or trenchers. Keep trench walls straight and clean for easy pipe placement.
- Depth depends on local frost line
- Width should fit the pipe and bedding
- Remove rocks and debris from trench bottom
Ensuring Proper Drainage
Check that trenches slope slightly downward. This helps water flow away from the pipes.
Good drainage prevents water from pooling around your pipes. It reduces damage risk.
- Slope trenches about 1/4 inch per foot
- Avoid low spots where water can collect
- Use gravel at trench bottom for drainage
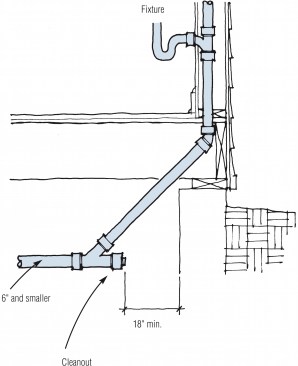
Credit: www.jlconline.com
Installing The Pipes
Installing outdoor plumbing lines requires careful planning and precision. Proper pipe installation ensures a long-lasting and leak-free system.
This guide focuses on laying pipes correctly, joining pipes and fittings, and sealing and testing joints to avoid common problems.
Laying Pipes Correctly
Start by digging trenches with the right depth and slope. The slope helps water flow smoothly and prevents blockages.
- Dig trenches at least 18 inches deep to avoid freezing.
- Keep a slope of about 1/4 inch per foot for drainage.
- Remove sharp rocks and debris from the trench.
- Use pipe supports or sand bedding for stability.
- Lay pipes straight and avoid unnecessary bends.
Joining Pipes And Fittings
Joining pipes correctly is essential to prevent leaks and breaks. Use the right fittings and tools for the pipe material.
| Pipe Type | Common Fittings | Joining Method |
| PVC | Elbows, Tees, Couplings | Solvent cement |
| Copper | Elbows, Unions, Tees | Soldering or compression |
| PEX | Crimp rings, Push-fit | Crimping or push-fit |
Sealing And Testing Joints
Seal each joint tightly to stop leaks. After sealing, test the system before covering the pipes.
- Use thread tape or pipe dope on threaded joints.
- Check solvent cement joints for full curing time.
- Pressurize the system and watch for drops in pressure.
- Look for visible leaks or water pooling around joints.
- Fix any leaks before backfilling trenches.
Connecting To The Water Supply
Connecting outdoor plumbing lines to the water supply is an important task. It ensures your pipes get water safely and work well.
Follow these simple steps to connect your outdoor plumbing correctly. Safety and care help avoid problems later.
Shutting Off Main Water
Before starting, turn off the main water supply. This stops water flow and prevents flooding.
Find the main shut-off valve. It is usually near the water meter or where the water line enters your home.
- Turn the valve clockwise to close it
- Check faucets to confirm water is off
- Wear gloves to protect your hands
Making The Connection
Use the right tools and materials for your pipe type. Common pipes are PVC, copper, or PEX.
Clean the pipe ends before joining. Apply primer and cement for PVC or solder for copper pipes.
- Measure and cut pipe to needed length
- Fit pipes together tightly
- Secure connections with clamps or fittings
Checking For Leaks
Turn the main water supply back on slowly. Watch all new connections for drips or wet spots.
Use a dry cloth to check each joint. Tighten or reseal any area with leaks.
- Open outdoor faucets to let air escape
- Look under ground covers or soil for wet spots
- Fix leaks immediately to avoid damage
Backfilling And Covering
After laying outdoor plumbing lines, you must backfill and cover the trenches. This step protects pipes and prevents damage.
Proper backfilling keeps the plumbing safe and helps restore your yard’s look.
Filling Trenches Safely
Fill trenches carefully to avoid pipe movement or damage. Use soft soil or sand around pipes first.
Compact the soil gently in layers to keep pipes stable and prevent future sinking.
- Start with a 6-inch layer of soft soil or sand around pipes
- Fill trench in 6-12 inch layers
- Compact each layer lightly with hand tools
- Do not use heavy machinery near pipes
Protecting Pipes From Damage
Cover pipes with protective materials before backfilling to stop cracks or breaks. Use pipe sleeves or foam if needed.
Avoid sharp rocks or debris in the backfill soil. These can puncture or damage pipes.
- Use sand or fine soil around pipes
- Remove rocks and large debris from backfill
- Place pipe sleeves on exposed pipe sections
- Check pipes for damage before covering
Restoring The Landscape
After backfilling, restore the area to its original state. Replace topsoil and reseed grass or plants.
Keep the soil loose on top for good plant growth. Water the area to help new plants grow well.
- Spread topsoil evenly over the filled trench
- Rake soil to level the surface
- Plant grass seed or lay sod on top
- Water regularly until plants grow strong
Maintenance Tips For Longevity
Outdoor plumbing lines need regular care to last longer. Proper maintenance helps avoid costly repairs and water loss.
Follow simple tips to keep your outdoor plumbing working well through all seasons.
Regular Inspections
Check your outdoor plumbing lines often. Look for leaks, cracks, or loose fittings. Early fixes stop bigger problems.
- Inspect pipes for damage or rust
- Look under sinks and around valves
- Check hose connections and drip emitters
- Test water pressure to find hidden leaks
- Clear debris around pipes and drains
Preventing Freezing
Freezing can crack pipes and cause serious damage. Protect your plumbing before cold weather arrives.
| Method | Description |
| Drain Water | Remove water from outdoor pipes and hoses |
| Insulate Pipes | Wrap pipes with foam sleeves or heat tape |
| Shut Off Valves | Turn off water supply to outdoor lines |
| Seal Openings | Close gaps in walls or crawl spaces near pipes |
| Use Heat Lamps | Keep areas with pipes warm during cold snaps |
Handling Repairs
Fix leaks and damages quickly. Small issues can grow if ignored. Use proper tools and materials for repairs.
- Turn off water before repairs
- Use pipe sealant or plumber’s tape on joints
- Replace cracked pipes instead of patching
- Test repaired section for leaks before use
- Call a professional if unsure about the fix
Credit: www.jlconline.com
Frequently Asked Questions
What Materials Are Best For Outdoor Plumbing Lines?
PVC and PEX pipes are ideal for outdoor plumbing due to durability and resistance to weather. Copper is also good but costlier. Choose materials that withstand temperature changes and avoid corrosion for longevity.
How Deep Should Outdoor Plumbing Lines Be Buried?
Outdoor plumbing lines should be buried below the frost line, typically 12 to 24 inches deep. This prevents freezing and pipe damage in cold weather. Check local codes for exact depth requirements.
Can I Install Outdoor Plumbing Lines Myself?
Yes, with basic plumbing knowledge and proper tools, you can install outdoor plumbing lines. Follow local codes, use quality materials, and ensure proper trenching and connections. For complex setups, consider hiring a professional.
How Do I Prevent Outdoor Pipes From Freezing?
Insulate outdoor pipes with foam sleeves or heat tape. Bury pipes below the frost line and seal any gaps near entry points. Drain outdoor lines before winter to avoid freezing and bursting.
Conclusion
Outdoor plumbing installation can seem daunting. With this guide, it’s manageable. Follow each step carefully. Use the right tools for each task. Ensure pipes are secure and fit well. Check connections to prevent leaks. Ask for help if you’re unsure.
Safety is always a priority. With patience, anyone can do it. Enjoy the benefits of a well-planned outdoor plumbing system. It enhances home value and convenience. Happy plumbing!