If you’re working with coax cables, knowing how to crimp coax connectors correctly can save you time and frustration. A bad connection can cause signal loss or interference, ruining your setup.
But don’t worry—this guide will walk you through each step clearly and simply. By the end, you’ll have the skills to make strong, reliable connections that last. Ready to get started and improve your cable work? Let’s dive in.
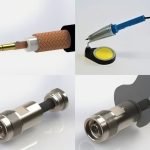
Tools Needed
Crimping coax connectors is simple with the right tools. Using proper tools helps you make secure connections.
Gather all necessary items before starting. This saves time and avoids mistakes during the process.
Types Of Coax Connectors
There are several coax connectors you might use. Common types include F connectors, BNC connectors, and RCA connectors. Each requires a slightly different crimping method.
- F Connectors:Used for cable TV and satellite.
- BNC Connectors:Used in video and radio frequency applications.
- RCA Connectors:Used for audio and video signals.
Crimping Tools Overview
You need a good crimping tool designed for coax connectors. This tool presses the connector onto the cable tightly.
| Tool | Purpose |
| Coaxial Cable Stripper | Removes the outer jacket without damaging the cable |
| Crimping Tool | Compresses the connector onto the cable |
| Cable Cutter | Cuts the coax cable cleanly |
| Compression Tool (optional) | Used with compression connectors for extra secure fit |
Additional Supplies
Besides tools, some extra supplies help make your work easier and neater. These include connectors, electrical tape, and a cleaning cloth.
- Coaxial connectors matching your cable type
- Electrical tape to secure and insulate connections
- Cleaning cloth to remove dust and dirt before crimping
- Heat shrink tubing for extra protection (optional)
Preparing The Cable
Preparing the cable is the first step to crimp coax connectors properly. You need to get the cable ready by removing some parts carefully.
This process helps the connector fit tightly and work well. Follow the right steps to avoid damage.
Stripping The Outer Jacket
Use a coaxial cable stripper tool to remove the outer jacket. Strip about half an inch from the end of the cable.
Be careful not to cut too deep. Damaging the inner layers can cause signal loss.
Trimming The Shield
After removing the outer jacket, fold back the braided shield gently. Trim any excess shield that might interfere with the connector.
Make sure the shield is neat and even. This helps create a good connection and prevents shorts.
Exposing The Center Conductor
Carefully strip the inner insulation to show the center conductor. Leave about a quarter inch of the conductor exposed.
Do not nick or bend the conductor. A clean, straight center conductor ensures a strong signal path.
Attaching The Connector
Attaching a coax connector is an important step in making a strong cable connection. This guide helps you attach the connector correctly.
Follow simple steps to ensure the connector fits well and works properly.
Inserting The Cable Into The Connector
First, strip the coax cable to expose the inner wire and shielding. Make sure not to cut too much.
Push the cable straight into the connector until it stops. The inner wire should go into the center pin.
Aligning The Components
Check that the cable is centered in the connector. The shielding should touch the connector body evenly.
Make sure the connector parts line up before crimping. Misalignment can cause poor connections.
- Inner wire straight and centered
- Shielding wrapped around connector sleeve
- Connector body flush with cable jacket
Ensuring Proper Fit
After inserting and aligning, the connector should fit tightly on the cable. Loose parts can cause signal loss.
Check that the connector does not move or slide on the cable. A good fit ensures strong, long-lasting connections.
Crimping Process
Crimping coax connectors is a key skill for building strong cable connections. The process joins the connector to the coax cable securely.
Good crimping ensures signal quality and prevents cable damage. Follow simple steps for a tight, reliable fit.
Selecting The Right Die
Choose a die that matches your coax connector size. Using the correct die avoids damage to the connector.
Check the die markings or guide to confirm it fits your cable type and connector brand.
- Match die size with connector diameter
- Use dies made for RG6, RG59, or your cable type
- Replace worn dies to keep crimps tight
Positioning The Connector
Slide the coax cable into the connector fully. The cable’s inner conductor should reach the connector tip.
Align the connector so the crimp area matches the die. Proper positioning prevents loose or uneven crimps.
- Strip cable to the correct length
- Insert cable until it stops inside the connector
- Check that braid and shield sit under the crimp ring
Applying The Crimp
Place the connector and cable inside the die jaws. Make sure they do not move before crimping.
Squeeze the crimp tool handles firmly until the die closes fully. This compresses the connector tightly on the cable.
- Hold the tool steady during the crimp
- Release handles slowly after full compression
- Inspect the crimp for even pressure and no gaps
Testing The Connection
After crimping coax connectors, it is important to test the connection. Testing helps ensure the signal will pass without problems. It can prevent future issues with your setup.
You can test the connection in a few simple ways. Check the physical look, use a tester, and verify signal quality. These steps confirm your work is solid.
Visual Inspection
Start by looking closely at the connector and cable. Make sure the connector is tight and the cable is not damaged. Look for any bends or loose parts.
Check that the metal parts inside the connector are clean and properly aligned. No wires should be outside the connector. Good visual condition means a better connection.
- Connector should fit snugly on the cable
- No exposed wires or frayed ends
- Metal contacts should be clean and straight
- No cracks or dents on the connector body
Using A Continuity Tester
A continuity tester checks if the wire inside the cable is complete. It tells if there are any breaks or shorts in the connection. This tool is simple and effective.
Connect one probe to the connector’s center pin and the other to the cable’s opposite end. If the tester shows continuity, the wire is good. Test the outer shield in the same way.
- Test center conductor for continuity
- Test outer shield for continuity
- No continuity means a break or loose connection
- Short circuit between center and shield must not exist
Signal Quality Check
Check the signal quality to ensure the connection works well. Use a signal meter or connect the cable to your device. Look for strong and stable signal readings.
If the signal is weak or cuts out, the connector may be bad. You might need to re-crimp or replace the connector. A good signal means your connection is ready to use.
- Use a signal meter for precise measurement
- Check for consistent signal strength
- Look for no signal drops or noise
- Test with the actual device if possible

Credit: m.youtube.com
Common Mistakes To Avoid
Crimping coax connectors needs care and attention. Mistakes can cause poor connections and signal loss.
Knowing common errors helps you get a better, more reliable result.
Over-crimping
Over-crimping means squeezing the connector too hard. This can damage the connector or cable.
Too much pressure may crush the cable or break the connector’s metal parts.
- Use a crimp tool with a proper pressure setting
- Apply just enough force to secure the connector
- Check the connection for tightness, not damage
Improper Cable Preparation
Failing to prepare the cable properly leads to weak connections. The cable must be stripped correctly.
Remove the right amount of insulation and avoid nicking the inner conductor.
- Strip the cable to the length recommended by the connector
- Keep the braid and shield intact until ready to fold back
- Handle the cable gently to avoid damage
Using Incorrect Tools
Using the wrong tools makes crimping hard and unreliable. Each connector type needs specific tools.
Crimp tools designed for other connectors can cause poor fits and signal problems.
- Match the crimp tool to the connector type
- Use a cable stripper made for coax cables
- Keep tools clean and in good condition
Tips For Durable Connections
Creating a strong connection with coax connectors ensures better signal quality. Durability depends on how you handle materials and tools. Careful steps can prevent future problems.
Use the right methods and maintain your equipment regularly. This guide shares simple tips to make your coax connections last longer.
Choosing Quality Materials
Selecting high-quality materials helps keep connections stable and resistant to wear. Look for connectors that fit well and cables with good shielding.
- Choose connectors made from corrosion-resistant metals like brass or nickel-plated steel.
- Pick cables with thick insulation to protect against damage and interference.
- Match connector size and type exactly to your cable for a tight fit.
- Avoid cheap or old materials that may degrade quickly.
Proper Storage Of Tools
Storing your crimping tools correctly keeps them in good shape and ready to use. This helps maintain precision and extends tool life.
| Tool | Storage Tip |
|---|---|
| Crimping Tool | Keep in a dry case to avoid rust |
| Strippers | Store with blades closed for safety |
| Connectors | Keep in labeled containers to avoid damage |
| Cable Cutters | Clean blades after use and oil joints |
Routine Maintenance
Regular maintenance of tools ensures consistent performance and clean crimps. Inspect and adjust tools often to avoid faulty connections.
Follow these maintenance tips:
- Check crimping jaws for wear or damage.
- Clean tools after each use to remove dirt and debris.
- Lubricate moving parts with light oil every few weeks.
- Tighten screws and bolts to keep tools stable.
- Test tools on scrap cable before important jobs.

Credit: www.youtube.com

Credit: mgs4u.com
Frequently Asked Questions
What Tools Do I Need To Crimp Coax Connectors?
You need a coaxial cable stripper, crimping tool, and the correct coax connectors. These tools ensure a secure, reliable connection without signal loss. Using the right tools saves time and improves cable performance.
How Do I Prepare Coax Cable For Crimping?
Strip the coax cable jacket carefully, exposing the inner conductor and shielding. Avoid nicking the conductor. Proper preparation ensures a tight, clean crimp and optimal signal transmission.
What Are Common Mistakes When Crimping Coax Connectors?
Common mistakes include improper stripping, loose crimps, and using wrong-sized connectors. These errors cause signal loss and connection failure. Following instructions and using quality tools prevent these issues.
How Can I Test A Crimped Coax Connector?
Use a cable tester or multimeter to check continuity and signal strength. Testing confirms a proper crimp and functional connection, helping avoid future troubleshooting. Perform tests after every crimp.
Conclusion
Crimping coax connectors seems tough at first. But practice makes it easy. Follow the steps carefully. Use the right tools. Quality matters. Check your connections. Ensure they are tight and secure. Loose connections cause problems. Double-check your work. Experience builds confidence.
Soon, you’ll crimp connectors like a pro. Remember, patience is key. Take your time. Avoid rushing. Mistakes happen when rushed. Enjoy the process. Each crimp is a step forward. You’re learning valuable skills. Skills that save time and money. Keep practicing.
You’ve got this!