
When you’re working on a woodworking project, getting a strong, clean bond between pieces is crucial. But how do you make sure your wood stays perfectly in place while the glue dries?
That’s where clamps come in. Using clamps to hold wood for gluing isn’t just helpful—it’s essential for a solid, lasting connection. You’ll discover simple yet effective ways to use clamps that will save you time, reduce mistakes, and improve the quality of your work.
Keep reading, and you’ll learn the secrets to making your glued joints stronger than ever before.
Types Of Clamps For Woodworking
Clamps hold wood pieces tightly while glue dries. They keep the wood steady and aligned.
Different clamps work better for different tasks. Knowing types helps pick the right one.
Bar Clamps
Bar clamps have a long metal bar with adjustable jaws. They hold wide wood pieces firmly.
They are good for large panels and furniture parts. You can adjust the clamp size easily.
Pipe Clamps
Pipe clamps use a pipe to hold wood pieces. The pipe length decides the clamp size.
They are strong and can handle heavy pressure. You can add longer pipes for big projects.
C-clamps
C-clamps have a C-shaped frame and a screw. They provide strong, focused pressure on wood.
These clamps work well for small jobs. They are easy to use and hold tight in corners.
Spring Clamps
Spring clamps use a strong spring to hold wood. They are quick to open and close.
These clamps are good for light pressure jobs. They work well for small or temporary holds.
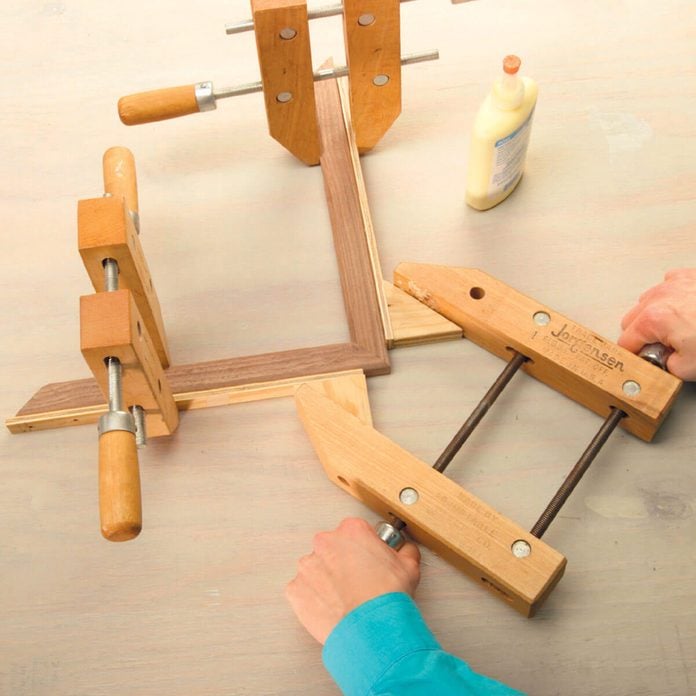
Corner Clamps
Corner clamps hold wood at right angles. They keep corners square while glue dries.
These clamps are perfect for frames and boxes. They make sure corners fit tightly together.

Credit: www.reddit.com
Choosing The Right Clamp For Gluing
Using the correct clamp helps hold wood pieces tightly while glue dries. This ensures strong and even bonds.
Selecting the right clamp depends on your project’s size and the pressure needed. The clamp’s material also matters for durability.
Matching Clamp Size To Project
Choose a clamp size that fits your wood pieces well. Small clamps work for thin or short boards.
Large clamps are best for wide or long panels. Using the right size avoids damaging the wood.
- Use small clamps for delicate or detailed work
- Use medium clamps for general woodworking projects
- Use large clamps for big or thick boards
Clamp Pressure Considerations
Clamp pressure must be enough to hold pieces together without squeezing out all glue. Too much pressure can damage wood.
Adjust clamp pressure carefully. Use clamps with adjustable tension for better control.
- Light pressure for thin or soft wood
- Medium pressure for most hardwoods
- High pressure for very thick or heavy pieces
Material And Durability
Clamps come in metal, plastic, and wood materials. Metal clamps last longer and hold more pressure.
Plastic clamps are lighter and less expensive but may break under high pressure. Wood clamps are gentle on surfaces but less common.
- Steel clamps: strong and durable for heavy work
- Plastic clamps: good for light projects and portability
- Wood clamps: protect wood surfaces, used for fine work
Preparing Wood Surfaces For Gluing
Using clamps to hold wood pieces firmly helps create strong bonds. Before clamping, prepare the wood surfaces well. Proper preparation ensures the glue sticks better and lasts longer.
Clean and smooth wood surfaces make gluing easier. Aligning the pieces correctly is important for a neat finish. Follow simple steps to get ready for gluing.
Cleaning And Sanding
Remove dirt, dust, and old glue from the wood. Use a clean cloth to wipe the surfaces before sanding. This helps the glue stick well.
Sand the wood to make it smooth and even. Use medium-grit sandpaper to roughen the surface slightly. This gives the glue more grip.
- Wipe wood with a damp cloth
- Remove grease or oils completely
- Sand with 120-150 grit sandpaper
- Clean dust off after sanding
Applying Glue Evenly
Spread glue evenly on one or both wood surfaces. Use a brush or a small spatula for smooth coverage. Avoid putting too much glue to prevent mess.
Cover the entire joining area with a thin layer. This helps the glue bond all parts well. Uneven glue can cause weak spots.
- Apply glue in thin, even layers
- Use a brush for hard-to-reach spots
- Do not overapply glue
- Check edges for full coverage
Aligning Pieces Correctly
Place wood pieces carefully before clamping. Make sure edges and corners line up perfectly. Good alignment prevents gaps and uneven joints.
Hold pieces steady as you bring clamps into position. Adjust the wood to fix any misalignment. Tighten clamps slowly to keep the pieces in place.
- Check edges for flush fit
- Align corners squarely
- Hold pieces steady when clamping
- Tighten clamps gradually
Proper Clamp Placement Techniques
Using clamps correctly helps glue wood pieces tightly. Proper placement stops gaps and weak bonds.
Clamping the wood right also avoids damage. It keeps your work clean and strong.
Spacing Clamps Evenly
Place clamps at equal distances along the wood. This spreads pressure and holds the pieces firmly.
Too few clamps or uneven spacing can cause weak joints. Use more clamps on longer pieces.
- Start clamps near the ends of the joint
- Space clamps evenly between the ends
- Use extra clamps if the wood is long
Avoiding Glue Squeeze-out
Clamp pressure can push glue out of the joint. Too much squeeze-out wastes glue and makes a mess.
Apply enough glue to cover the surface, but not too much. Tighten clamps slowly to control glue flow.
- Use a thin, even layer of glue
- Tighten clamps gradually, not all at once
- Wipe away extra glue with a damp cloth
Protecting Wood From Clamp Marks
Clamps can leave dents or marks on wood surfaces. Protect the wood to keep it smooth and clean.
Use soft pads or scrap wood between clamps and your project. This spreads the pressure and stops damage.
- Place scrap wood blocks under clamp jaws
- Use rubber or felt pads on clamps
- Check clamping pressure to avoid over-tightening
Applying The Right Clamping Pressure
Using clamps is key to holding wood pieces together while glue dries. The pressure must be just right to ensure a strong bond.
Too little pressure can cause weak joints. Too much pressure can damage the wood. Finding the right balance is essential.
Balancing Tightness And Wood Integrity
Clamps need to be tight enough to hold the wood firmly. But if they are too tight, they can leave marks or crush the wood fibers.
- Apply steady pressure, not sudden force.
- Check the wood surface often for dents or damage.
- Use clamps that fit the size and shape of your wood pieces.
- Tighten clamps gradually and evenly.
Using Cauls For Even Pressure
Cauls are flat boards placed between clamps and wood. They spread clamping force evenly and protect the wood surface.
| Benefit | Explanation |
| Even Pressure | Prevents glue gaps and uneven joints |
| Surface Protection | Stops clamp marks and dents |
| Better Alignment | Keeps wood pieces flush and straight |
Signs Of Over-clamping
Too much clamping pressure can harm your project. Watch for warning signs to avoid damage.
- Wood surface shows dents or crushed fibers
- Glue is squeezed out in large amounts
- Wood pieces shift or bend oddly
- Clamps feel very hard to tighten
Credit: www.familyhandyman.com
Managing Clamping Time
Using clamps to hold wood while glue dries is important. Proper clamping time makes joints strong and lasting.
If you remove clamps too soon, the bond may fail. Leaving clamps too long wastes time and can damage wood.
Recommended Clamping Durations
Different glues need different clamping times. Follow the glue maker’s instructions for best results.
- Wood glue usually needs 20 to 30 minutes of clamping
- Polyurethane glue requires about 1 to 2 hours clamping
- Epoxy glues can need 30 minutes to several hours clamping
- Longer clamping is safer for larger or heavier joints
Environmental Factors Affecting Dry Time
Temperature and humidity affect how fast glue dries. Warm, dry conditions speed up drying time.
Cold or damp air can slow drying. Adjust clamping time to match the environment around you.
- High humidity slows glue curing
- Low temperature makes glue set slower
- Good air flow helps speed drying
- Direct sunlight can dry glue unevenly
Removing Clamps Safely
Remove clamps only after glue sets enough to hold the joint. Check glue instructions for timing.
Loosen clamps gently to avoid damaging wood or the joint. Avoid twisting or forcing clamps off quickly.
- Wait full clamping time before removing clamps
- Loosen clamps slowly and evenly
- Check joint strength before heavy handling
- Clean off any excess glue after clamp removal
Common Gluing Mistakes To Avoid
Using clamps properly is important for wood gluing projects. Many people make avoidable errors that weaken the bond. Knowing these mistakes helps you get better results.
This guide covers three common problems: not enough clamp pressure, joints that do not line up, and poor glue coverage.
Insufficient Clamp Pressure
Not applying enough pressure can cause weak glue joints. Wood pieces may move or separate as the glue dries. It is important to tighten clamps just enough to hold parts firmly without damaging the wood.
- Check clamp tightness before glue sets
- Use enough clamps to spread pressure evenly
- Avoid overtightening that dents wood
- Replace worn clamp pads for better grip
Misaligned Joints
When wood pieces do not line up correctly, the glued joint is weak and looks unprofessional. Misalignment can cause gaps or uneven surfaces that affect strength.
| Common Causes | How to Fix |
|---|---|
| Improper clamp placement | Place clamps opposite each other |
| Uneven wood surfaces | Sand surfaces flat before gluing |
| Wrong glue amount causing slip | Apply glue evenly and avoid excess |
| Rushing clamp tightening | Adjust clamps slowly and check alignment |
Inadequate Glue Coverage
Not spreading glue evenly means some wood parts do not bond well. This weakens the joint and may cause parts to separate later. Cover all contact surfaces with glue for a strong hold.
- Use a brush or spreader to apply glue thinly and evenly.
- Cover the entire mating surface without leaving dry spots.
- Remove excess glue before clamping to avoid mess.
- Check edges and corners carefully for glue presence.
Maintenance And Care Of Clamps
Clamps are important tools for holding wood tightly while gluing. Taking care of them helps keep them strong and working well.
Regular maintenance stops damage and makes your clamps last longer. Clean, lubricate, and store clamps properly for best results.
Cleaning Clamp Surfaces
Clean clamp surfaces to remove glue, dirt, and dust. This helps clamps grip wood better and prevents marks on your work.
Use a soft cloth or brush to wipe off residue after each use. For stuck glue, use warm soapy water or a mild solvent carefully.
- Wipe jaws and pads clean
- Remove dried glue gently
- Dry clamps fully before storage
Lubricating Moving Parts
Lubricate screws, hinges, and sliding parts to keep clamps moving smoothly. This prevents rust and reduces wear.
Use light machine oil or a silicone spray for lubrication. Apply a small amount and wipe off extra oil to avoid dirt buildup.
- Apply oil on screw threads
- Lubricate pivot points and slides
- Operate clamps after oiling to spread it evenly
Storage Tips
Store clamps in a dry place to stop rust and damage. Keep them off the floor and away from moisture or direct sunlight.
Hang clamps on racks or pegboards to avoid bending and keep them easy to find. Group similar clamps together for quick use.
- Use wall hooks or shelves for storage
- Keep clamps dry and clean before storing
- Check clamps regularly for rust or damage

Credit: www.reddit.com
Frequently Asked Questions
What Types Of Clamps Work Best For Wood Gluing?
Bar clamps and pipe clamps are ideal for wood gluing. They provide strong, even pressure and adjust to various wood sizes. Quick-release clamps work well for smaller projects needing fast setup. Using the right clamp ensures secure bonding and prevents wood movement during drying.
How Long Should Clamps Hold Wood While Gluing?
Clamps should hold wood firmly for at least 30 minutes to 1 hour. This time allows the glue to set and bond properly. For stronger adhesives or thicker wood, clamps may need to stay on for several hours. Always follow the glue manufacturer’s recommendations.
Can Too Much Clamp Pressure Damage Wood?
Yes, excessive clamp pressure can squeeze out glue and dent wood. Apply firm but moderate pressure to avoid damaging the wood surface. Use protective pads between clamps and wood to distribute pressure evenly. Proper clamping ensures a strong bond without harming the material.
Why Is Even Pressure Important When Clamping Wood?
Even pressure prevents gaps and ensures a uniform glue bond. Uneven clamping can cause weak joints and misaligned pieces. Distribute clamps evenly along the wood to maintain consistent contact. This leads to a stronger, more durable glued joint.
Conclusion
Clamps are essential for wood gluing. They hold pieces securely in place. This ensures strong bonds without gaps or movement. Always choose the right type for your project. Consider the size and weight of the wood. Bar clamps work well for large pieces.
Spring clamps suit smaller tasks. Use enough pressure for a good bond, but not too much. This prevents wood damage. Practice makes perfect. Experiment with different clamps. Find what works best for your needs. Proper use of clamps leads to successful woodworking projects.
Enjoy crafting with confidence and precision.
