When you’re ready to make precise cuts in wood, how you mark your material can make all the difference. Imagine starting a project only to realize your measurements are off or your lines are unclear.
That’s frustrating and wastes both time and wood. You want your marks to be sharp, accurate, and easy to follow. This guide reveals the best ways to mark wood for cuts, helping you work smarter and create cleaner results every time.
Keep reading, and you’ll discover simple techniques and tools that can transform your woodworking experience.

Credit: www.familyhandyman.com
Choosing The Right Marking Tools
Marking wood correctly helps make accurate cuts. Picking the right tool affects your work quality.
Different tools suit different types of wood and projects. Learn about pencils, marking knives, gauges, and markers.
Pencils Vs. Marking Knives
Pencils are easy to use and common. They leave clear lines but can be wide or smudge.
Marking knives cut a thin line into the wood surface. This line is sharp and precise. It also helps guide saw blades better.
- Pencils:Good for rough marks and soft wood.
- Marking knives:Best for hard wood and fine joinery.
- Knives reduce line width and prevent wood fibers from tearing.
Using Marking Gauges
Marking gauges help make parallel lines along the wood edge. They keep lines straight and consistent.
| Feature | Benefit |
| Adjustable fence | Sets line distance from edge |
| Sharp pin or blade | Scores wood for clear lines |
| Consistent marking | Improves repeat cuts |
Chalk And Wax Markers
Chalk and wax markers show up well on rough or dark wood. They work where pencil marks might not be visible.
These markers can be wiped off or fade with sanding, so they suit temporary marks.
- Chalk markers give bright, easy-to-see lines.
- Wax markers resist moisture and last longer on oily wood.
- Both types work well outdoors or on rough surfaces.
Preparing The Wood Surface
Marking wood accurately needs a clean and smooth surface. Proper preparation helps lines show clearly and guides exact cuts.
Before marking, take time to make the wood ready. This improves your work and reduces mistakes.
Sanding For Smooth Marking
Sanding creates an even surface that holds pencil or chalk marks well. Rough or uneven wood can cause marks to smudge or fade.
- Use fine-grit sandpaper (120 to 220 grit) for best results.
- Sand along the wood grain to avoid scratches.
- Check the surface by running your hand over it to feel smoothness.
- Remove any high spots or rough patches with extra sanding.
Cleaning Dust And Debris
Dust and debris block clear lines and can cause measuring errors. Always clean the wood before marking.
| Cleaning Method | Purpose |
| Brush with a soft-bristled brush | Remove loose dust and small particles |
| Wipe with a dry cloth | Clear remaining dust without moisture |
| Use compressed air | Blow out dust from cracks and corners |
| Damp cloth wipe (if needed) | Remove sticky dirt; let wood dry fully before marking |
Techniques For Accurate Marking
Marking wood correctly helps make precise cuts. Accurate marks reduce mistakes and save time.
Use careful techniques and the right tools for clean, clear lines on your wood.
Measuring And Measuring Twice
Always measure wood before marking to get the right length or width. Then measure again to check accuracy.
Measuring twice helps catch errors early. It avoids cutting wood too short or too long.
- Use a reliable tape measure or ruler
- Hold the tool steady and straight
- Double-check numbers before marking
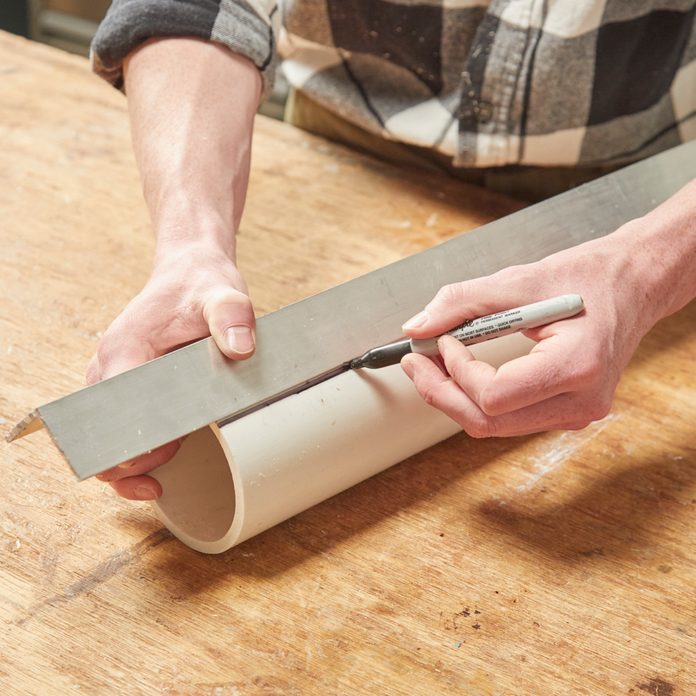
Using Straightedges And Squares
Straightedges help draw straight lines on wood surfaces. They guide your pencil or marking knife for a clean mark.
Squares help mark perfect right angles. They ensure your cuts fit together well in projects.
- Place the straightedge firmly on the wood
- Use a sharp pencil or marking knife for a thin line
- Align the square’s edges with the wood’s sides
Marking With Calipers And Dividers
Calipers measure small distances and mark precise points on wood. They work well for detailed work.
Dividers help transfer measurements from a ruler to wood. They keep markings consistent and equal.
- Adjust calipers to the exact size needed
- Use dividers to step off equal spaces along wood
- Press gently to avoid damaging the wood surface

Credit: www.familyhandyman.com
Marking For Different Types Of Cuts
Marking wood correctly is key to making clean cuts. Different types of cuts need different marking techniques.
Using the right marks helps you cut wood more accurately and reduces mistakes.
Crosscuts And Rip Cuts
Crosscuts cut wood across the grain. Rip cuts cut wood along the grain. Marking these cuts clearly is very important.
Use a sharp pencil or marking knife to draw a clear line. Mark the cut line on the face side for crosscuts and on the edge for rip cuts.
- For crosscuts, mark the line straight across the board.
- For rip cuts, mark the line along the board’s length.
- Use a square to keep lines straight and accurate.
Bevel And Miter Cuts
Bevel cuts are angled cuts on the edge of the wood. Miter cuts are angled cuts across the face. Both need precise marking.
Use a protractor or angle finder to mark the exact angle. Draw clear lines on the wood’s face and edge to guide the saw.
- Mark bevel cuts on the edge, showing the angle clearly.
- Mark miter cuts on the face, using a square and angle tool.
- Double-check angles before cutting to avoid mistakes.
Dado And Rabbet Cuts
Dado cuts are grooves across the wood’s width. Rabbet cuts are recesses along the edge. Both need careful marking for depth and width.
Use a marking gauge or ruler to set the width and depth. Mark the lines on the wood’s surface and edges clearly.
- Mark dado cuts across the board with width and depth lines.
- Mark rabbet cuts on the edge, showing both depth and width.
- Use a square to keep marks straight and even.
Tips For Maintaining Markings During Cutting
Marking wood before cutting helps guide precise cuts. Keeping these markings clear is important. Faded or smudged lines can cause mistakes.
This guide shares ways to keep your lines visible and sharp during cutting. Use simple tips to avoid losing your markings.
Enhancing Visibility Of Lines
Clear lines make cutting easier and more accurate. Use tools that produce dark, sharp marks on wood. A sharp pencil or fine tip marker works well.
Try these ideas to make lines stand out:
- Use a sharp pencil for thin, clear lines.
- Try a carpenter’s pencil for rough wood surfaces.
- Use a fine-tip permanent marker for dark lines.
- Draw lines twice for better visibility.
- Use contrasting colors on light or dark wood.
Avoiding Smudges And Worn Marks
Lines can fade or smudge during handling or cutting. Protect your markings to keep them clear until you finish the cut.
Try these tips to avoid smudges and worn marks:
- Spray a light coat of clear fixative over pencil lines.
- Avoid touching lines with oily or dirty hands.
- Use painter’s tape over lines to protect them.
- Cut slowly and carefully near markings.
- Redraw lines if they start to fade before cutting.
Common Mistakes And How To Avoid Them
Marking wood for cuts needs care and attention. Small mistakes can cause big problems.
Learn about common errors and simple ways to avoid them. This helps you save time and wood.
Misreading Measurements
Reading measurements wrong is a top mistake. It causes wrong cut lines and wasted wood.
- Double-check your measuring tape or ruler before use.
- Write down measurements clearly to avoid confusion.
- Measure twice before marking to ensure accuracy.
- Use a sharp pencil or marking tool for fine lines.
- Keep your tools clean and free from damage.
Improper Tool Handling
Wrong tool use leads to poor marks and unsafe cuts. Handle tools carefully to avoid errors.
| Tool | Common Mistake | How to Avoid |
| Measuring Tape | Slack or loose tape | Hold tape tight and straight |
| Pencil | Dull or thick tip | Sharpen pencil before use |
| Square | Misaligned edges | Check square edges for accuracy |
| Marking Knife | Uneven pressure | Use steady hand and light pressure |
Credit: www.familyhandyman.com
Frequently Asked Questions
What Is The Best Tool To Mark Wood For Cuts?
A sharp pencil is ideal for marking wood accurately. For precision, consider using a marking knife or carpenter’s pencil. These tools create clear, thin lines that guide your cuts perfectly.
How Do I Ensure Accurate Cut Lines On Wood?
Use a ruler or straightedge to draw straight lines. Measure twice before marking. Ensure the wood surface is clean for better visibility of the marks.
Can Different Marking Tools Affect Wood Cutting Quality?
Yes, the marking tool impacts cut accuracy. Fine lines from a marking knife reduce errors. Thick pencil marks may lead to imprecise cuts, affecting the final product.
Should I Use Chalk Or Pencil For Marking Wood?
Pencil marks are preferred for permanent, clear lines. Chalk is good for temporary marks but can smudge easily, causing inaccurate cuts. Choose based on the project needs.
Conclusion
Marking wood for cuts doesn’t need to be complicated. Use simple tools like pencils and rulers. They make your work precise. Try using chalk for dark wood. It helps marks stand out. Practice makes perfect. With time, you’ll get better.
Always measure twice, cut once. This saves time and reduces errors. Remember to keep your tools sharp. It ensures clean cuts and accurate marks. Following these tips can improve your woodworking projects. Happy woodworking!
