Are you ready to save time and money by installing your washing machine supply line yourself? It might sound tricky, but with the right steps, you can do it quickly and safely.
Imagine no more waiting for a plumber or dealing with leaks that cause headaches later. In this guide, you’ll find simple, clear instructions that anyone can follow. Keep reading, and you’ll have your washing machine connected and ready to go in no time.

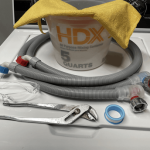
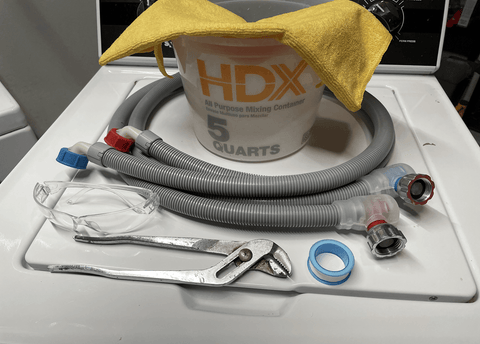
Credit: www.angi.com
Gather Necessary Tools
Before you install a washing machine supply line, you must gather the right tools. This helps make the job easier and safer.
Having all tools ready saves time and avoids frustration during installation.
Tools And Materials Checklist
- Adjustable wrench for tightening connections
- Teflon tape to seal pipe threads
- Supply hoses compatible with your washing machine
- Bucket to catch any water spills
- Towels or rags for cleanup
- Flashlight if working in a dim area
- Pipe cutter if hose trimming is needed
- Water shut-off valve to control water flow
Safety Precautions
Safety is important when installing supply lines. Follow these guidelines to avoid injury or damage.
| Precaution | Reason |
| Turn off water supply | Prevents flooding and water damage |
| Wear gloves | Protects hands from sharp edges |
| Check for leaks | Ensures connections are tight and secure |
| Use proper tools | Reduces risk of slipping or damaging parts |
| Work in a well-lit area | Improves visibility and accuracy |
Turn Off Water Supply
Before installing a washing machine supply line, you must turn off the water supply. This stops water flow and prevents leaks.
Turning off the water supply is an important safety step. It keeps your home dry and protects the pipes.
Locate Main Water Valve
Find the main water valve in your home. This valve controls all the water entering your house.
The valve is often near the water meter or where the main pipe enters your home. It may be in the basement, garage, or outside.
- Check near your water meter box
- Look in the basement or crawl space
- Search outside near the foundation
Shut Off Water Properly
Turn the main water valve clockwise to close it. This stops water from flowing into your home.
After closing the valve, open a faucet inside the house. This drains any water left in the pipes.
- Turn valve handle until it stops
- Open a faucet to release pressure
- Check that water has stopped flowing
Remove Old Supply Line
Removing the old washing machine supply line is an important first step. It ensures a clean and safe connection for the new line.
Follow these simple steps to disconnect the old supply line properly and avoid water leaks or damage.
Disconnect From Washing Machine
First, unplug the washing machine from the power outlet. This prevents any electrical hazards during the process.
Locate the supply line connection on the back of the machine. Use a wrench or pliers to loosen the nut that holds the supply line.
- Turn the nut counterclockwise to loosen it.
- Hold the supply line firmly while turning.
- Remove the supply line completely from the machine.
Disconnect From Water Source
Before removing the supply line from the water source, make sure to turn off the water supply valve.
| Valve Type | Action to Close |
| Gate Valve | Turn clockwise until tight |
| Ball Valve | Turn handle perpendicular to pipe |
Once the water is off, use a wrench to loosen the nut connecting the supply line to the valve. Remove the supply line carefully to avoid water spills.
Prepare New Supply Line
Installing a washing machine supply line starts with getting the new hose ready. This helps avoid leaks and problems later.
Take time to check the hose and add parts before attaching it to your machine.
Inspect New Hose
Look closely at your new supply hose before use. Check for cracks, holes, or weak spots.
A damaged hose can cause leaks or water damage. Make sure it is strong and flexible.
- Check both ends for secure fittings
- Look along the hose for cracks or holes
- Make sure the hose is not twisted or bent
- Ensure the hose length fits your space
Attach Washers
Washers help create a tight seal between the hose and the water source. They prevent leaks.
Put a washer inside each hose fitting before connecting the hose. Use new washers if possible.
- Use rubber washers made for washing machine hoses
- Place one washer at each hose end fitting
- Press washers firmly into the fittings
- Check washers for damage or wear before use
Connect Supply Line To Water Source
Connecting the washing machine supply line to the water source is easy. It helps provide water for your washer to work.
Make sure to follow the right steps to avoid leaks and ensure a solid connection.
Attach Hose To Valve
Locate the water valve near your washing machine space. This valve controls water flow to your machine.
Take the supply hose and screw it onto the valve’s threaded end. Turn the hose clockwise to attach it.
- Ensure the hose washer is inside the hose connector
- Start threading by hand to avoid cross-threading
- Do not force the hose if it feels stuck
Tighten Connections Securely
Use a wrench to tighten the hose connection to the valve. This prevents water leaks during washing.
Do not overtighten. Tighten just enough to stop leaks without damaging the parts.
- Hold the valve steady with one hand
- Turn the wrench slowly to tighten
- Check for leaks after turning the water on

Credit: www.reddit.com
Connect Supply Line To Washing Machine
Connecting the supply line to your washing machine is important for water flow. It needs to be done carefully to avoid leaks.
Follow simple steps to attach the hose securely and ensure a proper fit. This helps your machine work well.
Attach Hose To Machine Inlet
Locate the water inlet on the back of your washing machine. It is usually marked with blue or red colors.
Take the hose and screw it onto the inlet by turning it clockwise. Tighten it by hand until it feels secure.
- Do not cross-thread the hose when attaching
- Hand-tighten first to avoid damage
- Use a wrench only if needed, but avoid over-tightening
Ensure Proper Fit
Check that the hose fits snugly without gaps. A loose fit can cause water leaks during washing cycles.
After attaching, turn on the water supply and watch for drips. Tighten more if you see any leaks.
- Use a washer inside the hose connector for a tight seal
- Replace washers if worn or damaged
- Test by running a short wash cycle
Test For Leaks
After installing your washing machine supply line, checking for leaks is very important. Leaks can cause water damage and waste water.
Testing for leaks helps you find problems early. Fix leaks before using the washing machine to stay safe.
Turn On Water Supply
Slowly turn on the water supply valve. This lets water flow into the supply line. Watch the connection points closely.
Make sure water pressure is steady. Do not turn the valve on too fast. This can cause damage to pipes.
Check All Connections
Look carefully at all the places where the hose connects to the water supply and the washing machine. Check if any water is dripping.
- Feel for wet spots on hoses and fittings
- Look under the washing machine for puddles
- Use a dry cloth to find slow leaks
- Tighten any loose connections with a wrench

Credit: hawkeyedwaterdefense.com
Final Adjustments
After connecting your washing machine supply line, check all parts carefully. Final adjustments ensure a safe and leak-free setup.
Take time to secure hoses properly and clean your work area to avoid future problems.
Secure Hoses
Tighten the hose connections with a wrench but do not overtighten. Loose hoses can cause leaks, and overtightened hoses may crack.
- Check that the rubber washers are in place inside the hose connectors.
- Hand-tighten the hoses first, then use a wrench for a quarter turn.
- Make sure hoses are not kinked or bent sharply.
- Attach hoses to the washing machine and water supply securely.
Clean Work Area
Remove tools and debris from the area around the washing machine. A clean space reduces the risk of accidents and damage.
| Cleaning Task | Reason |
|---|---|
| Wipe floor dry | Prevents slipping and water damage |
| Clear away tools | Reduces tripping hazards |
| Dispose of old parts | Keeps space organized and safe |
Frequently Asked Questions
What Tools Are Needed To Install A Washing Machine Supply Line?
You need an adjustable wrench, Teflon tape, supply hoses, and a bucket. These tools ensure a proper, leak-free installation.
How Do I Connect The Supply Line To Water Valves?
Turn off water supply first. Wrap Teflon tape on valve threads. Attach hoses securely using an adjustable wrench.
How To Prevent Leaks In Washing Machine Supply Lines?
Use Teflon tape on all threaded connections. Tighten fittings securely but avoid over-tightening. Check for leaks after installation.
Can I Install Supply Lines Without A Plumber?
Yes, installation is simple with basic tools and instructions. Follow safety steps and ensure tight connections to avoid leaks.
Conclusion
Installing a washing machine supply line is a simple task. With clear steps, it’s easy to manage. Remember, safety comes first. Turn off the water supply before you start. Gather the right tools and materials. Follow the instructions carefully. Check for leaks after installation.
Tight connections prevent future problems. Regularly inspect your setup. It ensures long-term efficiency. A properly installed line saves water and energy. You can enjoy a hassle-free laundry experience. Keep your washing machine running smoothly. Now, you’re ready to tackle this household task confidently.
Happy washing!