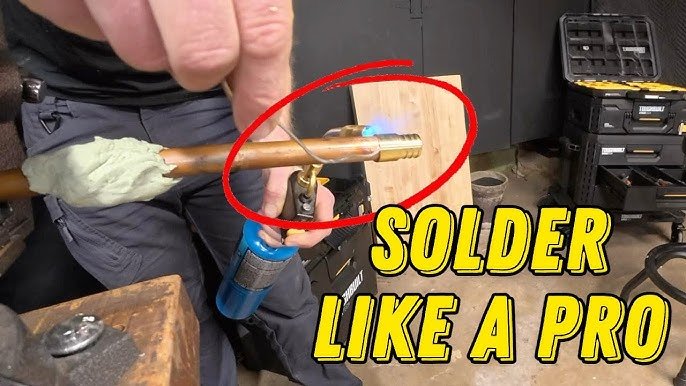
If you’re looking to improve your plumbing skills, learning how to solder PEX pipes is a smart move. Whether you’re fixing a leak or installing a new water line, knowing the right technique can save you time and money.
In this guide, you’ll discover simple, step-by-step instructions that make soldering PEX pipes easy—even if you’ve never done it before. By the end, you’ll feel confident handling your plumbing projects like a pro. Ready to get started? Let’s dive in.
Tools And Materials Needed
Soldering PEX pipes requires specific tools and materials. Using the right items ensures a strong, leak-free connection.
This guide covers the essential tools, types of PEX pipes, and the fittings and connectors you need.
Essential Tools
Having the correct tools makes soldering easier and safer. You need tools to cut, clean, and join the pipes.
- PEX pipe cutter to make clean cuts
- Deburring tool to smooth pipe edges
- PEX crimping tool or clamp tool
- Heat gun or torch for heating connections
- Pipe cleaning brush or sandpaper
- Measuring tape to measure pipe lengths
- Marker for marking cut points
Types Of Pex Pipes
PEX pipes come in different types, each with unique properties and uses. Knowing these helps you pick the right pipe.
| Type | Description | Common Use |
| PEX-A | Flexible and easy to bend | Residential plumbing |
| PEX-B | More rigid and less flexible | Commercial plumbing |
| PEX-C | Least flexible, cheaper | Basic water supply |
Fittings And Connectors
Fittings join PEX pipes to each other or to other plumbing parts. Use connectors that fit your pipe type.
- Crimp rings and crimp fittings
- Clamp rings and clamp fittings
- Push-fit fittings for easy installation
- Expansion fittings used with PEX-A
- Adapters for connecting to copper or PVC pipes
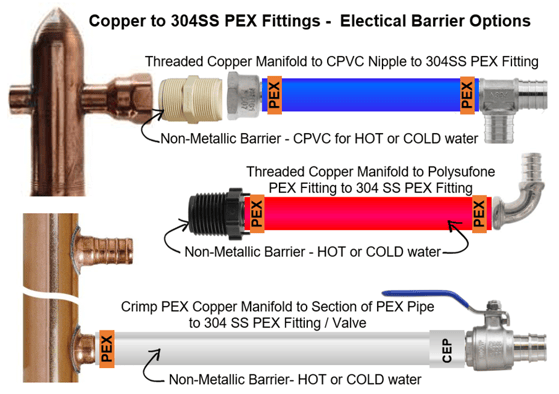
Credit: support.boshart.com
Preparing The Pex Pipe
Preparing the Pex pipe correctly helps ensure a strong solder joint. This process involves measuring, cutting, deburring, and cleaning the pipe. Each step must be done carefully for the best results.
Below are the key steps to prepare your Pex pipes before soldering.
Measuring And Cutting
Measure the length of pipe needed for your project. Use a tape measure to get an exact length. Mark the pipe clearly with a pencil or marker.
Cut the pipe straight using a sharp pipe cutter or a fine-toothed saw. Avoid crushing or deforming the pipe while cutting.
- Use a proper pipe cutter for clean cuts
- Cut at a right angle to the pipe length
- Double-check measurements before cutting
- Keep the cut edge smooth and even
Deburring The Edges
After cutting, remove any burrs or sharp edges inside and outside the pipe. Burrs can block water flow or cause poor connections.
Use a deburring tool or a round file to smooth the pipe edges. Turn the tool inside the pipe to clear the inner edges. Run it along the outside edge to remove rough spots.
Cleaning The Pipe Surface
Clean the pipe surface where you will solder. Dirt, oil, or moisture can weaken the joint. Use a clean cloth to wipe the pipe.
| Cleaning Material | Purpose |
| Sandpaper or Emery Cloth | Remove oxidation and roughen surface |
| Clean Cloth | Wipe away dust and debris |
| Pipe Cleaner or Alcohol | Remove oil and grease |
Choosing The Right Solder
Soldering PEX pipes needs the correct solder type to ensure a strong joint. Using the wrong solder can cause leaks or weak connections.
This guide explains the differences between lead-free and leaded solder. It also covers how to select the right flux for your job.
Lead-free Vs Leaded Solder
Lead-free solder is safer and meets modern plumbing codes. It does not contain toxic lead, making it better for drinking water systems. Leaded solder contains lead, which can be harmful if ingested.
| Solder Type | Lead Content | Safety | Use |
|---|---|---|---|
| Lead-Free Solder | 0% | Safe for drinking water | Preferred for PEX and copper pipes |
| Leaded Solder | Approximately 40% | Not safe for potable water | Used in non-potable systems or older pipes |
Flux Selection
Flux cleans and prepares pipe surfaces for soldering. It helps solder flow and bond properly. Choosing the right flux is key for strong joints.
- Use water-soluble flux for easy cleanup.
- Choose acid-based flux for heavy oxidation.
- Pick flux that matches your solder type.
- Avoid flux with corrosive chemicals for PEX.
- Check if the flux is rated for potable water systems.
Soldering Techniques
Soldering PEX pipes requires careful preparation and skill. The process joins pipes securely using heat and solder.
Following the right steps ensures a strong, leak-free connection. Focus on applying flux, heating, and soldering correctly.
Applying Flux
Flux helps clean the pipe and fitting surfaces. It also helps the solder flow smoothly when heated.
Use a brush to apply a thin, even layer of flux on both the pipe and fitting. Avoid applying too much.
- Clean pipe ends before applying flux
- Spread flux evenly on all joining surfaces
- Do not let flux drip or pool
Heating The Joint
Heat the joint evenly using a propane torch or suitable heat source. Move the flame around the pipe and fitting.
Heat until the flux sizzles and starts to melt. Avoid overheating or burning the pipe.
- Keep flame moving to avoid hot spots
- Heat until flux bubbles slightly
- Do not overheat PEX or fittings
Applying Solder
Touch the solder wire to the heated joint, not the flame. The solder melts and is drawn into the joint by capillary action.
Apply enough solder to fill the joint fully. Remove the heat and let the connection cool naturally.
- Feed solder at the joint’s edge
- Do not force solder with the flame
- Allow joint to cool without disturbance
Ensuring A Leak-proof Seal
Soldering PEX pipes requires care to avoid leaks. A tight, leak-proof seal keeps water flowing safely.
Proper inspection and testing help find problems early. Follow simple checks to ensure strong joints.
Inspecting The Joint
Look closely at the joint after soldering. Check for gaps or cracks between the pipe and fitting.
Make sure the solder flows evenly around the connection. Uneven solder can cause leaks over time.
- Remove any dirt or debris before soldering
- Use proper heat to melt the solder fully
- Check that solder covers the entire joint surface
- Look for shiny, smooth solder lines with no breaks
Testing For Leaks
After soldering, test the pipe by running water through it. Watch for any drips or moisture around the joint.
Use air pressure or water pressure tests if possible. These tests help find leaks that are hard to see.
- Turn on water slowly and watch the joint
- Check the pipe with a dry cloth for wet spots
- Use a pressure gauge for air or water tests
- Fix any leaks by reheating and adding solder
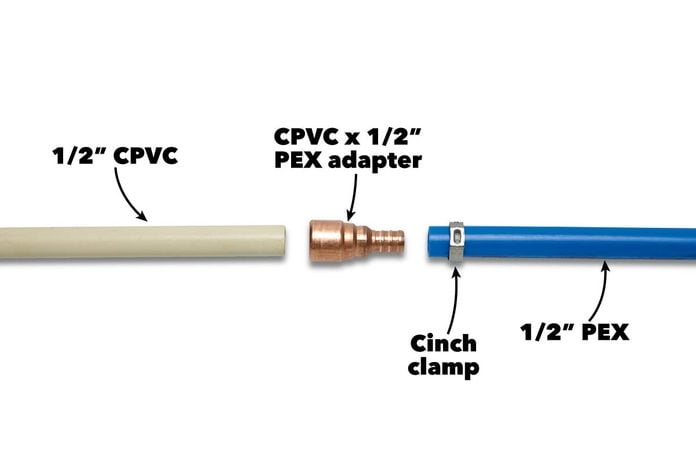
Credit: www.familyhandyman.com
Common Mistakes To Avoid
Soldering PEX pipes needs care to avoid leaks and damage. Many errors happen during the process.
Knowing what to avoid helps you get strong, lasting connections.
Overheating The Pipe
Heating PEX pipes too much can melt or deform them. This weakens the pipe and causes leaks.
Use a controlled heat source and move it quickly around the joint. Avoid holding the flame in one spot.
- Keep the heat source moving evenly
- Do not heat pipe for more than a few seconds
- Check pipe temperature often to avoid damage
Using Wrong Materials
Using incorrect solder or fittings can cause poor joints. Not all materials work with PEX pipes.
Always use fittings and solder designed for PEX. Avoid regular copper fittings or generic solder.
- Choose PEX-compatible fittings and connectors
- Use solder and flux made for plastic pipes
- Do not mix metals that cause corrosion
Maintenance Tips For Pex Pipes
Pex pipes are popular for plumbing because they are flexible and resistant to corrosion. Proper maintenance helps them last longer and work well.
Regular checks and quick repairs keep your plumbing safe and prevent leaks. Here are some tips to help you care for your Pex pipes.
Regular Inspection
Check your Pex pipes often for any signs of damage. Look for cracks, leaks, or bulges along the pipes.
Inspect the joints and fittings to make sure they are tight and secure. Catching problems early can save you from big repairs later.
- Look for wet spots or water stains near pipes
- Feel the pipes for soft or weak areas
- Check for discoloration or rust on metal fittings
- Listen for unusual sounds like dripping or hissing
Handling Repairs
If you find a leak or damage, fix it quickly to avoid water waste and damage. Small leaks can be sealed with special Pex repair clamps.
For bigger problems, you may need to cut out the damaged section and connect a new piece using proper fittings. Always turn off the water before starting repairs.
- Use a pipe cutter to make clean cuts
- Insert new fittings firmly to prevent leaks
- Check repair work by slowly turning water back on
- If unsure, call a professional plumber for help

Credit: www.thisoldhouse.com
Frequently Asked Questions
What Tools Do I Need To Solder Pex Pipes?
You need a Pex pipe cutter, a Pex crimp tool, fittings, and a heat gun or soldering kit. These tools ensure clean cuts and strong, leak-proof joints.
Can I Solder Pex Pipes Like Copper Pipes?
No, Pex pipes are joined using crimp or clamp fittings, not traditional soldering. Heat can damage Pex material, so use recommended connectors.
How Do I Prepare Pex Pipes Before Soldering?
Clean and cut Pex pipes squarely. Slide the fitting and ring on the pipe, then use a crimp tool to secure them properly.
Is Soldering Pex Pipes Safe For Plumbing?
Soldering Pex pipes directly is unsafe and ineffective. Use approved Pex fittings and tools to ensure safe, durable plumbing connections.
Conclusion
Soldering PEX pipes can be simple with the right steps. Always gather your tools first. Clean your pipes for a solid bond. Heat carefully and avoid overheating. Practice makes perfect, so start with spare pieces. Safety is key; wear gloves and goggles.
Check connections for leaks after finishing. Proper sealing ensures durability. Follow these tips for successful projects. With patience and practice, you’ll achieve great results. Remember, precision and care lead to quality work. Enjoy your plumbing endeavors with confidence!