
If you’ve ever tackled a woodworking or renovation project, you know how important it is to get smooth, even surfaces. A belt sander can be your best friend for this—but only if you know how to use it right.
In this guide, you’ll discover simple tips and tricks that will help you handle a belt sander safely and effectively. Whether you’re a beginner or just want to improve your skills, this post will give you the confidence to transform rough wood into a perfect finish.
Keep reading, and you’ll master your belt sander in no time.
Credit: www.familyhandyman.com
Choosing The Right Belt Sander
A belt sander is a powerful tool for smoothing wood and other materials. Picking the right one helps you work faster and safer.
It is important to know the types of belt sanders, key features, and belt grit options. These details guide you to the best choice.
Types Of Belt Sanders
There are several types of belt sanders. Each one suits different tasks and skill levels.
- Handheld Belt Sanders:Portable and good for small to medium jobs.
- Stationary Belt Sanders:Fixed on a bench for heavy or precise work.
- Detail Belt Sanders:Smaller with narrow belts for tight spaces.
Key Features To Look For
Choosing a belt sander means checking features that fit your needs. Some features improve comfort and control.
- Belt Size:Larger belts cover more area but are less precise.
- Power:Higher power helps with tougher materials.
- Variable Speed:Allows better control for different jobs.
- Dust Collection:Keeps your workspace clean and safe.
- Ergonomic Handle:Makes the tool easier to hold and use.
Selecting The Correct Belt Grit
Belt grit affects how smooth or rough the sanding will be. Use the right grit for your project.
- Coarse Grit (40-60):Removes a lot of material quickly.
- Medium Grit (80-120):Good for general sanding and shaping.
- Fine Grit (150-220):Used for finishing and smoothing surfaces.
Preparing Your Workspace
Setting up your workspace is important before using a belt sander. A clean and organized area helps you work safely and efficiently.
Take time to prepare everything you need. This makes sanding easier and reduces the chance of accidents.
Safety Gear Essentials
Wearing the right safety gear protects you from dust, noise, and flying debris. Always use protective equipment when sanding.
Essential gear includes items that cover your eyes, ears, and lungs. These reduce risks and keep you safe while working.
- Safety goggles or glasses to protect your eyes
- Dust mask or respirator to avoid breathing dust
- Ear plugs or earmuffs to protect your hearing
- Work gloves to protect your hands
- Close-fitting clothing to avoid loose fabric catching
Setting Up A Stable Work Area
Use a flat, sturdy surface to place your materials. A stable workbench helps you control the belt sander better.
Clear the area around your workspace. Remove anything that could cause you to trip or lose focus while sanding.
- Choose a workbench or table that does not wobble
- Keep the workspace clean and free of clutter
- Ensure good lighting to see your work clearly
- Keep cords and tools organized to avoid tripping
Securing Your Workpiece
Hold your workpiece firmly in place before sanding. This prevents slipping and gives you better control over the tool.
Use clamps or a vise to secure the item. This keeps your hands free and reduces the chance of injury.
- Use clamps to hold wood or other materials
- Check that the workpiece does not move before sanding
- Place padding under the workpiece to avoid damage
- Make sure the clamps do not block your sanding area
Operating The Belt Sander
Using a belt sander properly helps you get smooth and even surfaces. It is important to understand how to start, stop, and control the tool.
Following simple techniques will make your sanding work safer and more effective. This guide covers key tips on operating the belt sander.
Starting And Stopping Techniques
Start the belt sander before it touches the surface. Hold it firmly and keep it steady. To stop, lift the sander away and turn off the power.
- Plug in and check the belt tension.
- Hold the sander firmly with both hands.
- Turn on the sander and let it reach full speed.
- Gently lower it onto the workpiece.
- To stop, lift it off the surface first.
- Turn off the sander and wait for the belt to stop.
Maintaining Proper Pressure
Apply light to moderate pressure while sanding. Pressing too hard can damage the surface or wear the belt quickly. Let the sander do the work.
| Pressure Level | Effect |
| Too Light | Slow sanding, uneven finish |
| Proper | Smooth, even surface |
| Too Hard | Surface damage, belt wear |
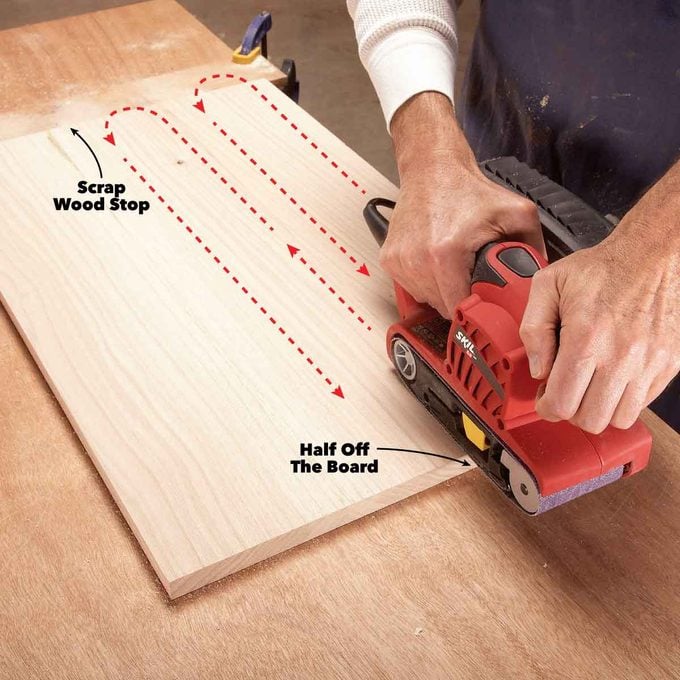
Moving The Sander Smoothly
Keep the sander moving at a steady pace. Do not stay in one spot too long. Move in the direction of the wood grain for best results.
- Start sanding at one end of the board.
- Push the sander forward smoothly and evenly.
- Keep the sander flat against the surface.
- Avoid jerky or fast motions.
- Overlap your passes slightly for full coverage.
Achieving A Smooth Finish
A belt sander helps you smooth wood fast. It removes rough spots and old finishes. Using it right gives a clean, even surface.
Focus on your sanding technique to avoid marks. Take time and follow proper steps. This guide shows how to get a smooth finish with a belt sander.
Sanding In The Right Direction
Always sand in the direction of the wood grain. This prevents scratches that cross the grain. Cross-grain sanding can leave marks that are hard to fix.
Move the sander evenly and smoothly. Avoid staying too long in one spot. This helps keep the surface flat and smooth.
Using Multiple Grits For Best Results
Start with coarse grit to remove rough areas fast. Then use medium grit to even out the surface. Finish with fine grit for a smooth look.
- Coarse grit: 40-60 for heavy sanding
- Medium grit: 80-120 for smoothing
- Fine grit: 150-220 for final finish
Changing grits gradually avoids deep scratches. It helps the wood look clean and polished.
Checking Your Progress
Stop often to check your work. Use your hand to feel the surface. Look closely for scratches or uneven spots.
If you see rough areas, sand them again gently. Good lighting helps spot problems early. Keep checking until the surface feels smooth and looks even.
Common Mistakes To Avoid
Using a belt sander can save time and effort in sanding projects. Avoiding common mistakes helps you get better results.
Learn about frequent errors and how to prevent them for safer, smoother sanding.
Over-sanding
Applying the belt sander too long in one spot can damage the wood. It creates uneven surfaces and removes too much material.
Move the sander evenly and keep it moving to avoid over-sanding. Let the tool do the work without pressing too hard.
Uneven Pressure Application
Pressing harder on one side of the belt sander causes uneven sanding. It can create grooves or dips on the surface.
Hold the sander flat and apply equal pressure across the entire base. This keeps the sanding smooth and consistent.
- Keep your hands steady
- Use both hands to control the sander
- Check the surface often for uniform sanding
Ignoring Safety Precautions
Not following safety rules can cause injuries or damage. Belt sanders create dust and move fast.
Always wear safety glasses and a dust mask. Keep fingers away from the sanding belt and work area clear.
- Wear protective gear like goggles and masks
- Check the sander and power cord before use
- Work in a well-ventilated space
- Keep your work area clean and free of clutter

Credit: www.familyhandyman.com
Maintaining Your Belt Sander
Keeping your belt sander in good shape helps it last longer. Regular care ensures it works well every time.
Simple maintenance tasks can prevent problems and keep your tool safe to use.
Cleaning And Storage Tips
After each use, clean dust and debris from your belt sander. Dust buildup can cause the machine to overheat.
Store the sander in a dry place to avoid rust and damage. Cover it to keep dirt away.
- Use a brush or compressed air to remove dust
- Wipe the surface with a dry cloth
- Keep in a cool, dry spot
- Cover to protect from dust and moisture
Replacing The Sanding Belt
Change the sanding belt when it wears out or tears. Using a worn belt can damage your work and the sander.
Make sure to turn off and unplug the sander before replacing the belt.
- Release the belt tension lever
- Remove the old belt carefully
- Place the new belt on the rollers
- Align the belt properly
- Re-engage the tension lever to tighten
Troubleshooting Common Issues
If your belt sander stops or runs poorly, check for simple problems first. Many issues come from belt or dust problems.
- Belt slips or moves off track: adjust the tension and alignment
- Sander does not start: check the power source and switch
- Overheating: clean dust from vents and motor
- Uneven sanding: replace worn belt or adjust pressure
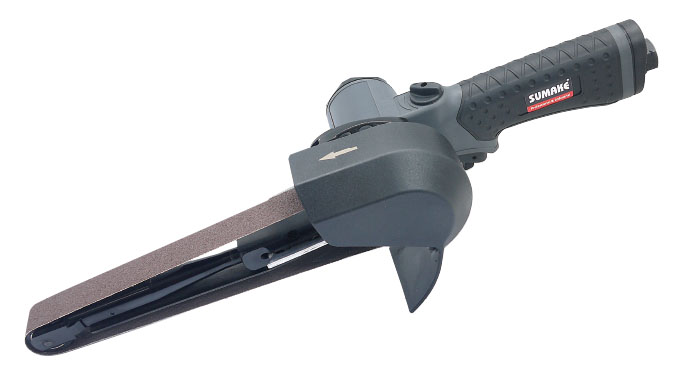
Credit: www.sumake.com
Frequently Asked Questions
What Materials Can I Sand With A Belt Sander?
A belt sander works well on wood, metal, and plastic. It removes rough surfaces quickly and smooths edges. Use the correct grit belt for each material to avoid damage and achieve optimal results.
How Do I Change A Belt Sander Belt Properly?
Turn off and unplug the sander first. Release the tension lever, remove the old belt, and fit the new one aligned with the rollers. Re-engage the tension lever and test the belt for proper tracking before use.
What Safety Tips Should I Follow Using A Belt Sander?
Always wear protective eyewear and a dust mask. Keep hands away from the moving belt and secure your workpiece. Use the sander on a stable surface and avoid loose clothing that might catch in the tool.
How Can I Prevent Belt Sander Belts From Slipping?
Ensure the belt is properly tensioned and aligned on the rollers. Clean the rollers regularly to remove dust buildup. Using the correct belt size and quality also reduces slipping and improves sanding efficiency.
Conclusion
Using a belt sander can be simple and rewarding. It smooths rough surfaces with ease. Remember to wear safety gear. Always secure your workpiece firmly. Regularly check the belt’s condition. This ensures better performance. Adjust the speed for different materials.
Practice on scrap pieces first. This helps build confidence. Keep a steady hand while sanding. Your projects will look professional. Now, you have the basics down. Happy sanding!
