If you want your cabinets to look professional and last for years, mastering dovetail joints is a game-changer. Cutting these joints might seem tricky at first, but with the right steps, you can create strong, beautiful connections that will impress anyone who sees your work.
In this guide, you’ll learn exactly how to cut dovetail joints for cabinets, even if you’ve never tried it before. By the time you finish reading, you’ll feel confident and ready to tackle your next woodworking project with precision and skill.
Ready to make your cabinets stand out? Let’s get started.
Tools Needed For Dovetail Joints
Cutting dovetail joints for cabinets requires specific tools. These tools help you create tight and strong joints.
Choosing the right tools makes the job easier and more precise. Both hand tools and power tools can be used.
Essential Hand Tools
Hand tools give you full control over cutting dovetails. They are great for fine detail work and beginners.
These tools help you mark, saw, and chisel the joints by hand.
- Dovetail saw – for precise cutting of pins and tails
- Chisels – to clean and shape the joint surfaces
- Mallet – to tap chisels safely
- Marking knife – to score lines for accuracy
- Clamps – to hold wood pieces firmly while working
Power Tools Options
Power tools speed up the cutting process and reduce hand fatigue. They offer more consistent results.
Some power tools are designed specifically for making dovetail joints.
- Dovetail jig and router – guides the router to cut perfect tails and pins
- Band saw – for rough cuts before cleaning with chisels
- Scroll saw – for detailed cutting of pins and tails
- Power drill with drill bits – for removing waste wood between pins and tails
Measuring And Marking Tools
Accurate measuring and marking are key to tight dovetail joints. These tools help you plan and mark cuts.
Good tools make sure your pins and tails fit perfectly together.
- Combination square – measures and marks right angles
- Marking gauge – sets consistent depth and spacing for cuts
- Pencil – for general marking
- Try square – checks the squareness of wood edges
- Calipers – measure thickness and spacing precisely
Choosing The Right Wood
Selecting the right wood is key to strong dovetail joints for cabinets. The wood must be durable and easy to work with. This guide helps you pick the best wood type for your project.
Understanding wood types, grain direction, and preparation helps create neat and lasting joints. Let’s look at important factors to consider before cutting.
Hardwood Vs Softwood
Hardwoods come from broadleaf trees and are usually stronger than softwoods. They hold dovetail joints well and resist dents. Softwoods are lighter and easier to cut but may wear out faster.
- Hardwoods: oak, maple, cherry, walnut
- Softwoods: pine, cedar, fir, spruce
- Hardwoods suit fine furniture and lasting cabinets
- Softwoods are good for practice or light-use pieces
Wood Grain Considerations
Wood grain affects strength and appearance of dovetail joints. Straight grain cuts cleaner and fits tightly. Avoid twisted or uneven grain that can cause weak joints.
| Grain Type | Effect on Joints | Example Wood |
|---|---|---|
| Straight Grain | Strong, easy to cut, tight fit | Maple, Cherry |
| Cross Grain | Hard to cut, weak joints | Oak (in some boards) |
| Interlocked Grain | Good strength, tricky to cut | Mahogany |
Wood Preparation Tips
Prepare wood carefully before cutting dovetails. Proper preparation improves joint accuracy and fit. Always check the wood for defects first.
- Inspect wood for knots, cracks, or warping
- Plane and sand surfaces smooth for clean cuts
- Mark grain direction clearly on each piece
- Cut test joints on scrap wood before the final cut
- Keep wood dry to avoid swelling or shrinking
Types Of Dovetail Joints
Dovetail joints are popular in cabinet making. They provide strong and lasting connections. Different types of dovetail joints suit different needs and looks.
Below are three main types of dovetail joints. Each type has unique features and uses in cabinet construction.
Through Dovetail
The through dovetail joint is visible from both sides. The pins and tails fit tightly together. This joint is strong and decorative.
- Pins and tails extend through the joint.
- Common in box and drawer construction.
- Easy to check fit and alignment.
- Offers excellent mechanical strength.
- Often used where joint visibility is desired.
Half-blind Dovetail
Half-blind dovetail joints hide the tails inside the joint. Only pins show on the front face. This joint is popular for drawer fronts.
| Feature | Description |
| Visibility | Pins visible, tails hidden |
| Strength | Strong but less visible than through dovetail |
| Use | Drawer fronts and cabinets |
| Appearance | Clean front surface |
Sliding Dovetail
Sliding dovetail joints connect boards by sliding one into the other. This joint adds strength along the joint length. It is good for shelves and panels.
Benefits of sliding dovetail joints:
- Provides strong resistance to pulling forces
- Offers alignment during assembly
- Good for mounting shelves inside cabinets
- Leaves clean edges without visible pins or tails

Credit: www.youtube.com
Marking The Dovetail Layout
Marking the dovetail layout is the first step in cutting strong cabinet joints. It shows where to cut the tails and pins on the wood pieces.
Clear marks help you cut accurately and fit the joint perfectly. Use sharp tools and take your time to mark carefully.
Setting The Tail Angle
The tail angle controls the shape of the dovetail joint. It affects strength and appearance of the cabinet corners.
Common angles are between 7 and 14 degrees. Softer woods use steeper angles for better hold. Hardwoods use lower angles.
- Choose 7 to 14 degrees for the tail angle
- Use steeper angles for soft wood
- Use gentler angles for hard wood
- Mark the angle clearly with a bevel gauge
Marking Tails And Pins
Start by marking the tails on one board. Use a pencil and ruler to draw the tail shapes based on your angle.
Next, place the tail board on the pin board and trace the tails onto it. This ensures the pins match the tails exactly.
- Draw tails on the tail board first
- Use a marking knife for sharp lines
- Fit the tail board over the pin board
- Trace tails onto the pin board
- Double-check all lines before cutting
Using Templates And Guides
Templates and guides help make consistent marks for dovetail joints. They save time and reduce mistakes.
Use a dovetail template with the correct angle to trace tails and pins. A marking gauge can also help mark lines parallel to edges.
- Choose a template with your desired tail angle
- Clamp the template securely to the wood
- Use a sharp pencil or knife to trace outlines
- Use a marking gauge for edge lines
- Templates improve speed and accuracy
Cutting The Tails
Cutting the tails is a key part of making dovetail joints for cabinets. The tails lock the joint and give it strength.
To cut good tails, you need careful marking, sawing, and chiseling. This guide shows how to do it right.
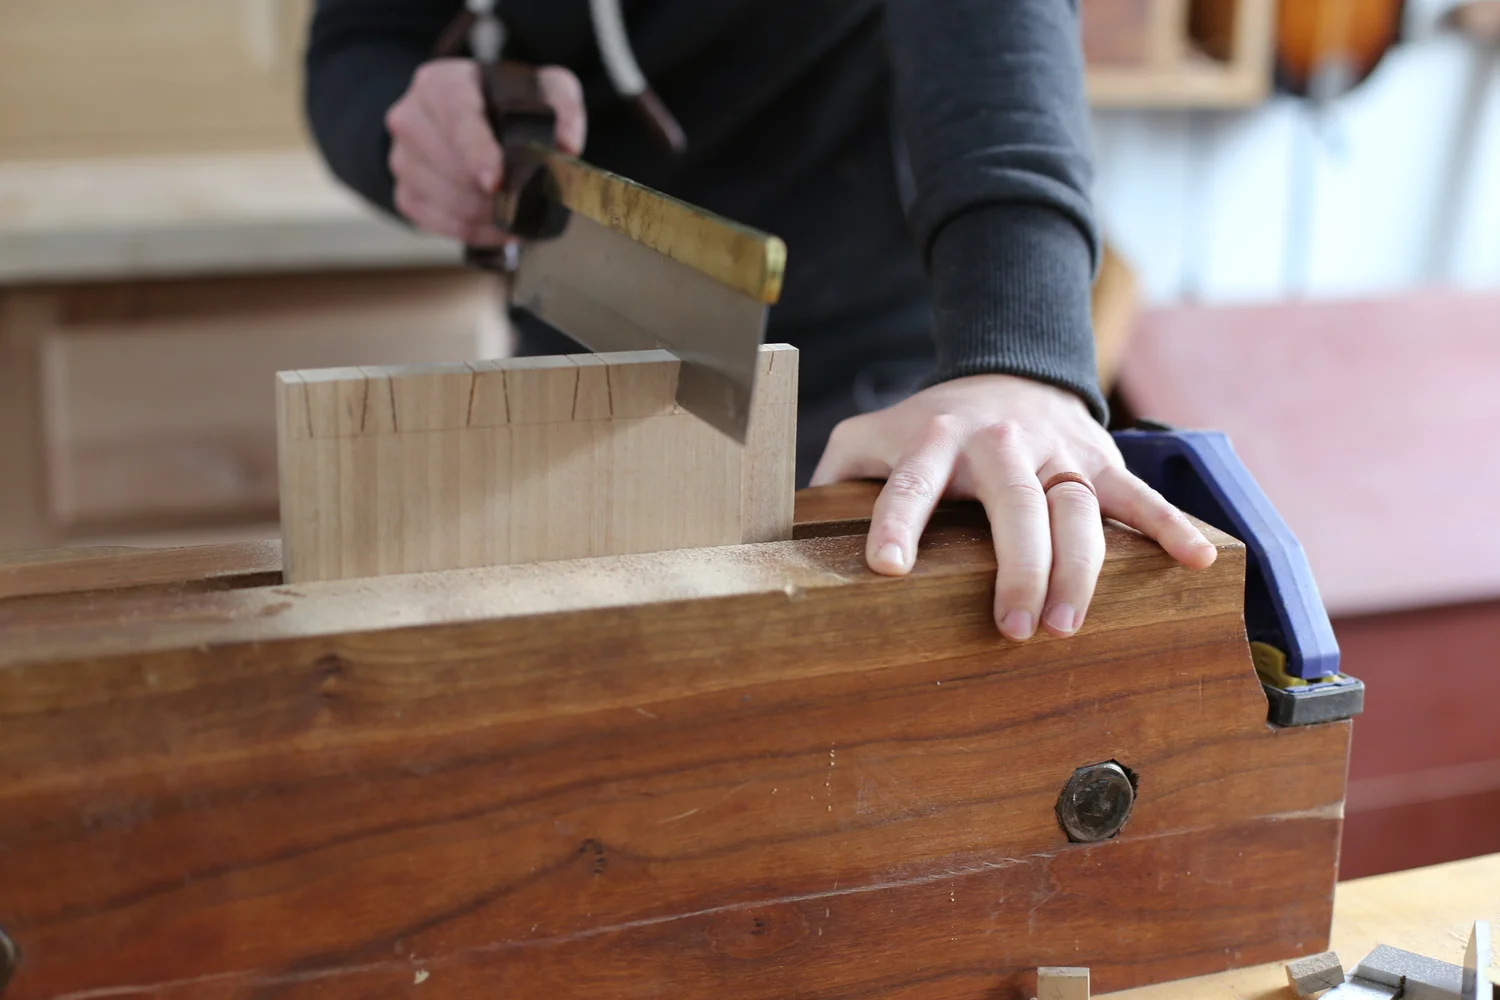
Sawing Techniques
Start by marking the tails clearly on the wood. Use a sharp dovetail saw to cut along the lines.
Cut slowly and steadily to keep the cuts straight. Saw on the waste side of the line for a tight fit.
- Hold the saw at a slight angle for better control
- Keep your wrist firm but relaxed
- Use short, smooth strokes to avoid splintering
- Check the cut depth often to avoid cutting too deep
Chiseling Tips
After sawing, remove the waste wood between the tails with a sharp chisel. Work carefully to avoid damage.
Start by making shallow cuts along the baseline. Then clean out the center by chopping carefully.
- Use a mallet to tap the chisel gently
- Keep the chisel sharp for clean cuts
- Work from the outside edges toward the center
- Test fit the joint often to check progress
Avoiding Common Mistakes
Many beginners cut tails too wide or uneven. This makes the joint loose or weak.
Watch your lines and cut slowly. Do not rush the sawing or chiseling steps.
- Don’t cut on the wrong side of the line
- Avoid removing too much wood at once
- Keep your tools sharp and clean
- Check measurements before cutting

Credit: m.youtube.com
Cutting The Pins
Cutting pins is a key part of making dovetail joints for cabinets. Pins fit into tails to hold pieces tightly together.
It needs careful measuring and cutting to make strong, neat joints. Follow these steps to cut pins well.
Transferring Tail Layout
First, place the tail board on the pin board. Align edges carefully to match the joint.
Use a marking tool to trace the shape of the tails onto the pin board. This shows where to cut pins.
- Clamp boards to keep them steady
- Use a sharp pencil or marking knife
- Mark both sides of the pin board clearly
Sawing And Chiseling Pins
Cut along the lines with a fine saw. Saw carefully to avoid cutting outside the marks.
Remove waste wood with a sharp chisel. Work slowly to keep the pin edges straight and clean.
- Cut just outside the lines for a tight fit
- Use a mallet to tap the chisel gently
- Clean up corners and inside edges
Fitting And Adjustments
Test fit the pins into the tails. The fit should be snug but not too tight or loose.
Trim pins with a chisel or sandpaper if needed. Adjust slowly and check the fit often.
- Remove small amounts for better control
- Check alignment of both boards
- Ensure pins slide in without force
Assembly And Finishing
Cutting dovetail joints for cabinets is only part of the process. Proper assembly and finishing make the joint strong and neat.
Take your time during assembly to ensure a tight fit. Finishing adds the final touch to your cabinet’s look.
Dry Fitting The Joint
Dry fitting means putting the dovetail joint together without glue. This step checks if the pieces fit well.
Make sure the tails and pins slide in snugly without forcing. Fix any tight spots by sanding or trimming gently.
- Assemble the joint by hand
- Check for gaps or loose areas
- Adjust fit with light sanding or trimming
- Ensure all parts line up evenly
Gluing And Clamping
Apply glue evenly on all joint surfaces. Use enough glue but avoid excess that can squeeze out.
After gluing, clamp the joint firmly. Clamping holds the pieces in place while the glue dries.
- Use a wood glue suitable for cabinets
- Spread glue on tails and pins evenly
- Clamp the joint with moderate pressure
- Wipe away any glue squeeze-out immediately
- Allow glue to cure fully before removing clamps
Sanding And Final Touches
Once the glue is dry, remove clamps carefully. Sand the joint area smooth to blend the wood.
Use fine-grit sandpaper to avoid damaging the wood. Clean dust before applying finish like paint or varnish.
- Sand joint edges flush with the wood surface
- Use 180 to 220 grit sandpaper for best results
- Remove dust with a brush or cloth
- Apply finish according to your cabinet style

Credit: www.youtube.com
Advanced Tips For Precision
Cutting dovetail joints for cabinets demands careful attention. Precision ensures strong, beautiful joints that last.
These tips help you improve your technique and get the best results with dovetail joints.
Using A Dovetail Jig
A dovetail jig guides your saw and router to make accurate cuts. Choose a jig that fits your project size.
Clamp the wood firmly and check the jig settings before cutting. Use sharp router bits for clean edges.
- Set the jig according to the wood thickness
- Use stop blocks to keep consistent lengths
- Test cuts on scrap wood before the final piece
- Keep the router steady and move smoothly
Improving Speed And Accuracy
Speed comes with practice, but accuracy should never be rushed. Prepare your materials and tools well.
| Tip | How It Helps |
| Use sharp blades | Reduces tear-out and rough edges |
| Mark joints clearly | Prevents mistakes in alignment |
| Keep consistent pressure | Ensures smooth, even cuts |
| Work in good light | Improves visibility and precision |
Troubleshooting Fit Issues
Fit problems happen when joints are too loose or tight. Adjust your technique to fix these problems.
- Check your jig settings if joints are loose
- Make shallower cuts if the joint is too tight
- Slightly sand tight areas for a better fit
- Use a mallet gently to test assembly
Frequently Asked Questions
What Tools Are Needed For Cutting Dovetail Joints?
You need a dovetail saw, chisels, marking gauge, and a mallet. A pencil and square help with accurate markings. Power tools like a router can speed the process.
How Do You Mark Dovetail Joints Accurately?
Use a marking gauge to set the depth. Mark pins and tails with a pencil. Ensure precise measurements for tight-fitting joints.
What Is The Best Wood For Dovetail Joints?
Hardwoods like oak, maple, and cherry work best. They provide strength and clean cuts. Softwoods may splinter or wear faster.
How Long Does It Take To Cut Dovetail Joints?
It varies with skill and tools. Beginners may take 1-2 hours per joint. Experienced woodworkers can complete them in under 30 minutes.
Conclusion
Creating dovetail joints takes practice and patience. Start with basic tools and techniques. Focus on accuracy and precision in each step. Measure twice, cut once, as they say. With time, your skills will grow stronger. Don’t rush the learning process.
Each joint is a chance to improve. Soon, your cabinets will showcase your craftsmanship. Remember, woodworking is both art and skill. Enjoy each project and watch your abilities expand. By following these steps, you’ll create durable and beautiful dovetail joints.
Keep learning and refining your technique. Happy woodworking!