
If you work with metal tubing, knowing how to create perfect flares is a skill you can’t afford to miss. Using a tubing flaring tool might seem tricky at first, but once you get the hang of it, you’ll save time and avoid leaks in your pipes.
Imagine finishing your project with clean, secure connections that look professional every time. In this guide, you’ll discover simple, step-by-step instructions to master your tubing flaring tool quickly and confidently. Keep reading to learn how to make your tubes fit perfectly and keep your work strong and reliable.
Choosing The Right Flaring Tool
Using a tubing flaring tool helps create strong and leak-free connections. Picking the right tool is important for good results. This guide explains key points to consider before buying one.
Look at the type of flare, the material of your tubing, and the tool’s quality. These factors affect how well the tool works and how long it lasts.
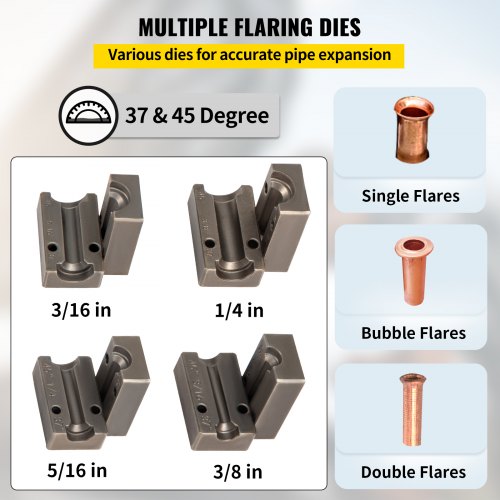
Types Of Flaring Tools
There are several flaring tools. Each suits different flare styles and tubing sizes. Choose one that fits your project needs.
- Single flare tools: Make one flare at a time, good for simple jobs.
- Double flare tools: Create two-layer flares for stronger seals.
- Bubble flare tools: Form rounded flares used in some brake lines.
- Multi-die tools: Work with many tubing sizes and flare types.
Material Compatibility
Check the tubing material before choosing a tool. Different metals need different care to avoid damage.
| Material | Recommended Tool Type | Notes |
| Copper | Single or Double Flare Tool | Soft, easy to flare |
| Aluminum | Double Flare Tool | Fragile, needs gentle handling |
| Steel | Heavy-duty Multi-die Tool | Hard, requires strong clamps |
| Brass | Single Flare Tool | Soft but brittle, flare carefully |
Tool Quality And Durability
Buy a tool made from strong materials. Quality tools last longer and give cleaner flares. Look for features that improve ease of use.
- Steel frames resist bending and wear
- High-quality dies reduce flare cracking
- Ergonomic handles cut down hand fatigue
- Adjustable clamps fit various tubing sizes
- Replaceable parts extend tool life
Preparing The Tubing
Preparing the tubing is important for a good flare connection. You need to measure, cut, and clean the tubing carefully. This ensures a tight and leak-free seal.
Follow the steps below to get the tubing ready before using the tubing flaring tool.
Measuring And Cutting Tubing
Measure the tubing length you need carefully. Mark the spot clearly with a marker. Use a tubing cutter to make a clean, straight cut. Avoid crushing or deforming the tubing.
- Use a tape measure for accuracy.
- Mark the tubing with a permanent marker.
- Place the tubing cutter on the mark.
- Tighten the cutter and rotate to cut.
- Check the cut end for straightness.
Deburring The Edges
After cutting, the tubing edges may have burrs. Burrs can damage the flare and cause leaks. Remove them using a deburring tool or a fine file. Smooth edges help form a proper flare.
| Tool | Purpose |
|---|---|
| Deburring tool | Removes inside and outside burrs |
| Fine file | Smooths sharp edges carefully |
| Sandpaper | Polishes edges for a clean finish |
Cleaning The Tubing Surface
Clean the tubing surface before flaring. Dirt or oil can weaken the connection. Use a clean cloth and a mild cleaner to wipe the tubing. Make sure it is dry and free of debris.
- Wipe tubing with a clean, dry cloth.
- Use isopropyl alcohol to remove oils.
- Let tubing air dry completely.
- Inspect for any remaining dirt or damage.
Setting Up The Flaring Tool
Using a tubing flaring tool starts with setting it up correctly. A proper setup makes sure the flare is even and strong.
Follow the steps to clamp the tubing, adjust the tool, and align everything before flaring.
Clamping The Tubing Securely
Place the tubing in the clamp slot that matches its size. Tighten the clamp so the tube does not move.
Make sure the tubing end sticks out just enough for the flare to form. Too much or too little will cause problems.
- Choose the right clamp hole for tubing diameter
- Insert tubing fully and align the end with the clamp edge
- Tighten the clamp screws firmly
- Double-check tubing does not spin or slide
Adjusting The Tool For Flare Size
Set the flaring tool’s cone to match the flare size you need. Most tools have size marks for guidance.
Turn the tool’s handle slowly to push the cone into the tubing end. Stop when the flare shape is clear and smooth.
- Check tubing size to pick flare diameter
- Adjust cone position using the tool’s scale
- Apply steady pressure when flaring
- Avoid forcing the tool too hard
Ensuring Proper Alignment
Align the tubing and tool parts so the flare forms evenly around the tubing end. Misalignment causes leaks.
Look at the tubing from the side and front. Make sure the tubing is straight and the tool’s cone is centered.
- Check tubing is straight in the clamp
- Center the flaring cone on tubing end
- Adjust if flare looks uneven during test flare
- Re-clamp tubing if needed
Credit: www.vevor.com
Creating The Flare
Using a tubing flaring tool helps shape the end of a metal tube. This flare allows the tube to connect tightly with fittings. Creating a proper flare is important for a strong and leak-free joint.
This guide covers how to create a good flare by applying steady pressure, avoiding common mistakes, and checking flare quality.
Applying Steady Pressure
Hold the tubing flaring tool firmly and turn the handle slowly. Apply steady pressure to shape the flare evenly. Do not rush or force the tool too hard.
Steady pressure helps prevent cracks or uneven flares. Turn the tool until the flare matches the size of the fitting.
- Keep the tubing straight in the tool.
- Turn the handle slowly and evenly.
- Stop when the flare reaches the fitting size.
Avoiding Common Mistakes
Common mistakes can damage the flare or cause leaks. Avoid cutting the tube too short or flaring unevenly. Do not over-tighten the tool.
Make sure the tube end is clean and smooth before flaring. Remove any burrs or dirt to get a good seal.
- Do not flare a dirty or dented tube end.
- Avoid bending the tube near the flare.
- Do not use too much force with the tool.
Checking Flare Quality
Inspect the flare after making it. The flare should be smooth and even all around. It must not have cracks or sharp edges.
Test the flare by fitting it with the connector. The fit should be tight without gaps or leaks.
- Look for a uniform flare shape.
- Check for any cracks or splits.
- Ensure a tight fit with the connector.
Troubleshooting Flare Issues
Using a tubing flaring tool can be tricky. Sometimes the flare does not come out right. This guide helps you fix common problems.
Check your flare carefully. Small errors can cause leaks or weak joints. Learn how to fix cracks, uneven flares, and when to start over.
Fixing Cracks And Imperfections
Cracks in the flare can cause leaks. They often happen if you use too much force or if the tubing is damaged. To fix cracks, first smooth the edges with fine sandpaper.
Make sure the tubing end is clean and free of dirt. If the crack is small, sometimes re-flaring the tube gently can help seal it.
Dealing With Uneven Flares
Uneven flares do not fit well and may leak. This happens if the tubing is not aligned properly in the tool. Check the position before you start flaring.
- Place the tubing straight and flush against the flaring tool’s stop.
- Use a clamp or vise to keep the tubing steady.
- Tighten the tool evenly to avoid tilting the flare cone.
- Inspect the flare for even thickness and shape after flaring.
When To Start Over
Some flare problems need a fresh start. If the flare is cracked badly or too uneven, it is safer to cut the tubing and try again.
| Problem | Cause | Solution |
| Cracked flare | Excessive force or damage | Sand edges or cut and re-flare |
| Uneven flare | Improper alignment | Reposition tube and flare again |
| Too thin flare | Over-flaring | Cut tubing and start over |
Credit: www.walmart.com
Maintenance And Storage
Taking care of your tubing flaring tool helps it last longer. Regular maintenance keeps it working well.
Proper storage protects the tool from damage and rust. Follow simple steps to maintain and store your tool.
Cleaning The Tool After Use
Clean the tubing flaring tool after every use. Remove dirt, metal shavings, and oil from all parts.
Use a dry cloth or a soft brush to clean hard-to-reach areas. Avoid water to stop rust from forming.
- Wipe the tool with a clean cloth
- Brush away debris from joints and threads
- Do not soak the tool in water
- Dry thoroughly before storing
Lubricating Moving Parts
Lubricate the moving parts to keep the tool working smoothly. Use light machine oil or a similar lubricant.
Apply oil to the hinges, screws, and sliding parts. Wipe off any extra oil to avoid dust buildup.
- Use a small amount of oil on all moving joints
- Turn the tool parts to spread the lubricant evenly
- Remove excess oil with a clean cloth
- Lubricate regularly for best performance
Proper Storage Tips
Store the tubing flaring tool in a dry place to prevent rust. Keep it away from moisture and dirt.
Use a toolbox or a protective case to avoid damage. Keep the tool in a place where it will not fall or get crushed.
- Store in a dry, cool location
- Use a protective case or toolbox
- Avoid places with high humidity
- Keep away from heavy objects that can cause damage
Tips For Faster Mastery
Using a tubing flaring tool can be tricky at first. Learning some tips helps you get better fast. This guide shares easy ways to improve your skills quickly.
Practice and the right tools make a big difference. Try these ideas to speed up your learning process and flare tubes with confidence.
Practice Techniques
Practicing often is key to getting good at flaring tubes. Focus on smooth, even pressure and steady hand movements. Start with scrap tubing before working on real projects.
- Cut tubing cleanly and squarely each time
- Use a deburring tool to remove sharp edges
- Tighten the flaring tool slowly and evenly
- Check the flare angle to match the fitting
- Repeat the process until flares look uniform
Using Visual Guides
Visual guides help you understand each step. Pictures or videos show the right way to hold the tool and shape the flare. Follow along to avoid mistakes.
| Step | Description | Visual Tip |
| Cut | Make a clean, straight cut on the tube | Use a tube cutter with a sharp blade |
| Deburr | Remove sharp edges inside and outside | Use a deburring tool or fine sandpaper |
| Insert | Place tube into the flaring tool clamp | Align tube end even with the clamp edge |
| Flare | Tighten the tool to form the flare | Turn handle slowly for even pressure |
| Inspect | Check flare shape and smoothness | Look for cracks or uneven edges |
Learning From Experts
Watching experts flare tubing teaches useful tricks. You learn how to hold tools, control pressure, and fix errors. Listen to their advice and ask questions.
Tips from experts:
- Keep your work area clean and organized
- Use the right size flaring tool for your tubing
- Practice steady, slow movements rather than fast force
- Check your flare against fittings before final use
- Learn to spot small defects early to avoid leaks

Credit: www.amazon.ca
Frequently Asked Questions
What Is A Tubing Flaring Tool Used For?
A tubing flaring tool shapes tube ends to create secure connections. It ensures leak-proof joints in plumbing and automotive systems. This tool helps fit tubes into fittings by widening the ends. Proper use improves system durability and prevents fluid leaks.
How Do You Prepare Tubing Before Flaring?
First, cut the tubing cleanly and squarely using a tubing cutter. Remove any burrs inside and outside the tube with a deburring tool. This ensures a smooth flare and tight seal. Proper preparation prevents damage and improves flare quality.
Can A Tubing Flaring Tool Work On All Tube Types?
Most flaring tools work on soft metals like copper, aluminum, and brass tubing. Harder metals may require specialized tools or techniques. Always check the tool specifications before use. Using the correct tool protects tubing and ensures proper flaring.
How To Avoid Common Mistakes Using A Flaring Tool?
Avoid uneven cutting and improper tube alignment in the clamp. Use steady pressure while flaring to prevent cracks. Always deburr tubing ends before flaring. These steps ensure a clean, strong flare and prevent leaks or tube damage.
Conclusion
Mastering a tubing flaring tool enhances your plumbing skills. Practice makes perfect. Always ensure tools are clean and well-maintained. Safety should be your top priority. Follow each step carefully for best results. With time, flaring becomes second nature. You’ll achieve strong, leak-free connections.
Stay patient and attentive. Mistakes happen, but they teach valuable lessons. Keep your workspace organized for efficiency. Remember, precision is key in every task. Happy flaring!
