Are you ready to take your DIY projects to the next level? Knowing how to use a hand saw properly can save you time, money, and frustration.
Whether you’re cutting wood for a simple shelf or crafting something more complex, mastering this essential tool gives you control and precision. In this guide, you’ll discover easy steps and expert tips that make every cut clean and accurate. Stick with me, and by the end, you’ll feel confident picking up a hand saw and tackling your projects like a pro.
Choosing The Right Hand Saw
Using the right hand saw is key for DIY projects. It saves time and gives a clean cut.
This guide helps you pick the right saw by looking at types, materials, and blade teeth.
Types Of Hand Saws
There are many hand saw types. Each fits a different task and material.
- Crosscut saws cut across wood grain.
- Rip saws cut along wood grain.
- Back saws have a stiff spine for precise cuts.
- Keyhole saws cut small shapes and curves.
- Bow saws are good for cutting branches and logs.
Selecting Based On Material
Choose a saw that matches the material you will cut. This makes cutting easier and better.
| Material | Best Saw Type | Reason |
| Softwood | Crosscut or Rip Saw | Works well with common wood grains |
| Hardwood | Back Saw | Offers control for tough wood |
| Metal | Hacksaw | Designed to cut metal safely |
| Plastic | Fine-toothed Saw | Prevents cracking and chipping |
Blade Teeth And Cuts
The blade teeth affect how the saw cuts. Teeth size and shape change the cut style.
- Large teeth cut fast but rough.
- Small teeth cut slow but smooth.
- Crosscut teeth are angled to cut wood fibers cleanly.
- Rip teeth are straight for cutting wood fibers lengthwise.
- Skip teeth have gaps to clear sawdust quickly.
Essential Hand Saw Safety Tips
Using a hand saw is common in DIY projects. It is important to stay safe while working with this tool.
Following safety tips can prevent injuries and help you work better and faster.
Protective Gear
Wear protective gear to keep yourself safe from cuts and debris. Always protect your eyes and hands.
- Use safety goggles to protect your eyes from sawdust.
- Wear sturdy gloves to avoid cuts and splinters.
- Put on a dust mask if cutting materials that create fine dust.
- Wear closed-toe shoes to protect your feet from falling objects.
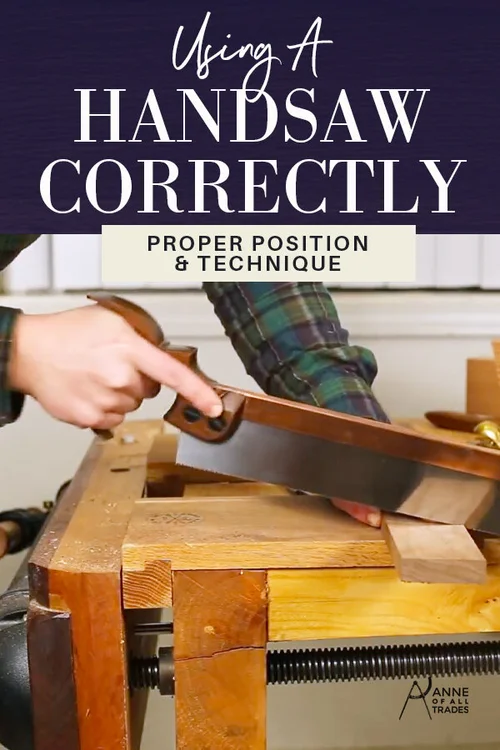
Proper Handling Techniques
Hold the saw firmly with both hands. Keep your fingers away from the blade path.
Use smooth, even strokes. Do not force the saw; let the blade do the work.
- Keep your body balanced and stand in a stable position.
- Start cutting slowly to create a guide notch.
- Cut away from your body to reduce injury risk.
- Do not rush; steady cutting is safer and more precise.
Work Area Setup
Set up a clean and organized work area. Make sure the workpiece is secure before sawing.
A clutter-free space reduces accidents and helps you focus on your task.
- Use clamps or a vise to hold materials firmly.
- Keep tools and materials within easy reach.
- Ensure good lighting to see the cutting line clearly.
- Clear sawdust regularly to avoid slipping or fire hazards.
Preparing Your Workpiece
Preparing your workpiece correctly makes cutting easier and safer. It helps you get clean, straight cuts with a hand saw. Take time to set up your material before you start cutting.
This guide covers marking cut lines, securing the material, and measuring accurately. Each step is key to a good result in your DIY project.
Marking Cut Lines
Marking clear cut lines shows exactly where to saw. Use a pencil or a marking knife for precision. Draw the line on the side that will be visible after cutting.
Check the line twice before you start cutting. A straight line helps guide the saw blade smoothly along the cut.
Securing The Material
Hold the workpiece firmly to keep it from moving. Use clamps or a vise to lock it in place on your workbench. This keeps your hands safe and the cut accurate.
- Place clamps near the cut line but not in the way of the saw
- Check that the material does not wobble before cutting
- Use a scrap wood piece under the workpiece if needed for support
Measuring Accurately
Measure your workpiece carefully before cutting. Use a tape measure or ruler for exact lengths. Mark the measurements clearly on the material.
| Tool | Use | Tip |
| Tape Measure | Measure length and width | Keep it straight for best accuracy |
| Carpenter’s Square | Check right angles | Align with edges before marking |
| Pencil | Mark cut lines | Use sharp tip for thin lines |
Mastering Cutting Techniques
Using a hand saw for DIY projects requires good cutting skills. Proper techniques help you cut wood cleanly and safely.
Learn how to start, control, and finish your cuts well. These tips make your work easier and more precise.
Starting The Cut
Begin with a steady position to guide the saw. Mark your cut line clearly to follow it easily.
Use light, short strokes to create a groove. This groove helps keep the saw from slipping.
- Secure the wood firmly before cutting
- Hold the saw handle comfortably
- Start with gentle, controlled strokes
- Follow the marked line closely
Maintaining Control
Keep your hand steady and your body balanced as you saw. Maintain a consistent speed for smooth cutting.
Apply even pressure on the saw blade. Avoid pushing too hard to prevent bending or breaking the blade.
- Use your arm, not just your wrist
- Keep the saw blade straight
- Cut at a steady pace
- Watch the line to stay accurate
Finishing Smoothly
Slow down as you near the end of the cut. This helps avoid splintering or rough edges.
Use fine strokes to clean up the cut edge. Sand the edge if you want a smooth finish.
- Reduce speed near the cut end
- Keep control to avoid splinters
- Use sanding to smooth rough edges
- Check your cut for accuracy
Maintaining Your Hand Saw
Taking care of your hand saw keeps it sharp and safe. Regular maintenance helps the saw last longer.
Good maintenance includes cleaning, sharpening, and fixing parts when needed. These simple steps improve your DIY work.
Cleaning And Storage
Clean your hand saw after every use. Remove sawdust and resin from the blade to stop rust.
Store the saw in a dry place. Use a blade cover or hang it to avoid damage.
- Wipe the blade with a dry cloth
- Use a brush to remove stuck debris
- Apply light oil to prevent rust
- Keep the saw away from moisture
- Store hanging or in a protective case
Sharpening The Blade
A sharp blade cuts better and safer. Check the teeth for dullness before starting a project.
Use a triangular file to sharpen each tooth evenly. Keep the file angle steady for best results.
- Secure the saw in a clamp
- File each tooth from front to back
- Keep the same angle on every tooth
- Remove metal filings after sharpening
- Test the saw on scrap wood
Replacing Parts
Sometimes, parts wear out and need replacement. Handles and blades are the most common parts to replace.
Use tools to remove old parts carefully. Fit new parts tightly to keep the saw stable.
- Remove screws or bolts holding the handle
- Take out the old blade carefully
- Fit the new blade in the same position
- Attach the handle firmly back in place
- Check for tightness before use

Credit: www.anneofalltrades.com
Troubleshooting Common Issues
Using a hand saw can be simple, but sometimes problems occur. Knowing how to fix these helps your projects go smoothly.
This guide covers common saw problems and how to solve them quickly and safely.
Saw Sticking Or Binding
Saw sticking happens when the blade gets stuck inside the wood. This slows your cutting and can be unsafe.
- Check if the saw blade is too thick for the wood slot.
- Make sure you apply even pressure while sawing.
- Keep the cut line straight to avoid pinching the blade.
- Use sharp blades to reduce resistance.
- Apply wax or soap on the blade to help it slide.
Uneven Or Jagged Cuts
Uneven cuts can ruin your project’s look and fit. Jagged edges make finishing work harder.
| Cause | Fix |
|---|---|
| Blade wobbling | Hold the saw steady and check for a loose handle |
| Cutting at an angle | Keep your wrist and arm aligned with the blade |
| Using a dull blade | Replace or sharpen the blade |
| Wood not secured | Clamp the wood tightly before cutting |
Blade Dullness Signs
A dull blade makes cutting harder and unsafe. Watch for these signs to know when to sharpen or change it.
- Need to push very hard to cut through wood
- Saw blade leaves rough, torn edges
- Cutting takes longer than usual
- Blade heats up or smells burnt
- Blade teeth look chipped or worn down
Project Ideas For Practice
Using a hand saw is a great skill for many DIY projects. It helps you cut wood with control and precision.
This guide shares some simple project ideas to help you practice and improve your hand sawing skills.
Simple Woodworking Projects
Start with easy projects that need straight cuts and small pieces of wood. These help you get comfortable with the saw.
- Cutting small wooden shelves
- Making picture frames
- Building a birdhouse
- Crafting wooden coasters
- Creating simple boxes
Home Repairs
Hand saws can fix many small problems around your house. Practice by doing simple repairs and adjustments.
| Repair Task | Wood Type | Cut Type |
| Fixing cabinet doors | Softwood | Straight cut |
| Replacing baseboards | Softwood or hardwood | Angle cut |
| Trimming door frames | Softwood | Cross cut |
| Building temporary supports | Softwood | Rip cut |
Creative Diy Builds
Try fun projects that let you design and build your own items. These challenge your sawing skills in new ways.
Here are some ideas:
- Wooden planters with angled cuts
- Custom picture ledges
- Small stools or benches
- Decorative wall art from wood scraps

Credit: www.anneofalltrades.com

Credit: www.youtube.com
Frequently Asked Questions
What Type Of Hand Saw Is Best For Diy Projects?
The best hand saw for DIY projects depends on your task. A crosscut saw is ideal for cutting wood across the grain. For detailed work, a back saw offers precision. Always choose a saw with comfortable grip and sharp teeth.
How Do I Properly Hold A Hand Saw?
Hold the saw handle firmly with your dominant hand. Keep your other hand steady on the material. Maintain a straight wrist and use smooth, controlled strokes. Proper grip improves accuracy and reduces fatigue during cutting.
What Safety Tips Should I Follow When Using A Hand Saw?
Always wear safety goggles to protect your eyes from debris. Keep fingers away from the blade’s path. Use a stable surface to support your material. Work slowly and carefully to avoid slips and injuries.
How Can I Maintain My Hand Saw For Better Performance?
Clean your saw after each use to remove dust and resin. Keep the blade dry to prevent rust. Sharpen the teeth regularly for efficient cutting. Store it in a dry place to prolong its lifespan.
Conclusion
Mastering hand saw use enhances your DIY skills. It’s a rewarding tool. Remember, practice makes perfect. Start with simple projects. Choose the right saw for each task. A firm grip ensures safety. Sharpen your saw regularly for clean cuts. Always follow safety guidelines.
Keep your workspace organized. This avoids accidents and boosts efficiency. With patience, you’ll see great results. Hand saws bring precision to your projects. Build confidence with each cut. Explore new projects at your own pace. Enjoy the process. Your creativity knows no bounds.
Happy sawing!