Are you planning to work on your plumbing but unsure how to connect pipes quickly and securely? Learning how to install compression fittings can save you time, money, and headaches.
These simple yet reliable connectors are perfect for joining pipes without soldering or special tools. In this guide, you’ll discover easy steps to install compression fittings like a pro, even if you’re a beginner. Keep reading to unlock the secrets of a leak-free, sturdy connection that lasts.
Your next plumbing project just got a whole lot easier!
Tools And Materials Needed
Installing compression fittings requires specific tools and materials. Using the right items helps ensure a secure and leak-free connection.
This guide covers the types of compression fittings, essential tools, and how to choose the right tubing.
Types Of Compression Fittings
Compression fittings come in several types depending on the application. Common types include straight, elbow, and tee fittings.
- Straight fittings:Connect two tubes in a straight line.
- Elbow fittings:Allow tubing to change direction, usually at 90 degrees.
- Tee fittings:Split or combine flow with a T-shaped connector.
- Union fittings:Join two tubes but can be easily disconnected.
Essential Tools
You need a few basic tools to install compression fittings properly. These tools help tighten fittings and prepare tubing.
| Tool | Use |
| Adjustable wrench | Tightens the compression nuts securely |
| Tube cutter | Provides clean, straight cuts on tubing |
| Deburring tool | Removes sharp edges from cut tubing ends |
| Marker | Marks tubing length for correct fitting placement |
Choosing The Right Tubing
Picking the correct tubing ensures a tight fit and prevents leaks. Consider the tubing material and size carefully.
- Material:Copper and plastic tubing are common for compression fittings.
- Size:Tubing must match the fitting size exactly for proper sealing.
- Wall thickness:Thicker walls give better durability and pressure resistance.
Credit: dfhydraulics.com
Preparing The Tubing
Preparing the tubing is important before installing compression fittings. Good preparation helps create a strong, leak-free connection.
Follow these steps to get the tubing ready for the fittings and ensure a proper seal.
Cutting Tubing Cleanly
Cut the tubing straight and smooth. A clean cut helps the fitting seat properly and prevents leaks.
Use a sharp tubing cutter or a fine-toothed saw for the best results. Avoid crushing or deforming the tubing.
Deburring The Edges
Remove any burrs or rough edges from the cut tubing. Burrs can damage the fitting and cause leaks.
Use a deburring tool or a fine file to smooth the inside and outside edges of the tubing.
- Check both inside and outside edges
- Remove all sharp bits
- Make sure the edges are round and smooth
Checking For Damage
Inspect the tubing for cracks, dents, or bends before installing fittings. Damaged tubing can cause leaks or failure.
Replace any tubing that shows signs of damage. Use only tubing in good condition for a safe connection.
Assembling The Fitting
Compression fittings join tubes or pipes securely without soldering. Assembling these fittings correctly ensures a tight seal.
This guide explains how to put the parts together step by step for a strong connection.
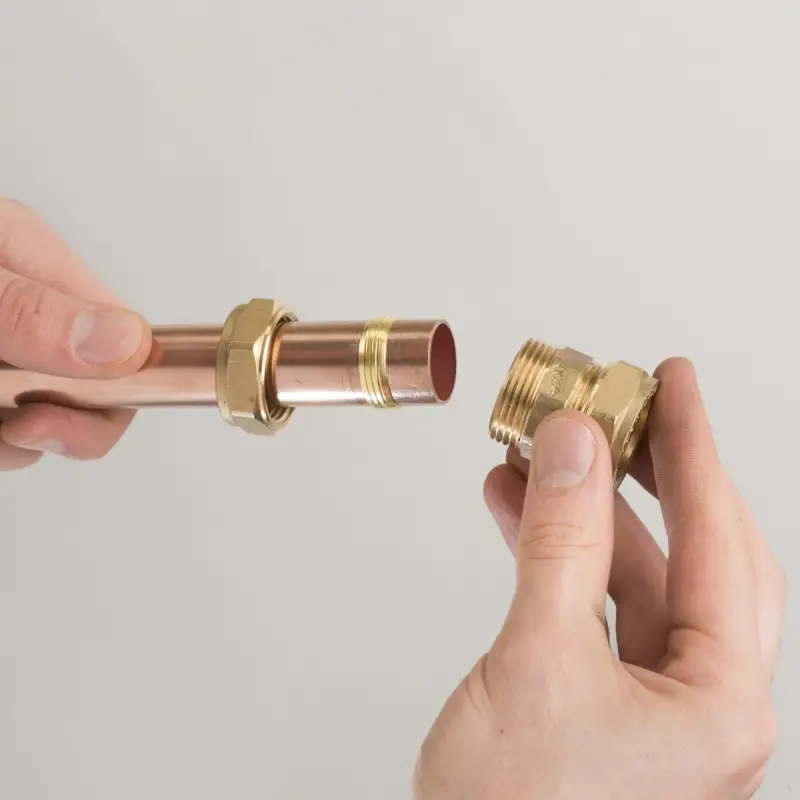
Sliding On The Nut And Ring
Start by sliding the compression nut onto the tubing. The threaded side must face the fitting.
Next, slide the compression ring (also called a ferrule) onto the tubing. It should sit behind the nut.
- Place the nut first with threads facing the fitting
- Slide the ring right after the nut
- Ensure both parts slide freely on the tube
Positioning The Tubing
Push the tubing into the body of the fitting. Make sure it goes all the way in.
Check that the tubing sits firmly against the fitting stop inside.
- Insert tubing fully into the fitting body
- Tube end should touch the fitting stop
- Do not force or bend the tube at this stage
Tightening The Nut
Slide the ring and nut forward to the fitting. Hand-tighten the nut first.
Use a wrench to tighten the nut. Turn it until you feel resistance and a firm seal forms.
- Hand-tighten the nut onto the fitting
- Use a wrench to tighten more
- Stop tightening when resistance is firm
- Avoid over-tightening to prevent damage

Credit: www.youtube.com
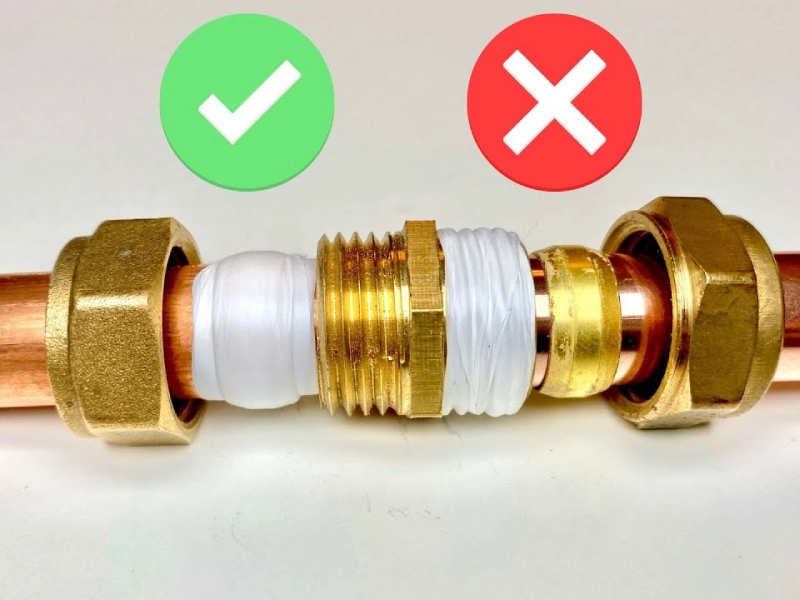
Ensuring A Leak-free Seal
Installing compression fittings correctly helps prevent leaks in pipes. A good seal keeps water or gas inside the system.
Follow simple steps to tighten fittings and check for leaks. This protects your home and saves money.
Proper Tightening Techniques
Start by hand-tightening the nut on the fitting. This ensures parts fit well without damage.
Use two wrenches to tighten the fitting. Hold the body with one wrench and turn the nut with the other.
- Tighten the nut until it feels firm and snug.
- Do not force the nut too hard in this step.
- Check that the pipe is straight and fully inserted.
Avoiding Over-tightening
Over-tightening can damage the fitting and cause leaks. Stop tightening once the nut is firm.
If you feel strong resistance, do not keep turning. This can crack the fitting or deform the pipe.
- Use the right wrench size to prevent slipping.
- Do not use power tools for tightening.
- Check manufacturer instructions for torque limits.
Testing For Leaks
After installation, test the fitting by turning on the water or gas supply slowly. Watch for drips or moisture.
You can also use soapy water on the fitting. Bubbles show where gas or air escapes.
- Look closely around the nut and pipe connection.
- Fix leaks by tightening slightly if needed.
- Replace fittings if leaks continue after tightening.
Common Issues And Fixes
Compression fittings often face issues like leaks or loose connections. Fixing these problems ensures a strong, lasting seal. This guide explains how to spot and fix common problems.
Understanding these fixes helps keep your plumbing safe and efficient. Follow simple steps to avoid costly repairs and water damage.
Identifying Leaks
Leaks happen if the fitting is not tight or the parts are damaged. Look for water around the joints or wet spots on pipes. You can also check for dripping sounds or dampness.
- Check if the nut is securely tightened.
- Look for cracks or scratches on the pipe.
- Inspect the compression ring for wear or damage.
- Use a dry cloth to find small leaks.
- Test the joint by gently pressing around it.
Reassembling The Fitting
Reassemble the fitting carefully to avoid leaks. Clean all parts before putting them back. Make sure the pipe slides fully into the fitting.
- Remove the compression nut and ring.
- Clean the pipe end and fitting inside.
- Place the compression ring on the pipe.
- Insert the pipe into the fitting body.
- Tighten the compression nut by hand, then use a wrench.
- Do not overtighten to avoid damaging parts.
Replacing Damaged Parts
Damaged parts cause leaks and weak connections. Replace any worn or broken pieces to fix issues. Use the correct size and type for your fitting.
| Part | Signs of Damage | Fix |
| Compression Ring | Cracks or flattened edges | Replace with a new ring |
| Compression Nut | Stripped threads or cracks | Use a new nut of the same size |
| Pipe End | Scratches or dents | Cut pipe back to clean area |
Credit: dfhydraulics.com
Maintenance Tips
Compression fittings need care to work well over time. Regular maintenance helps prevent leaks and damage. Keeping fittings clean and checking them often extends their life.
Follow these simple tips to maintain your compression fittings and avoid costly repairs.
Regular Inspections
Check compression fittings regularly for signs of wear or leaks. Look for cracks, rust, or water stains around the fittings. Early detection stops small problems from getting worse.
Use a flashlight to see tight spaces. Tighten loose fittings carefully to avoid damage. Inspections should happen at least once every three months.
Cleaning Compression Fittings
Clean fittings to remove dirt and debris that cause damage. Use a soft cloth or brush to wipe the surface. Avoid harsh chemicals that can corrode metal parts.
If you see buildup, soak the fitting in warm, soapy water. Dry completely before reassembling. Clean fittings ensure a tight, leak-free seal.
When To Replace Fittings
Replace compression fittings if they show cracks, heavy rust, or leaks that do not stop after tightening. Old or damaged fittings can cause water damage or system failure.
- Replace if metal feels weak or soft
- Change fittings with stripped threads
- Swap fittings after repeated repairs fail
- Use new fittings after long-term use (5+ years)
Frequently Asked Questions
What Tools Are Needed To Install Compression Fittings?
You need a pipe cutter, adjustable wrench, and deburring tool. These tools ensure clean cuts and secure fitting installation.
How Do Compression Fittings Work In Plumbing Systems?
Compression fittings join pipes by compressing a ring onto the pipe. This creates a watertight seal without soldering or welding.
Can I Reuse Compression Fittings After Removal?
Reusing compression fittings is not recommended. The compression ring may deform, causing leaks or weak connections.
What Common Mistakes Should I Avoid When Installing Compression Fittings?
Avoid overtightening, cutting pipes unevenly, or neglecting to deburr edges. These mistakes lead to leaks and fitting damage.
Conclusion
Installing compression fittings can seem tricky at first. But with this guide, it becomes simple. Follow each step closely. Ensure your tools are ready. Check for leaks after installation. This ensures safety and efficiency. Practice makes perfect, so don’t worry if it takes time.
Compression fittings offer a reliable connection. Useful for many plumbing tasks. Remember, patience is key. Always double-check your work. A secure fitting prevents future issues. Happy plumbing!