Are you about to start a construction project and wondering how to get your measurements just right? Using a tape measure might seem simple, but knowing the right techniques can save you time, avoid costly mistakes, and make your work look professional.
You’ll discover easy steps to use a tape measure like a pro. By the end, you’ll feel confident measuring anything on your project with precision. Keep reading, because mastering this tool is easier than you think—and it’s one skill every builder needs.

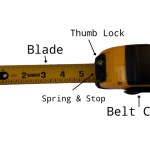
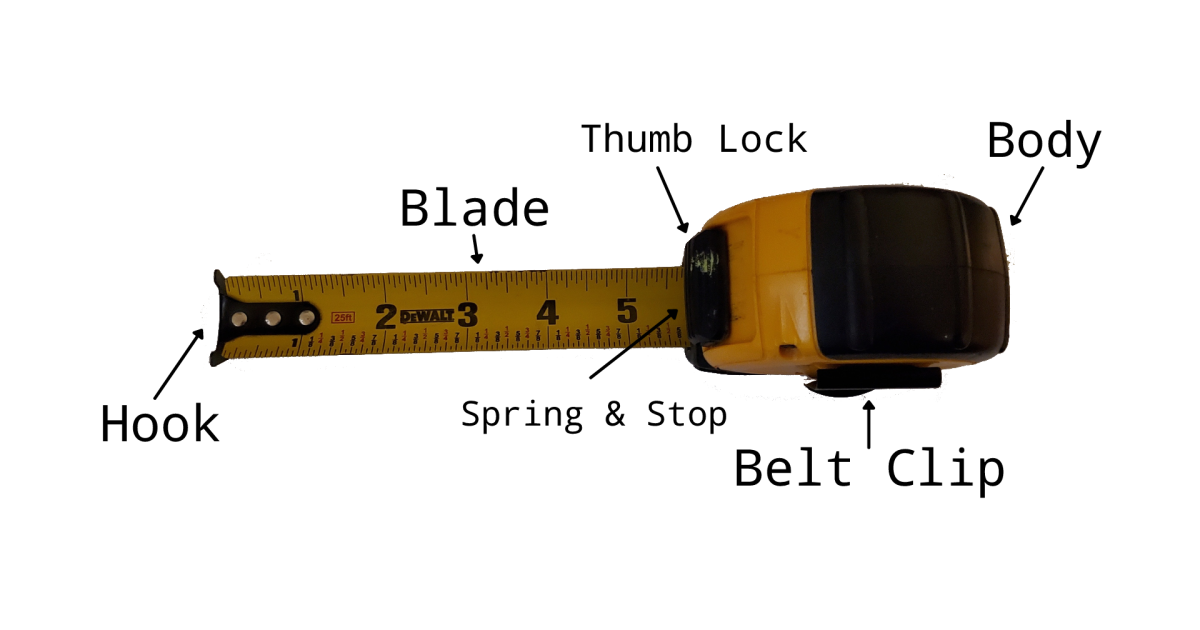
Credit: m.youtube.com
Choosing The Right Tape Measure
Using a tape measure is important for any construction project. Picking the right tape measure helps you work faster and more accurately.
There are many tape measures available. You need to know the types, sizes, and features that suit your work.
Types Of Tape Measures
Tape measures come in different styles. Each type fits certain jobs better than others.
- Standard Tape Measure:Most common, flexible metal blade with markings.
- Cloth Tape Measure:Made of fabric or fiberglass, good for curved surfaces.
- Long Tape Measure:Used for large distances, often 50 feet or more.
- Digital Tape Measure:Shows measurements on a screen for easy reading.
Length And Durability Factors
Choose a tape measure long enough for your projects. Most home tasks need 16 to 25 feet tapes.
Durability matters. Look for strong casing and a blade that resists bending or breaking.
- Length:Pick length based on project size.
- Blade Material:Steel blades last longer than plastic ones.
- Casing:Rubber or metal casing protects the tape.
- Blade Coating:Coated blades resist rust and wear.
Features To Look For
Extra features can make your tape measure easier to use and more accurate.
- Locking Mechanism:Holds the tape in place while measuring.
- Belt Clip:Keeps the tape handy on your belt or pocket.
- Magnetic Hook:Sticks to metal surfaces for one-person measuring.
- Easy-to-Read Markings:Large numbers and clear lines reduce mistakes.
Basic Tape Measure Techniques
A tape measure is a simple tool that helps you get accurate measurements for construction projects. Using it correctly saves time and avoids mistakes.
This guide covers basic skills to read measurements, use different units, and hold the tape properly.
Reading The Measurements
Tape measures show numbers and marks to tell you the length. The biggest numbers usually show inches or centimeters. Smaller marks between numbers show smaller parts like fractions or millimeters.
- Look at the number closest to the tape’s end for whole units.
- Count the smaller marks between numbers for fractions.
- Use the tape’s edge as the starting point for measuring.
- Read measurements straight on to avoid mistakes.
Using Both Imperial And Metric Units
Many tapes show two scales: imperial and metric. The imperial side uses inches and feet. The metric side uses centimeters and millimeters. Knowing both helps you work on any project.
| Unit | Used For | Common Marks |
| Inches (Imperial) | Woodworking, US projects | Whole inches, 1/2, 1/4, 1/8, 1/16 |
| Feet (Imperial) | Long measurements | 1 foot = 12 inches |
| Centimeters (Metric) | Most countries, science | Whole centimeters |
| Millimeters (Metric) | Precise small parts | 1/10 of a centimeter |
Hooking And Holding Properly
The metal hook at the tape’s end helps you start your measure correctly. Hold the tape tight to avoid slack. Use your fingers to keep it steady.
- Hook the metal end on the edge of the object.
- If measuring inside edges, press the hook against the surface.
- Hold the tape flat and straight for accuracy.
- Keep the tape from bending or twisting.
Measuring Straight Distances
Using a tape measure is a key skill in construction. It helps you find exact lengths and distances quickly.
Measuring straight distances ensures materials fit well. It also helps avoid costly mistakes on the job.
Measuring Walls And Floors
Start by placing the tape at one end of the wall or floor. Keep the tape straight and tight to get an accurate reading.
For long distances, use the tape’s lock to hold it in place. Note the measurement at the point where the tape ends.
- Hold the tape flat against the surface
- Avoid bending or twisting the tape
- Record the measurement carefully
Avoiding Common Mistakes
Do not let the tape sag or bend while measuring. This can cause errors in your numbers.
Make sure to start measuring at zero on the tape. Sometimes the tape hook can move and give wrong results.
- Check the tape hook is secure
- Keep the tape straight and level
- Double-check your readings before cutting
Using A Helper For Accuracy
Ask a helper to hold the tape at one end. This keeps the tape steady and straight.
You can focus on reading the measurement clearly. This teamwork reduces mistakes and saves time.
- One person holds the tape firmly
- The other reads and records the measurement
- Use clear communication to confirm numbers
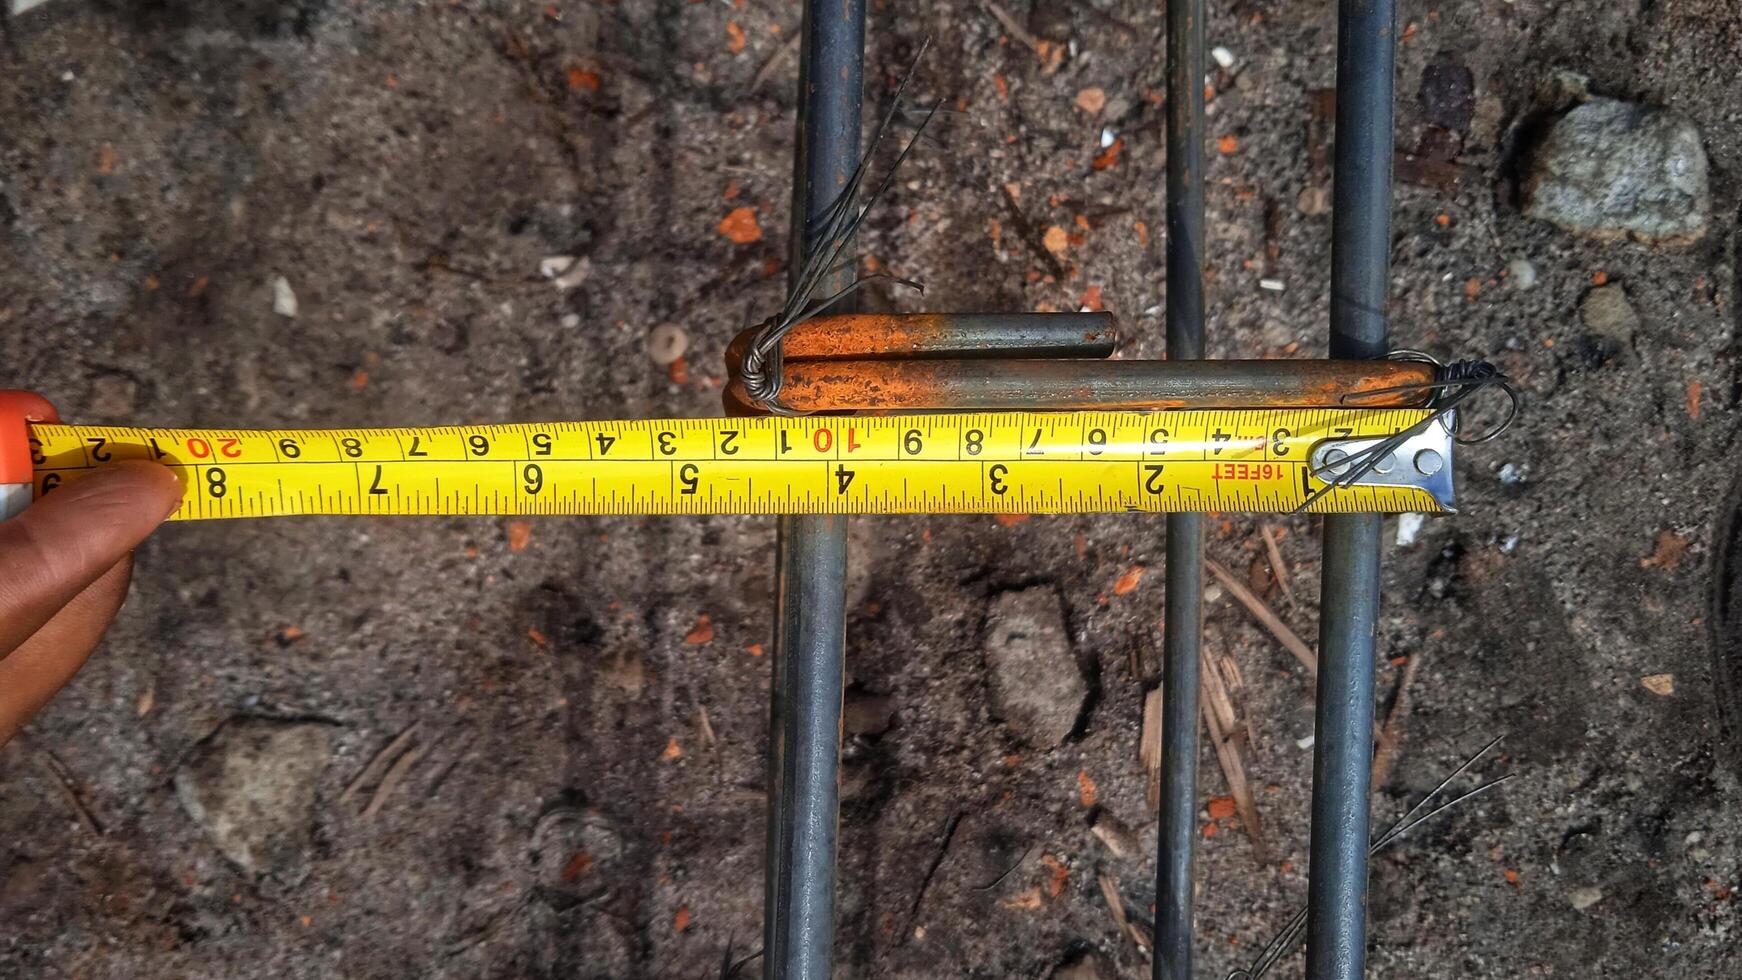
Credit: www.vecteezy.com
Measuring Around Corners And Angles
Measuring around corners and angles is common in construction projects. It helps ensure materials fit correctly. Using a tape measure properly saves time and reduces errors.
This guide covers useful techniques for inside and outside corners. It also explains how to read your tape’s markings effectively.
Techniques For Inside And Outside Corners
Inside and outside corners require different measuring methods. For inside corners, place the tape measure along one wall and extend it to the corner. For outside corners, measure the distance around the edge.
- For inside corners, use the tape’s hook to catch the corner edge.
- For outside corners, wrap the tape around the edge for a precise length.
- Mark measurements clearly on your material before cutting.
- Double-check measurements by measuring twice.
Using The Tape’s Markings Effectively
Tape measures have many markings that can be confusing. Understanding these helps you read measurements quickly and accurately.
| Marking | Meaning | Use |
| Inches | Large numbers | Main measurement units |
| Fractions | Smaller lines between inches | Precise cuts |
| Feet | Marked every 12 inches | Longer distances |
| Highlight marks | Special marks every 16 or 19.2 inches | Stud spacing in framing |
Advanced Tips For Construction Projects
Using a tape measure correctly is key for precise construction work. Small mistakes can cause big problems later.
This guide gives advanced tips to improve your measuring skills. These tips help avoid errors and save time.
Marking Measurements Clearly
Mark your measurements clearly to avoid confusion on site. Use a sharp pencil or fine marker for accuracy.
Make marks visible but not too thick. This keeps lines precise for cutting or drilling.
- Use a carpenter’s pencil for strong, clear lines
- Make marks perpendicular to the edge for easy reading
- Label your marks with numbers if needed
- Use masking tape on dark surfaces before marking
Double Checking Critical Dimensions
Always double check important measurements before cutting or fastening. This prevents costly mistakes.
Measure twice, cut once is a useful rule. Use your tape measure to confirm both length and angle.
- Re-measure from two different points
- Check diagonal measurements for squareness
- Use a helper to hold the tape for better accuracy
- Record measurements to compare before action
Maintaining Your Tape Measure
Keep your tape measure in good condition to get accurate results every time. Clean and store it properly.
Regular maintenance avoids tape damage like kinks, rust, or broken hooks.
- Wipe the tape blade clean after use
- Retract the tape slowly to avoid snapping
- Check the hook for looseness or damage
- Store in a dry place to prevent rust
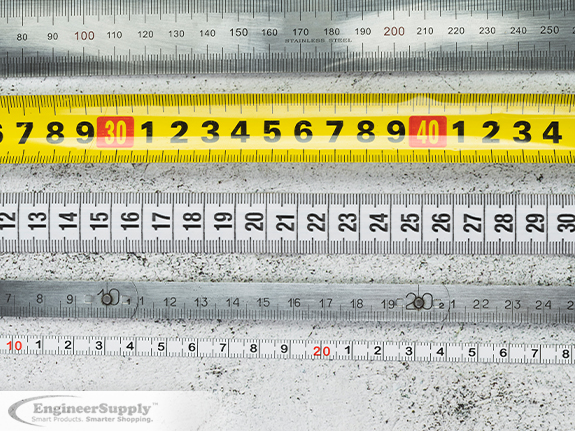
Credit: www.engineersupply.com
Safety Tips When Using Tape Measures
Using a tape measure is common in construction work. It helps get accurate measurements. Staying safe while using it is very important.
Improper use can cause injuries. Follow simple safety tips to protect yourself and others.
Handling The Tape Safely
Hold the tape measure firmly when pulling it out. Keep your fingers clear of the tape edge. This prevents cuts and pinches.
Use the tape’s lock to keep it steady. Avoid forcing the tape to stretch beyond its limit.
- Grip the tape case tightly
- Keep fingers away from tape edge
- Use the lock to hold tape in place
- Do not pull tape too fast or far
Preventing Tape Snapbacks
Tape snapback happens when the tape recoils quickly. It can hit your hand, face, or eyes. Always control the tape as you retract it.
Wear safety glasses to protect your eyes. Let the tape retract slowly by releasing the lock gently.
- Watch the tape while retracting
- Release lock slowly to avoid fast snapback
- Wear safety glasses during use
- Keep tape away from face and body
Storing The Tape Properly
Store the tape measure in a dry place. Avoid leaving it in direct sunlight or wet areas. This keeps the tape from rusting or breaking.
Retract the tape fully before storing. Check the tape for damage regularly and replace if needed.
- Keep tape in a dry, cool spot
- Retract tape fully before storage
- Inspect tape for damage often
- Replace tape if it shows wear or cracks
Frequently Asked Questions
How Do I Read A Tape Measure Correctly?
To read a tape measure, start at the zero mark. Note the largest numbered inch first. Then, count the smaller lines for fractions. Each small line is a fraction of an inch. Combine these to get an accurate measurement for construction projects.
What Are Common Tape Measure Markings?
Common tape measure markings include inches, feet, and fractions. Some also show centimeters and millimeters. The black numbers indicate inches and feet. Red numbers often mark feet. Fractions help measure smaller dimensions precisely on construction sites.
How Can I Avoid Errors Using A Tape Measure?
Avoid errors by keeping the tape straight and taut. Don’t bend or twist it while measuring. Always start measuring from the zero mark. Double-check measurements before cutting or drilling. These steps ensure accuracy in construction projects.
When Should I Use A Tape Measure In Construction?
Use a tape measure for layout, cutting, and fitting materials. It helps measure distances, lengths, widths, and heights. This tool is essential during framing, drywall installation, and finishing. Accurate measurements prevent costly mistakes and material waste.
Conclusion
Mastering the tape measure is crucial for successful construction. It’s a simple tool. Yet, with practice, it becomes second nature. Measure twice, cut once. This saves time and materials. Remember to maintain your tape measure. Keep it clean and store it properly.
A well-maintained tool ensures accuracy. Practice regularly to improve your skills. With patience, you’ll gain confidence. Soon, you’ll handle any project with ease. Whether big or small, precise measurements make a difference. They lead to better outcomes. So, grab your tape measure and get started.
Your construction projects will thank you.