If you’re new to woodworking, mastering wood chisel techniques can open up a whole new world of creativity for you. Imagine shaping wood with precision, carving out details that bring your projects to life.
But where do you start? This guide will walk you through the essential tips and tricks that make using a wood chisel easier and more effective. By the end, you’ll feel confident handling your chisel and ready to create beautiful, polished pieces.
Keep reading to discover how simple changes in your technique can transform your work and boost your skills faster than you think.

Credit: daitool.com
Choosing The Right Chisel
Wood chisels are essential tools for woodworking. Picking the right chisel helps you work safely and precisely. This guide will help beginners choose the correct chisel for their projects.
Understanding the types, sizes, and quality of chisels is key. Each factor affects how well the tool works and how comfortable it feels in your hand.
Types Of Wood Chisels
There are several types of wood chisels. Each type serves a different purpose in woodworking. Knowing these helps you pick the right one for your project.
- Bench Chisels:General-purpose chisels for many tasks.
- Paring Chisels:Thin blades for fine, delicate work.
- Mortise Chisels:Thick blades for heavy chopping and making holes.
- Skew Chisels:Blades angled for smoothing and trimming edges.
- Corner Chisels:Used to clean and square corners.
Selecting The Best Size
Chisels come in many widths. The size you choose depends on your project and skill level. Smaller chisels offer control for detailed work. Larger chisels remove more wood quickly.
| Chisel Width | Use |
| 1/4 inch (6 mm) | Fine details and small joints |
| 1/2 inch (12 mm) | General carving and shaping |
| 3/4 inch (19 mm) | Removing larger wood pieces |
| 1 inch (25 mm) and above | Heavy chopping and rough work |
Quality And Material Considerations
Choose chisels made from strong steel. High carbon steel holds a sharp edge longer. The handle should feel solid and comfortable in your hand. Wood or plastic handles both work well.
- Look for sharp, well-ground blades
- Check for secure blade-to-handle joints
- Choose handles that fit your grip
- Avoid cheap materials that bend or chip easily
Preparing Your Workspace
Getting ready before you use a wood chisel is very important. A good workspace helps keep you safe and makes your work easier.
This guide will show you how to set up a safe area, gather the right tools, and ensure proper lighting for your chisel work.
Setting Up A Safe Area
Choose a place that is clear of clutter and distractions. Make sure there is enough room for your tools and wood pieces.
- Keep the floor clean to avoid slipping
- Use a sturdy workbench to hold your wood firmly
- Wear safety glasses and gloves to protect yourself
- Keep children and pets away from the workspace
Essential Tools And Accessories
Having the right tools helps you work better and safer. Besides the wood chisel, other tools make the job easier.
| Tool | Purpose | Tip |
| Wood Chisel | Cut and shape wood | Keep sharp for clean cuts |
| Workbench | Hold wood steady | Use clamps for extra grip |
| Mallet | Strike the chisel | Use wooden or rubber mallet |
| Sharpening Stone | Sharpen chisel blade | Sharpen regularly to keep edge |
| Safety Glasses | Protect eyes | Wear at all times |
Maintaining Proper Lighting
Good lighting helps you see details clearly and avoid mistakes. Natural light is best, but lamps work well too.
Tips for good lighting:
- Work near a window during the day
- Use a bright desk lamp aimed at your work
- Avoid shadows on your wood surface
- Consider using daylight bulbs for true colors
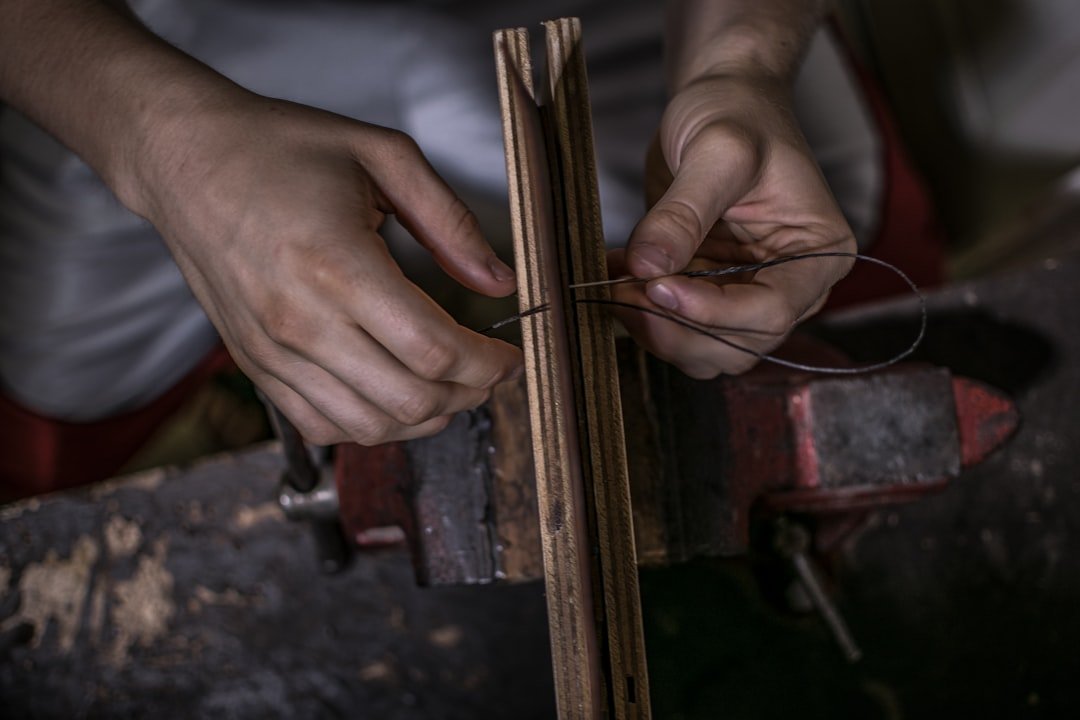
Basic Chisel Handling
Using a wood chisel correctly is important for safety and good results. Beginners should learn how to hold and control the tool well.
This guide shows simple ways to hold the chisel, position your body, and use your hands for better control.
Correct Grip Techniques
Hold the chisel firmly but not too tight. Use your dominant hand on the handle and your other hand near the blade for guidance.
Keep your fingers away from the sharp edge. This grip helps you cut wood precisely and safely.
- Grip the handle with your dominant hand.
- Place your other hand near the blade for control.
- Keep fingers clear of the cutting edge.
- Use a firm but relaxed grip to avoid fatigue.
Body Positioning For Control
Stand with your feet shoulder-width apart for balance. Keep your body close to the workpiece to guide the chisel well.
Bend your knees slightly and lean forward a little. This position gives you more control and reduces strain.
- Stand steady with feet shoulder-width apart.
- Keep your body close to the workpiece.
- Bend knees slightly for better balance.
- Lean forward to guide the chisel smoothly.
Using Both Hands Effectively
Use your dominant hand to push or strike the chisel handle. Your other hand guides the blade and controls the angle.
This two-hand method helps you make smooth cuts and avoid slips. It also improves accuracy on detailed work.
- Push or strike the handle with your dominant hand.
- Guide the blade with your other hand.
- Control the cutting angle carefully.
- Work slowly for better precision.

Credit: www.youtube.com
Sharpening And Maintenance
Keeping your wood chisels sharp and well-maintained helps them last longer. Sharp chisels cut cleaner and work safer. Regular care saves time and effort during projects.
This guide covers tools for sharpening, a clear sharpening process, and how to care for your chisels every day.
Tools For Sharpening
You need the right tools to sharpen chisels well. These tools help keep the blade edge smooth and sharp.
- Sharpening stones (coarse, medium, fine grit)
- Honing guide to keep the blade angle steady
- Leather strop for polishing the edge
- Water or oil to lubricate stones
- Cloth to clean the blade
Step-by-step Sharpening Process
Follow these steps to sharpen your wood chisel safely and effectively.
- Clean the chisel blade with a cloth to remove dirt.
- Attach the honing guide to the blade to keep the right angle.
- Soak the sharpening stone in water or apply oil, based on type.
- Start sharpening on the coarse stone, moving the blade back and forth.
- Repeat on the medium and fine stones for a sharper edge.
- Use the leather strop to polish and remove any burrs.
- Wipe the blade clean and check the edge for sharpness.
Routine Care And Storage
Regular care keeps your chisels working well and prevents damage over time.
| Care Task | Frequency | Details |
| Clean blade | After each use | Remove wood chips and dust |
| Apply oil | Weekly | Light coat to stop rust |
| Sharpen edge | When dull | Use sharpening stones and strop |
| Store properly | Always | Keep in dry place, use blade guard |
Essential Cutting Techniques
Using a wood chisel properly is key to shaping wood safely and neatly. Beginners should learn the basic cutting techniques first.
This guide covers paring cuts, chopping and mortising, and making bevels and chamfers. Each helps you work with wood in different ways.
Paring Cuts
Paring cuts are gentle, controlled slices. Use them to smooth wood surfaces or remove thin layers. Hold the chisel at a low angle and push slowly with your hand.
Chopping And Mortising
Chopping cuts remove larger wood pieces quickly. Mortising creates square holes for joints. Use a mallet to tap the chisel straight down for these cuts.
- Mark the cut area clearly
- Hold the chisel firmly and steady
- Strike with a mallet in short, strong hits
- Remove wood in small layers
- Check fit often for accuracy
Creating Bevels And Chamfers
Bevels and chamfers add angled edges to wood pieces. Tilt the chisel to the desired angle and push or tap gently. Adjust the angle to control the edge shape.
| Technique | Chisel Angle | Use |
| Bevel | 15° to 30° | Smooth angled edges |
| Chamfer | 30° to 45° | Decorative edge cuts |
Safety Tips For Beginners
Using a wood chisel can be safe if you follow simple rules. Safety helps you avoid injuries while working.
Knowing how to protect yourself and handle tools carefully is very important for beginners.
Protective Gear
Wearing the right protective gear keeps you safe from cuts and wood chips. Always use safety glasses to protect your eyes.
Gloves can protect your hands but make sure they fit well. Use a dust mask if you work with dry wood to avoid breathing dust.
- Safety glasses to protect eyes
- Close-fitting gloves for hand safety
- Dust mask to avoid inhaling wood dust
Safe Cutting Practices
Cut away from your body to avoid injuries. Hold the chisel firmly and use controlled, steady pressure.
Keep your workpiece secured with clamps so it does not move. Use a sharp chisel to make clean cuts with less force.
- Cut away from your body
- Hold chisel firmly with both hands
- Secure wood with clamps
- Keep chisels sharp for easy cutting
Handling Mistakes And Errors
If you make a wrong cut, stop and check the damage. Do not try to fix mistakes quickly without thinking.
Use light taps with a mallet to adjust small errors. Always clean and inspect your tools after use to keep them safe.
- Stop if you make a mistake
- Use light taps to correct small errors
- Clean tools after each use
- Check tools for damage regularly
Practice Projects To Build Skills
Using a wood chisel takes practice and patience. Starting with simple projects helps build confidence and control. These projects focus on cutting, shaping, and joining wood safely and accurately.
Try each project several times. With each try, your skills will improve. This guide shows useful exercises for beginners to sharpen their chiseling techniques.
Simple Wood Shapes
Begin by making basic shapes from soft wood. This helps you learn to hold and guide the chisel properly. Practice cutting squares, circles, and triangles.
- Cut small squares about 2 inches wide
- Shape circles using gentle curved cuts
- Create triangles with straight, angled cuts
- Smooth edges by shaving thin layers
- Try making shallow grooves and channels
Basic Joinery Exercises
Joinery requires precise chiseling to fit pieces together. Practice simple joints like the lap joint and mortise and tenon. These projects teach accuracy and depth control.
| Joint Type | Description | Skill Focus |
|---|---|---|
| Lap Joint | Two wood pieces overlap and fit flush | Cutting flat surfaces and angles |
| Mortise and Tenon | One piece has a slot, the other a matching tongue | Precision in hollowing and shaping |
| Half-Lap Joint | Both pieces are cut halfway to join | Equal depth and clean edges |
Progressing To Complex Cuts
Try cutting curves, bevels, and intricate patterns as your skills grow. These cuts need steady hands and sharp tools. Practice on scrap wood before working on final pieces.
- Cut gentle curves with slow, smooth strokes
- Create bevels by angling the chisel edge carefully
- Carve decorative patterns using fine chisels
- Test fits frequently to avoid overcutting
- Keep tools sharp for clean, precise cuts

Credit: daitool.com
Frequently Asked Questions
What Is The Best Way To Hold A Wood Chisel?
Hold the wood chisel firmly with your dominant hand near the handle. Use your other hand to guide and stabilize the blade. This grip offers better control and accuracy when carving or shaping wood. Always ensure your hands are dry and steady for safety.
How Do You Sharpen A Wood Chisel Properly?
Sharpen a wood chisel using a sharpening stone or honing guide. Start with coarse grit and gradually move to finer grit stones. Maintain a consistent bevel angle, usually 25 to 30 degrees. Regular sharpening keeps the chisel effective and safe to use.
Which Wood Chisel Technique Is Ideal For Beginners?
For beginners, the push cut technique is ideal. Push the chisel forward with controlled pressure to remove thin wood layers. Practice on soft wood to build confidence. Avoid forcing the tool, which can cause slips or damage.
How Can I Prevent Wood Splitting When Chiseling?
To prevent wood splitting, always chisel with the grain direction. Make shallow, gradual cuts instead of deep, forceful ones. Score the wood edges before chiseling to guide clean cuts. Using a sharp chisel also reduces the risk of splitting.
Conclusion
Wood chiseling offers rewarding experiences for beginners. Practice regularly to improve skills. Remember, patience is key in honing these techniques. Start with simple projects to build confidence. Gradually, you’ll notice smoother results. Safety should always be a top priority. Keep tools sharp and handle them with care.
Experiment with different woods for varied experiences. Enjoy each project and take pride in your progress. Every cut and carve helps in learning. Soon, these techniques will become second nature. Embrace the journey, and happy chiseling!