Are you ready to take your woodworking skills to the next level? Cutting dados and grooves might sound tricky, but with the right guide, you’ll master these essential techniques quickly.
Imagine creating strong joints and clean, precise channels that make your projects look professional and last longer. Whether you’re building shelves, cabinets, or simple boxes, understanding how to cut dados and grooves can transform your work. Keep reading, and you’ll discover easy steps, helpful tips, and expert tricks that will boost your confidence and craftsmanship every time you pick up your tools.
Types Of Dados And Grooves
Dados and grooves are common woodworking joints. They help join pieces of wood firmly. Knowing the types helps you choose the right cut for your project.
This guide explains different types of dados and grooves. It covers through and stopped cuts, as well as straight and rabbeted grooves.
Through Vs. Stopped Cuts
Through cuts go all the way across the wood. You can see the cut from both sides. Stopped cuts end before the edge. They hide the joint inside the wood.
- Through Cuts:Easier to make and check for fit.
- Stopped Cuts:Look cleaner because the joint is hidden.
- Use Through Cuts:When strength is more important than appearance.
- Use Stopped Cuts:When you want a neat finish.
Straight Vs. Rabbeted Grooves
Straight grooves are simple slots cut into the wood. Rabbeted grooves have a stepped edge, like a small ledge. Both hold panels or boards securely.
| Type | Description | Common Use |
| Straight Groove | Single slot cut along the grain | Panel fitting, backing boards |
| Rabbeted Groove | Groove with a stepped or recessed edge | Cabinet backs, drawer bottoms |
Choosing The Right Tools
Cutting dados and grooves needs the right tools for clean results. Picking the correct tool makes the work easier and safer.
This guide explains three common tool choices for dados and grooves. Each tool fits different needs and skill levels.
Table Saws And Dado Blades
Table saws with dado blades offer fast, wide cuts. You can adjust the blade width to match the groove size. This setup works well for repeatable, straight dados.
- Use stacked dado blades for wide grooves
- Set blade height carefully for clean cuts
- Ensure the table saw fence is locked firmly
- Wear eye and ear protection when operating
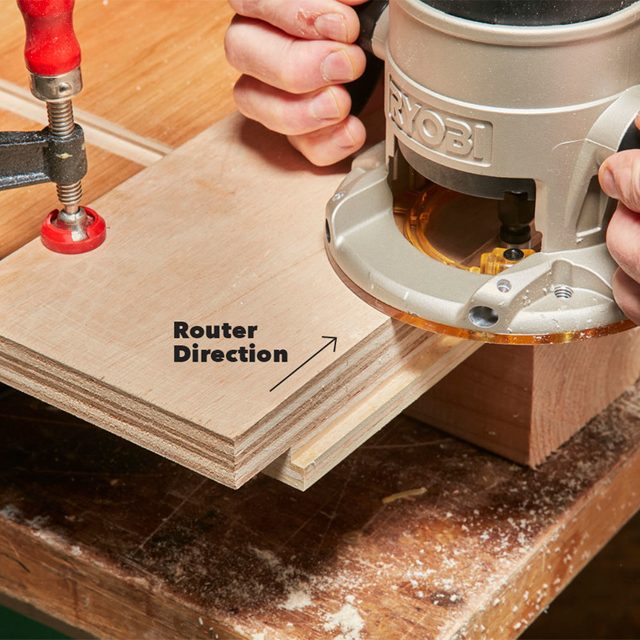
Router And Router Bits
Routers give precise control for dados and grooves. You can use different bits to cut various widths and shapes. This tool is good for detailed or curved cuts.
| Router Bit Type | Use | Cut Width |
| Straight Bit | General dados | 1/8″ to 1″ |
| Rabbet Bit | Edge grooves | 1/4″ to 3/4″ |
| Slot Cutter | Thin grooves | 1/16″ to 1/4″ |
Hand Tools For Dados
Hand tools work well for small or quick cuts without power tools. They need more skill but give good results for simple grooves.
- Chisels for cleaning and shaping grooves
- Hand saws for shallow cuts
- Marking gauges to set groove width
- Mallets to tap chisels safely
Setting Up For Precision
Cutting dados and grooves requires careful setup to get clean, accurate results. Small mistakes can cause poor fits and weaken joints.
This guide covers key setup steps for precise cuts. You will learn how to measure and mark, adjust depth, and use guides.
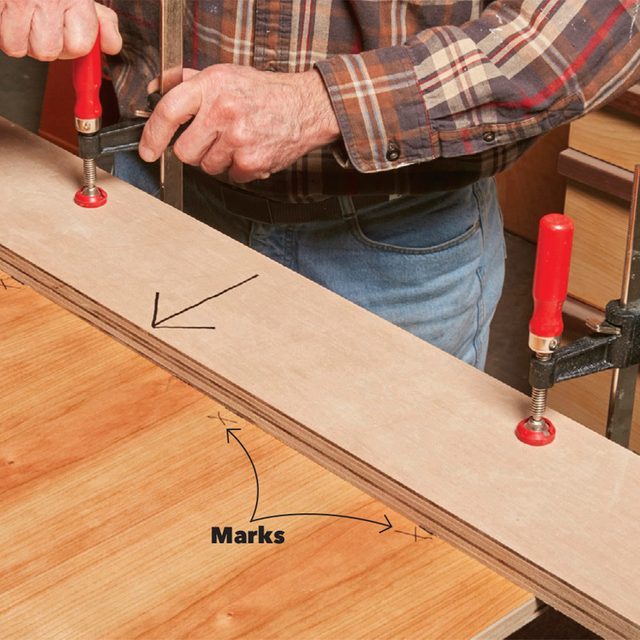
Measuring And Marking Techniques
Accurate measurements help ensure your dados and grooves fit perfectly. Use reliable tools for marking your wood.
- Use a steel ruler or tape measure for exact length.
- Mark lines with a sharp pencil or marking knife.
- Check marks twice before cutting.
- Use a square to draw straight, perpendicular lines.
- Mark both edges of the board to guide your cut.
Adjusting Blade And Bit Depth
Setting the right depth for your blade or router bit controls the groove’s size. Too shallow or too deep can cause issues.
| Tool | Recommended Depth | Why It Matters |
| Table Saw Blade | Match groove width and board thickness | Prevents tear-out and ensures tight joints |
| Router Bit | Set depth to match groove depth needed | Controls groove strength and appearance |
Using Guides And Fences
Guides and fences keep your cuts straight and consistent. Use tools that attach firmly and do not move during cutting.
- Clamp a straight fence to the table saw or router table.
- Use a miter gauge or sled for cross cuts and angled grooves.
- Check that guides are parallel to the blade or bit.
- Make test cuts on scrap wood to confirm settings.
Cutting Techniques
Cutting dados and grooves is an important skill for woodworking. It helps join pieces and create strong fits. Using the right cutting techniques improves accuracy and safety.
Understanding how to handle tools and control cuts will make your work look better. It also reduces mistakes and tool wear.
Safe Blade Operation
Always check your blade before cutting. Make sure it is sharp and clean. A dull blade can cause rough cuts and may be dangerous.
Wear safety glasses and use push sticks to keep your hands away from the blade. Keep your workpiece firmly against the fence and table for control.
- Inspect blade for damage or dullness
- Use safety gear like goggles and ear protection
- Keep hands clear with push sticks or blocks
- Secure your workpiece properly
Multiple Passes Vs. Single Cut
Cutting a dado or groove in one pass may strain the blade and motor. It can cause burning or rough edges. Making several shallow passes is safer and cleaner.
Multiple passes remove material slowly. This reduces heat and gives you better control over the cut depth and width.
- Single cut: faster but may stress tools
- Multiple passes: slower but safer and smoother
- Adjust depth gradually in each pass
- Check cut quality between passes
Controlling Feed Rate
Feed rate means how fast you push the wood into the blade. Too fast can cause rough cuts and blade damage. Too slow can burn the wood and dull the blade.
Find a steady speed that lets the blade cut cleanly without forcing it. Keep a consistent feed rate for the best results.
- Push wood steadily, not too fast or slow
- Listen to the sound of the blade for strain
- Slow down if smoke or burning happens
- Practice to find the best speed for your tool
Common Mistakes To Avoid
Cutting dados and grooves requires careful attention. Making mistakes can ruin your project.
Knowing what to avoid helps you get clean, accurate cuts every time.
Misalignment Issues
Misalignment happens when the blade does not follow the guide properly. It causes uneven cuts.
Even small misalignments make the dado or groove look sloppy and weak.
- Check your fence and guide setup before cutting.
- Use clamps to keep the wood steady.
- Test cuts on scrap wood to verify alignment.
Overcutting And Tear-out
Overcutting removes too much material and makes the joint loose. Tear-out leaves rough edges.
Both can weaken the joint and spoil the wood’s look.
- Set the blade depth carefully before cutting.
- Make several shallow passes instead of one deep cut.
- Use sharp blades to reduce tear-out.
- Cut with the grain to avoid splintering.
Inadequate Support
Not supporting the wood properly causes wobbling and uneven cuts. It can also be unsafe.
Lack of support leads to mistakes and damage to the workpiece or blade.
- Use a stable workbench or table for support.
- Support long boards with extra stands or helpers.
- Hold the wood firmly but avoid blocking the blade path.
Credit: www.familyhandyman.com
Finishing And Cleanup
Cutting dados and grooves requires careful finishing to ensure a smooth look. Cleaning up the cuts improves both function and appearance.
This guide covers sanding, checking fits, and applying finishes for the best results.
Sanding And Smoothing Cuts
Use sandpaper to smooth rough edges inside the dados and grooves. Start with medium grit and finish with fine grit for a clean surface.
- Begin with 120-grit sandpaper to remove large splinters.
- Switch to 220-grit for a smoother finish.
- Use a sanding block or sponge for even pressure.
- Sand along the grain to avoid scratches.
Checking Fit And Adjustments
Test the fit of the piece that goes into the dado or groove. It should slide in easily without gaps or too much force.
| Fit Issue | Solution |
|---|---|
| Piece too tight | Lightly sand the edges until it fits smoothly |
| Piece too loose | Add wood glue or thin wood strips to fill gaps |
| Uneven fit | Check for debris and sand high spots |
Applying Sealants Or Finishes
Sealants protect the wood and enhance the look of your dados and grooves. Choose the right finish for your project.
- Apply wood sealer to prevent moisture damage.
- Use paint or stain for color and protection.
- Consider clear varnish for a natural wood look.
- Apply finish evenly with a brush or cloth.
- Let each coat dry completely before adding another.
Advanced Tips For Complex Projects
Cutting dados and grooves can be tricky in complex woodworking tasks. You need precise techniques to get clean and accurate results.
This guide gives you advanced tips for handling curved grooves, hardwoods, and joinery with dados. These tips improve your skills for detailed projects.
Cutting Curved Grooves
Curved grooves need special attention to keep the shape smooth. Using a flexible guide or template helps control the router along curves.
Choose a small router bit for better control. Move slowly to avoid chipping the wood and to follow the curve closely.
- Use a template made of plywood or MDF
- Clamp the template firmly to the workpiece
- Use a flush-trim bit with a bearing
- Keep the router speed low for better control
- Practice on scrap wood before the final cut
Working With Hardwoods
Hardwoods are dense and can burn or chip if cut too fast. Use sharp bits to reduce heat and get clean cuts.
Cut dados in multiple shallow passes instead of one deep cut. This avoids stress on the tool and wood.
- Choose carbide-tipped bits for durability
- Keep bits sharp and clean
- Set shallow cutting depths for each pass
- Use slower feed rates to avoid burning
- Let the tool cool down between cuts
Incorporating Dados Into Joinery
Dados add strength and alignment to joints. Plan the groove size to match the thickness of the mating piece exactly.
Use stop blocks on your fence to keep groove length consistent. This keeps joints tight and professional-looking.
- Measure the wood thickness before cutting the dado
- Use a dado blade set or router bit sized to fit snugly
- Set stop blocks for repeatable groove length
- Test fit pieces before final assembly
- Sand the groove edges lightly for better glue adhesion
Credit: www.familyhandyman.com
Credit: www.woodworkingtalk.com
Frequently Asked Questions
What Tools Are Best For Cutting Dados And Grooves?
The best tools include table saws, routers, and dado blades. These provide clean, precise cuts for woodworking projects. Using sharp blades and proper guides improves accuracy and safety. Choose tools based on the material and groove size needed.
How Do I Measure Depth For Dados Accurately?
Use a depth gauge or ruler to measure the cut depth. Set the tool’s fence and blade height carefully before cutting. Double-check measurements to ensure the dado fits the joining piece snugly without gaps.
Can I Cut Dados Without A Table Saw?
Yes, you can use a router or hand tools like chisels. Routers offer clean, controlled cuts for dados. Hand tools require more skill but can be effective for small or delicate projects.
What Safety Tips Should I Follow When Cutting Grooves?
Always wear safety glasses and hearing protection. Keep hands away from the blade or bit. Use push sticks and clamps to secure wood. Follow tool manufacturer guidelines and work slowly for precise cuts.
Conclusion
Cutting dados and grooves doesn’t have to be daunting. With practice, it becomes easier. Always prioritize safety. Use the right tools for precise cuts. Measure twice, cut once. This ensures accuracy and reduces mistakes. Patience is key in woodworking. Take your time to achieve the best results.
Keep your tools sharp and clean. This ensures smooth and efficient cutting. Remember, practice improves your skills over time. Enjoy the process of learning and creating. Your projects will reflect your growing expertise. Happy woodworking!