Are you struggling to get a strong, reliable connection when working with electrical wires? Crimping electrical connectors might seem tricky at first, but once you know the right steps, it becomes simple and saves you time and frustration.
This guide will walk you through everything you need to know to crimp connectors like a pro. By the end, you’ll have the confidence to handle your wiring projects safely and efficiently. Ready to master this essential skill? Keep reading to unlock tips that make all the difference.

Credit: www.icrimptools.com
Types Of Electrical Connectors
Electrical connectors join wires and cables to create safe and strong connections. They come in many shapes and sizes. Each type serves a specific use in electrical work.
Choosing the right connector is important for safety and performance. This guide covers common styles and materials used in electrical connectors.
Common Connector Styles
There are several common styles of electrical connectors. Each style fits different wires and tasks. Knowing these styles helps pick the right one.
- Butt Connectors:Join two wires end-to-end. They are simple and often used in repairs.
- Ring Terminals:Have a ring shape for secure bolt or screw connections.
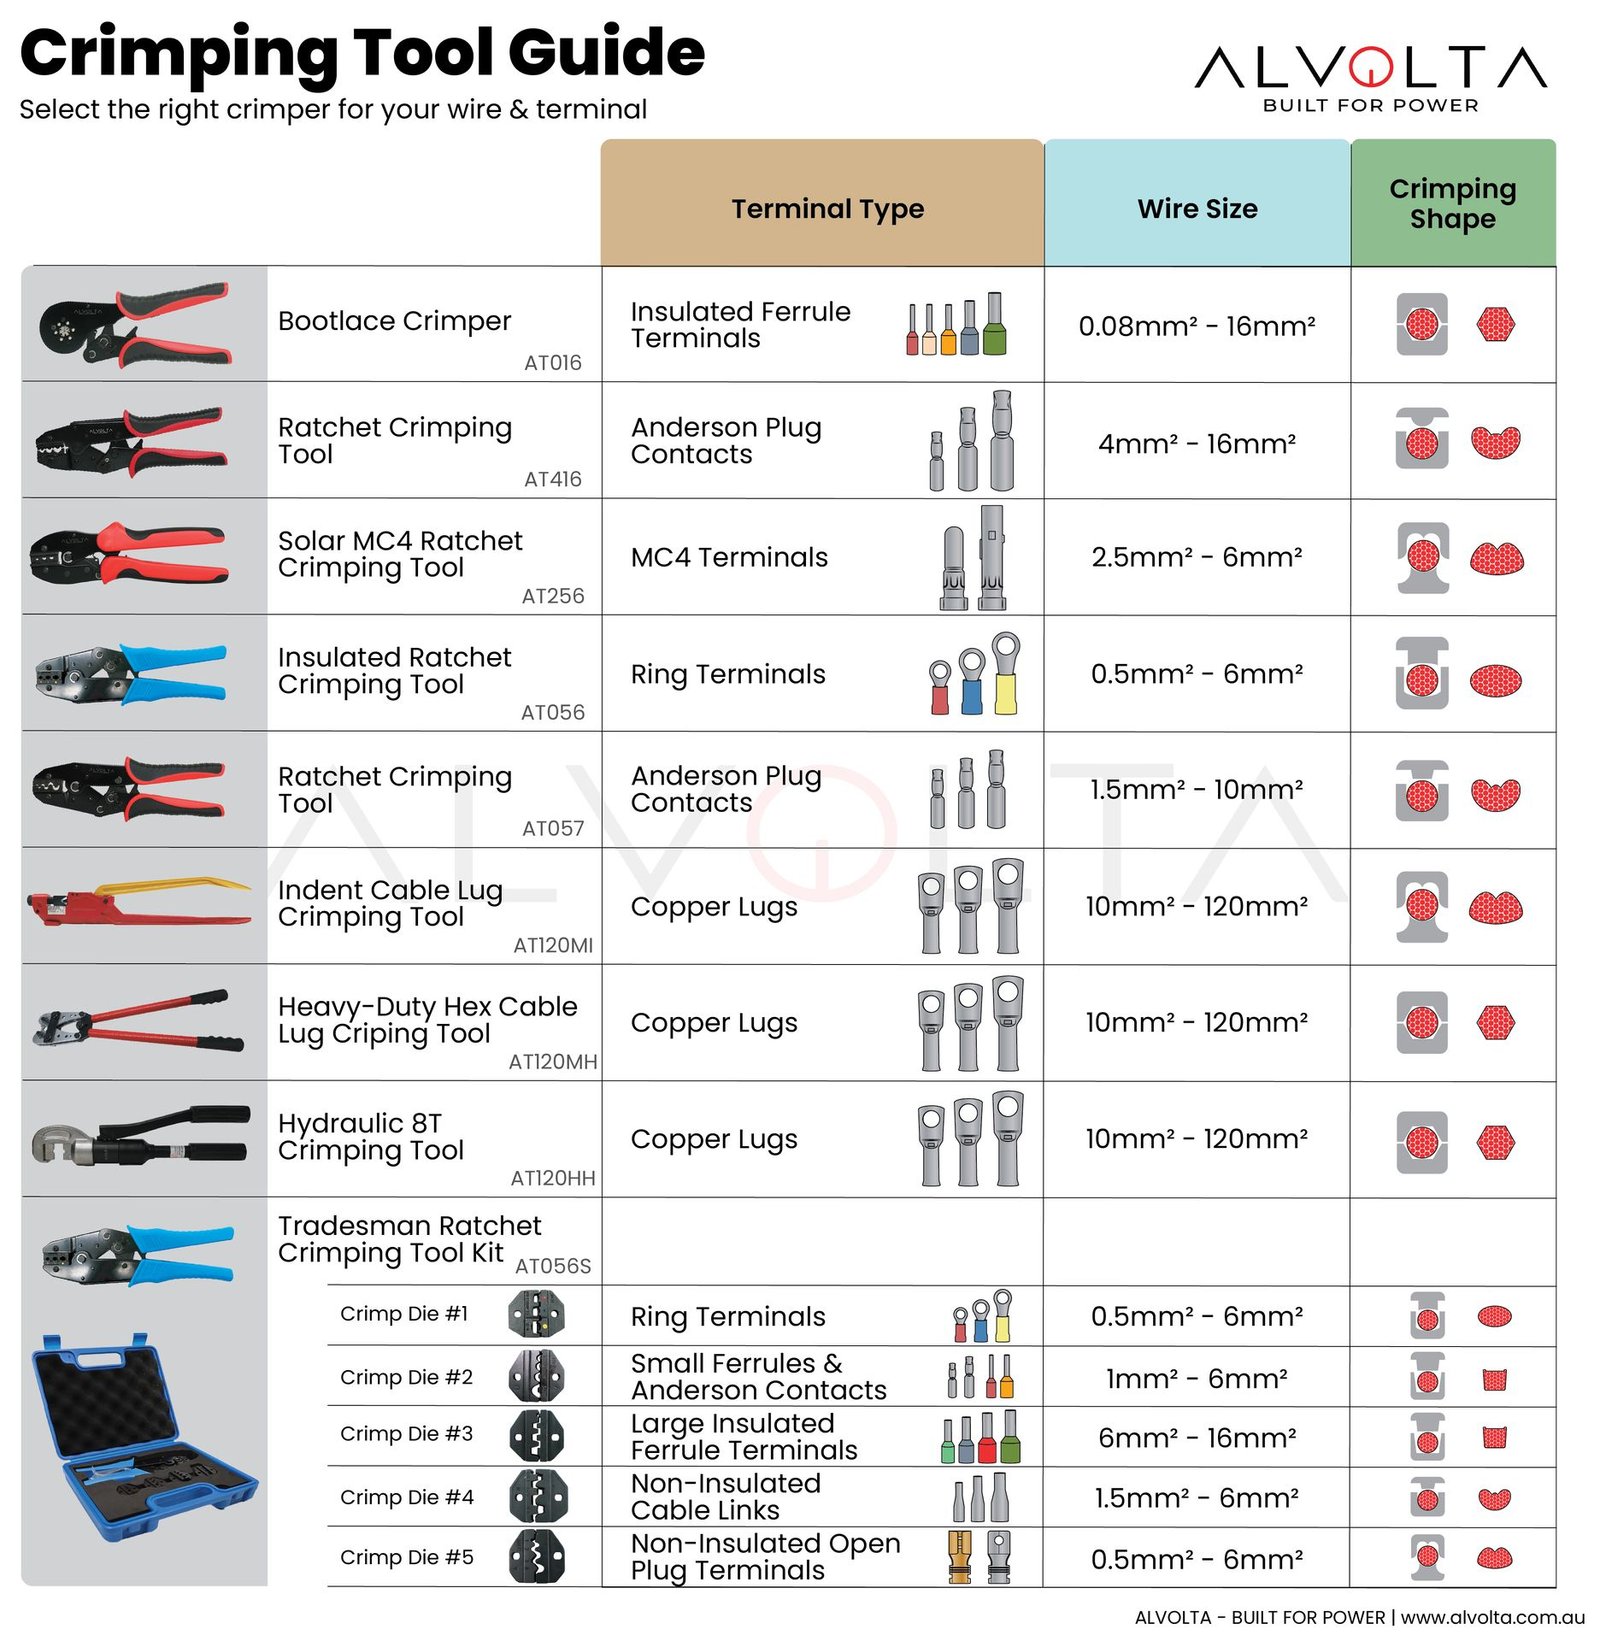
- Spade Terminals:Shaped like a fork, easy to connect and disconnect from screw terminals.
- Quick Disconnects:Allow fast connection and disconnection without tools.
- Bullet Connectors:Male and female parts fit together like a bullet and socket.
Materials And Finishes
Materials and finishes affect connector durability and conductivity. Common materials include copper, brass, and aluminum. Finishes help resist corrosion and improve connection quality.
| Material | Properties | Common Use |
| Copper | High conductivity, flexible | Most electrical connectors |
| Brass | Good conductivity, strong | Terminals and pins |
| Aluminum | Lightweight, lower conductivity | Specialized connectors |
| Tin Plating | Prevents corrosion, improves soldering | Most copper connectors |
| Nickel Plating | Resists heat and corrosion | High-temperature connectors |

Credit: xbcomponents.com
Essential Crimping Tools
Crimping electrical connectors needs the right tools. Good tools make strong and safe connections.
This guide covers key tools and how to keep them in top shape.
Manual Vs. Hydraulic Tools
Manual crimping tools work by hand pressure. They are good for small jobs and light wires.
Hydraulic tools use fluid power. They need less effort and handle bigger connectors.
- Manual tools are simple and cheap.
- Hydraulic tools give strong, even crimps.
- Manual tools suit light wiring jobs.
- Hydraulic tools fit heavy-duty tasks.
- Hydraulic tools cost more and need care.
Tool Maintenance Tips
Keep crimping tools clean and lubricated. This helps them last and work well.
| Maintenance Task | Frequency | Details |
| Cleaning | After each use | Remove dirt and debris from jaws |
| Lubrication | Monthly | Apply light oil to moving parts |
| Inspection | Weekly | Check for damage or wear |
| Storage | After use | Keep in a dry, safe place |
Preparing Wires For Crimping
Preparing wires correctly is important for a strong electrical connection. Careful preparation helps avoid failures and ensures safety.
This guide covers the basics of stripping wire insulation and selecting the right wire gauge for crimping.
Stripping Wire Insulation
Remove the insulation carefully without cutting the wire strands. Use the right tool to avoid damage.
- Choose a wire stripper that fits your wire size.
- Place the wire in the correct notch on the stripper.
- Squeeze the handles and pull the insulation off smoothly.
- Inspect the wire for any cuts or broken strands.
- Do not strip more insulation than needed for the connector.
Wire Gauge Selection
Select a wire gauge that matches the connector and the electrical load. Wrong gauge can cause poor connection or overheating.
| Wire Gauge | Connector Size | Use |
| 22-18 AWG | Small | Low current, signal wires |
| 16-14 AWG | Medium | Automotive and household wiring |
| 12-10 AWG | Large | Heavy-duty appliances and power cables |
Step-by-step Crimping Process
Crimping electrical connectors ensures a strong and safe connection. It is a simple process but must be done carefully.
This guide explains how to crimp connectors correctly in a few clear steps.
Inserting Wire Into Connector
First, strip the wire insulation to the right length. The exposed wire should fit fully inside the connector barrel.
Insert the bare wire end straight into the connector. Make sure no strands are outside the barrel.
- Use a wire stripper to remove insulation cleanly
- Check that the wire length matches the connector size
- Push the wire all the way into the connector barrel
- Keep wire strands tight and straight
Applying The Crimp
Place the connector with the wire into the crimp tool’s correct slot. The tool must match the connector size.
Squeeze the crimp tool handles firmly until the connector is tightly compressed around the wire.
- Choose a crimp tool made for your connector type
- Align the connector in the tool jaws properly
- Apply even pressure for a secure crimp
- Release the tool and remove the crimped connector
Inspecting The Crimp Quality
Check the crimp for tightness and neatness. The wire should not move inside the connector.
Look for any damage or gaps. A good crimp is smooth and shows no cracks.
- Pull gently on the wire to test grip
- Ensure the connector barrel is not deformed
- Confirm no wire strands are exposed outside
- Replace if the crimp looks loose or uneven
Common Crimping Mistakes
Crimping electrical connectors seems simple but can cause problems. Mistakes during crimping can lead to weak connections or failure.
Knowing common crimping mistakes helps you avoid bad electrical connections. This guide covers some usual errors and how they affect your work.
Overcrimping
Overcrimping happens when you press the connector too hard. It can damage the wire or connector body.
This mistake can break wire strands inside the connector. It also may cause the connector to crack or deform.
- Wire strands can snap or get crushed
- Connector may lose its shape and fit poorly
- Electrical resistance can increase, causing heat
Undercrimping
Undercrimping occurs when the connector is not pressed enough. It creates a loose connection that can fail easily.
Loose crimps let wires slip out or create sparks. This causes unreliable power flow and possible safety risks.
- Wire may pull out of the connector
- Connection may have high resistance
- Risk of short circuits or fire increases
Using Incorrect Connectors
Using the wrong connectors for your wire size or type causes poor connections. Not all connectors fit all wires.
This mistake can lead to loose crimps or damaged wires. Choosing the right connector ensures strong and safe connections.
- Match connector size to wire gauge
- Use connectors designed for the wire type
- Avoid mixing connectors and wires from different systems
Testing And Troubleshooting
Testing and troubleshooting ensure your electrical connectors work safely. Proper checks help avoid failures and hazards.
Use simple tools and methods to find weak or faulty connections. This guide covers pull tests and how to spot problems.
Conducting Pull Tests
A pull test checks if the connector is firmly attached to the wire. It measures the strength of the crimp connection.
- Use a pull tester or a spring scale to apply force.
- Pull the wire straight out from the connector.
- Note the force needed to break or loosen the connection.
- Compare this force to the standard value for your connector type.
- If the connection breaks below standard, redo the crimp.
Identifying Faulty Connections
Faulty connections can cause power loss, heat, or sparks. Look for signs that show a poor crimp or damage.
| Symptom | Cause | Action |
| Loose wire | Improper crimping | Re-crimp using correct tool |
| Discoloration | Overheating | Inspect and replace connector |
| Corrosion | Moisture exposure | Clean or replace connector |
| Broken strands | Wire damage | Trim and re-crimp wire |
Safety Tips For Crimping
Crimping electrical connectors is a common task in wiring jobs. It must be done safely to avoid accidents.
Using the right tools and safety gear helps protect you during crimping work.
Proper Handling Of Tools
Always use crimping tools carefully. Hold them firmly and do not rush your work.
Keep tools clean and in good condition. Damaged tools can slip and cause injury.
- Check the tool before use for any damage
- Use the correct tool for the connector size
- Apply steady pressure while crimping
- Do not use excessive force to avoid tool breakage
- Store tools properly after use
Protective Gear Recommendations
Wear protective gear to keep yourself safe from sparks and sharp edges. Safety glasses protect your eyes.
Gloves help protect your hands from cuts and electrical shocks. Use insulated gloves if working on live circuits.
- Safety glasses or goggles
- Cut-resistant gloves
- Insulated gloves for live wires
- Long sleeves to protect arms
- Closed-toe shoes to protect feet
Credit: sanaco.com.sa
Advanced Crimping Techniques
Crimping electrical connectors requires skill and attention to detail. Using advanced methods ensures strong and safe connections.
This guide covers special techniques for high-voltage cables and the use of heat shrink tubing for protection.
Crimping For High-voltage Applications
High-voltage cables need precise crimping to avoid failures. Use the right tools and connectors made for high voltage.
- Strip insulation carefully without damaging the conductor.
- Choose connectors rated for the voltage level.
- Use a calibrated crimping tool for uniform pressure.
- Check crimps for tightness and no gaps.
- Test the connection with a high-voltage tester.
Using Heat Shrink Tubing
Heat shrink tubing adds insulation and strain relief to crimped connectors. It protects connections from moisture and damage.
| Type of Heat Shrink | Material | Common Use |
|---|---|---|
| Polyolefin | Shrinks at 90°C | General insulation and protection |
| Fluoropolymer | Shrinks at 250°C | High heat and chemical resistance |
| Polyvinylidene Fluoride | Shrinks at 150°C | High voltage insulation |
Frequently Asked Questions
What Is The Purpose Of Crimping Electrical Connectors?
Crimping secures wires to connectors using pressure, ensuring a strong, reliable electrical connection. It prevents wire slippage and improves conductivity. Proper crimping avoids loose connections, which can cause electrical failures or hazards. It’s a quick, efficient method commonly used in wiring and electronics.
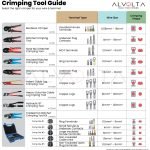
How Do I Choose The Right Crimping Tool?
Select a crimping tool based on connector type and wire gauge. Use tools that match your connector’s specifications for a secure fit. Quality tools ensure consistent crimps and reduce connection failures. Always check the tool’s compatibility with your project for best results.
Can I Reuse Crimped Connectors?
No, crimped connectors should not be reused. Reusing can weaken the connection and cause electrical failures. Always replace connectors after removal to maintain safety and reliability. Proper disposal and use of new connectors ensure optimal electrical performance.
What Are Common Mistakes In Crimping Connectors?
Common mistakes include using wrong tools, incorrect wire stripping, and improper pressure. These errors cause weak connections or damage wires. Avoid over-crimping and under-crimping for a secure fit. Following proper technique guarantees durable and safe electrical joints.
Conclusion
Mastering crimping is essential for safe electrical connections. Reliable connections prevent electrical failures. Always choose the right tools and connectors. Practice makes perfect in achieving firm crimps. Double-check your work for security and durability. Proper crimping enhances the longevity of your projects.
Remember, safety first with electrical tasks. Stay informed and follow guidelines for the best results. Your confidence will grow with experience. Keep learning and improving your skills. Happy crimping!