If you want your woodworking projects to be precise and professional, mastering the combination square is a game-changer. This simple tool helps you measure, mark, and check angles with ease, saving you time and frustration.
In this guide, you’ll discover how to use a combination square to improve your layouts and get perfect results every time. Whether you’re a beginner or looking to sharpen your skills, understanding this tool will boost your confidence and the quality of your work.
Keep reading to unlock the secrets of accurate woodworking layouts with a combination square.
Choosing The Right Combination Square
A combination square is a handy tool for woodworking layouts. It helps measure and mark angles accurately. Picking the right one makes your work easier and precise.
Different types of combination squares fit different tasks. You should consider the material and features to get the best tool for your needs.
Types Of Combination Squares
Combination squares come in various types. Each type serves a special purpose in woodworking and measuring.
- Standard Combination Square:Used for general measuring and marking.
- Double Square:Has two adjustable heads for more angles.
- Center Square:Helps find the center of round objects.
- Bevel Square:Adjustable for marking angles other than 90° and 45°.
Materials And Build Quality
The material affects the tool’s strength and accuracy. Look for durable materials that last long and hold their shape.
Common materials include stainless steel, brass, and hardened aluminum. The ruler and head should feel solid and not wobble.
- Stainless Steel:Rust-resistant and strong.
- Brass:Durable and smooth, but heavier.
- Hardened Aluminum:Lightweight and sturdy.
Features To Look For
Good features make using the combination square easier and more accurate. Check for smooth adjustment and clear measurements.
- Locking Mechanism:Keeps the ruler fixed in place.
- Clear Markings:Easy-to-read measurements on the ruler.
- Spirit Level:Built-in level for checking horizontals.
- Sharp Scriber:For marking wood precisely.
- Comfortable Grip:Easy to hold and use.

Credit: www.reddit.com
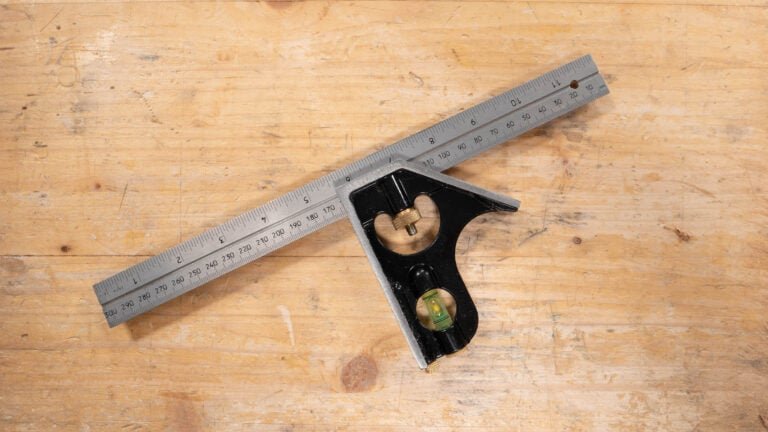
Parts Of A Combination Square
A combination square is a useful tool in woodworking. It helps you measure and mark wood accurately. Knowing its parts helps you use it better.
This guide explains the main parts: blade and ruler, stock and handle, bubble level and scriber. Each part has a special role.
Blade And Ruler
The blade is a metal ruler that slides through the stock. It usually has measurements in inches and millimeters. The blade helps you measure lengths and mark straight lines.
- Made of hardened steel for durability
- Marked with clear measurement lines
- Can slide and lock in place for different uses
Stock And Handle
The stock is the thick part that holds the blade. It forms a perfect 90-degree angle with the blade. The handle helps you hold the tool steady.
| Part | Function |
| Stock | Holds the blade at a right angle |
| Handle | Provides grip and control |
Bubble Level And Scriber
The bubble level is a small vial filled with liquid. It helps check if a surface is level or plumb. The scriber is a small pointed tool attached to the stock. It is used to mark wood precisely.
- Bubble level shows horizontal or vertical alignment
- Scriber can be removed and replaced if needed
- Both add extra functions to the combination square
Setting Up Your Combination Square
Using a combination square correctly helps you make accurate woodworking layouts. Setting it up properly is important for precise measurements.
Learn how to adjust the blade, calibrate the square, and use the locking mechanism well. This guide will help you prepare your tool for good work.
Adjusting The Blade
The blade is the metal ruler part of your combination square. Adjusting it lets you measure different lengths and angles.
Slide the blade through the head to the size you need. Make sure it lines up with the measurement marks on the ruler.
- Hold the head firmly while sliding the blade
- Check the blade edge for straightness
- Align the blade with your measurement mark
Calibrating The Square
Calibration ensures your square shows true 90-degree and 45-degree angles. It helps you mark wood accurately.
Place the square against a known straight edge. Check if the blade sits flush without gaps. If needed, adjust the blade or head.
- Find a flat, straight surface
- Place the square blade against the surface
- Look for light gaps between blade and surface
- Adjust the blade or head to remove gaps
Locking Mechanism Tips
The locking mechanism holds the blade in place during use. A tight lock keeps your measurements steady and accurate.
Turn the locking knob or screw firmly but not too tight. Over-tightening can damage the tool or make adjustments hard.
- Check the lock before marking or cutting
- Loosen the lock gently to adjust blade
- Tighten the lock just enough to hold blade firmly

Credit: www.youtube.com
Basic Woodworking Layout Techniques
Woodworking needs careful measuring and marking. These steps help you make accurate cuts and shapes.
A combination square is a useful tool for many layout tasks. It helps you mark lines and check angles easily.
Marking 90-degree Angles
Use the combination square to mark perfect right angles on your wood. This is important for straight cuts.
Place the ruler against the wood edge. Slide the square head until it fits tight. Draw your line along the ruler.
- Keep the square head flush with the wood edge
- Hold the ruler firmly to avoid movement
- Use a sharp pencil for clear lines
Checking For Squareness
Check if two edges or surfaces meet at a true right angle. This ensures your project parts fit well.
Place the square inside the corner. If the ruler touches both edges evenly, the corner is square. If not, adjust your work.
- Test corners before gluing or fastening
- Use the square on assembled pieces too
- Correct any errors early to save time
Measuring And Marking Depth
Set the ruler to the depth you need. Lock the head in place. Use this to mark cut or drill depth on wood.
Slide the ruler until the head stops at your measurement. Hold it steady and mark across the wood surface for a clear guide.
- Use the depth stop to avoid cutting too deep
- Mark both sides if needed for accuracy
- Double-check measurements before cutting
Advanced Layout Uses
A combination square is a versatile tool for woodworking layouts. It helps with precise measurements and angles beyond basic tasks.
Using its features well can improve your project accuracy and save time. This guide covers advanced uses for better results.
Marking 45-degree Angles
The combination square has a built-in 45-degree edge. Use it to mark perfect 45-degree angles on wood pieces.
Place the square’s body flat against the wood edge. Then, draw a line along the angled side for accurate cuts or joints.
- Ensure the stock is firmly held in place.
- Use a sharp pencil for clear lines.
- Double-check the angle before cutting.
Transferring Measurements
Transfer measurements easily from one piece to another using the combination square. Lock the ruler at the needed length.
Then, move the tool to the second workpiece and mark the measurement. This avoids repeated measuring and errors.
- Unlock the ruler and slide it smoothly.
- Use the fence to keep the ruler stable.
- Mark lightly, then darken the line if needed.
Using The Scriber For Fine Lines
The scriber is a small metal point on the combination square. It makes thin, precise lines on wood for detailed layouts.
Use the scriber instead of a pencil for marking fine lines that show clearly and are easy to follow during cutting.
- Hold the scriber at a low angle to the wood.
- Apply gentle pressure for a clean scratch.
- Use it on soft or hard wood for crisp marks.
Common Mistakes To Avoid
Using a combination square for woodworking helps you measure and mark accurately. Many beginners make errors that affect their work. Avoiding these mistakes saves time and improves results.
Pay attention to how you read measurements, align the blade, and keep your tool in good shape. These details matter for clean, precise woodworking layouts.
Misreading Measurements
One common mistake is reading the ruler scale wrong. This can cause wrong cuts and poor fits. Always check the measurement units before marking your wood.
Take your time to read the numbers carefully. Look for the main scale and the smaller marks. Make sure you use the correct side of the ruler for inches or millimeters.
- Check if the ruler shows inches or millimeters
- Align your eye straight above the scale to avoid parallax errors
- Double-check measurements before marking
Improper Blade Alignment
The blade of a combination square must be perfectly square to the ruler. If it is off, your lines will not be straight or accurate. This mistake leads to crooked cuts.
Always tighten the locking knob firmly to keep the blade in place. After setting the blade, test it against a known square to confirm it is true.
- Loosen and adjust the blade carefully
- Tighten the knob securely after adjustment
- Test blade alignment on a flat surface or known square
Ignoring Tool Maintenance
Neglecting regular cleaning and care of your combination square reduces its accuracy. Dirt, rust, or damage affects measurements and layout quality.
Keep the blade and ruler clean and dry. Store the tool in a safe place to avoid drops or bending. Lubricate moving parts lightly to prevent rust and stiffness.
- Wipe off sawdust and dirt after each use
- Apply light oil to metal parts to stop rust
- Store in a protective case or toolbox
Maintenance And Care Tips
Keeping your combination square in good shape helps it last longer. Proper care ensures accurate measurements each time you use it.
Simple cleaning and storage habits prevent damage and rust. Follow these tips to maintain your woodworking tool.
Cleaning The Square
Remove dirt and dust after every use. Use a soft cloth to wipe the blade and head gently.
- Use mild soap and water for stubborn grime
- Dry the square completely to avoid moisture
- Do not use harsh chemicals that can damage the finish
Preventing Rust
Rust can ruin your combination square’s accuracy. Keep metal parts dry and protected.
| Method | Details |
| Apply Light Oil | Use a cloth with machine oil on the metal parts |
| Use Silica Gel | Place packets in the storage area to absorb moisture |
| Wipe After Use | Remove sweat and water to prevent rust |
Storing Properly
Store your combination square in a dry place away from dust. Keep it in a case or pouch if possible.
- Keep the square flat to avoid bending the blade
- Avoid placing heavy items on top of it
- Check the tool regularly for signs of wear or damage

Credit: www.axminstertools.com
Frequently Asked Questions
What Is A Combination Square Used For In Woodworking?
A combination square measures angles, depths, and distances precisely. It helps mark 90° and 45° lines, ensuring accurate cuts and layouts in woodworking projects.
How Do You Adjust A Combination Square Properly?
Loosen the locking nut, slide the ruler to the desired measurement, then tighten the nut firmly. This secures the ruler for accurate marking and measuring.
Can A Combination Square Replace A Carpenter’s Square?
Yes, a combination square offers more versatility. It measures angles, depths, and checks flatness, making it a more multifunctional tool than a basic carpenter’s square.
How To Use A Combination Square For Marking 45-degree Angles?
Place the stock of the square against the wood edge. Use the ruler aligned with the 45-degree edge to mark the angle accurately.
Conclusion
Mastering the combination square improves your woodworking precision. It helps ensure accurate cuts and angles. This tool is essential for layout tasks. Its versatility makes it a valuable addition to your toolkit. Understanding its uses can enhance your projects. Practice regularly to gain confidence.
Soon, you’ll notice improved results in your work. Remember, patience and attention to detail are key. Happy woodworking!