Are you ready to make your small projects look sharp and precise? Using a try square might be the secret tool you’ve been missing.
This simple device can help you measure and mark perfect right angles, making your work cleaner and more professional. Whether you’re building a birdhouse, fixing a shelf, or crafting something special, knowing how to use a try square will save you time and frustration.
Keep reading, and you’ll discover easy steps to master this handy tool and take your projects to the next level.

Credit: www.wikihow.com
Choosing The Right Try Square
A try square is a handy tool for small woodworking projects. It helps you check right angles and mark straight lines. Choosing the right try square makes your work easier and more accurate.
There are different types, materials, and sizes to consider. Knowing these will help you pick the best tool for your project.
Types Of Try Squares
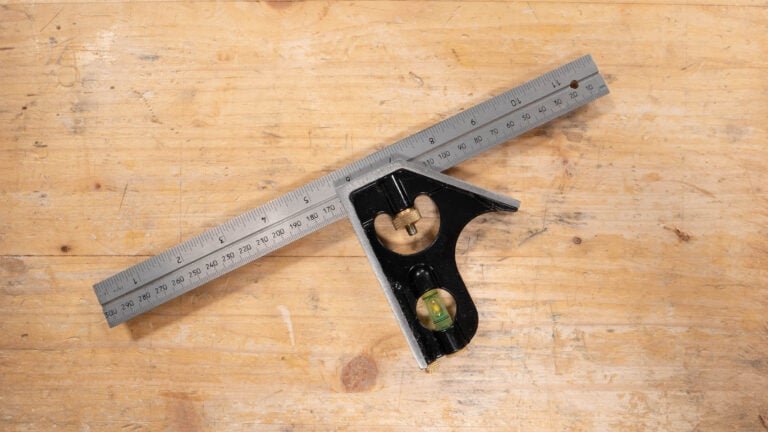
Try squares come in several types. The most common are the steel try square, combination square, and wooden try square. Each has its own use and benefits.
- Steel Try Square:Durable and precise, perfect for metal and wood.
- Combination Square:Multi-use tool with adjustable ruler and angle settings.
- Wooden Try Square:Traditional and lightweight, good for simple tasks.
Materials And Build Quality
Try squares are made from wood, steel, or plastic. Steel is strong and stays accurate longer. Wood is light but can warp over time. Plastic is cheap but less durable.
Look for smooth edges and tight joints. A good try square should not have gaps between the blade and handle. Quality materials improve accuracy and lifespan.
Size Considerations For Small Projects
Try squares come in different sizes. Small projects work best with a 4-inch or 6-inch blade. Larger blades can be hard to handle in tight spaces.
Choose a size that fits your work area and project needs. A compact try square is easier to store and carry around.
Basic Try Square Components
A try square is a simple tool used in woodworking and small projects. It helps you check angles and mark straight lines.
Knowing the parts of a try square helps you use it correctly. The main parts are the blade and the stock.
Blade And Stock Parts
The blade is the flat metal part of the try square. It is usually marked with measurements in inches or centimeters.
The stock is the thicker part attached to the blade. It acts as a handle and helps keep the blade at a right angle.
- Blade:Thin, flat, and marked for measuring
- Stock:Thick, sturdy, and holds the blade firmly
Reading The Measurements
The blade has measurement marks like a ruler. These help you measure small distances or mark lines.
Read the numbers from the edge of the stock along the blade. Use the marks to draw straight lines or check sizes.
- Look at the numbers near the stock edge
- Use the marks to measure or mark wood
- Check that the blade and stock form a perfect 90-degree angle
Preparing Your Workspace
Using a try square correctly starts with a good workspace. Prepare your area to work safely and accurately.
A clean and organized workspace helps you focus on your small projects. It reduces mistakes and saves time.
Stable Surface Setup
Choose a flat and steady surface to place your materials. A stable surface keeps your work steady and your measurements precise.
Make sure the surface does not wobble or move when you apply pressure. This helps keep your try square aligned properly.
- Use a solid workbench or table
- Clear clutter to avoid distractions
- Check stability by pressing on the surface
- Place non-slip pads under materials if needed
Proper Lighting
Good lighting helps you see edges and lines clearly. It reduces eye strain and improves accuracy when using the try square.
Use bright, even light that does not cast strong shadows on your work area. Natural light or LED lamps work well.
- Work near a window during the day
- Use adjustable desk lamps for focused light
- Avoid glare on the material surface
- Check lighting from different angles
Marking Accurate Lines
Using a try square helps you draw straight and precise lines. This tool is great for small projects that need exact measurements.
Marking lines carefully makes cutting and assembling easier. It saves time and reduces mistakes.
Aligning The Try Square
Place the try square’s stock firmly against the edge of your material. Make sure it does not move while marking.
The blade must lie flat on the surface. Check that the square forms a perfect 90-degree angle with the edge.
- Hold the stock tight against the edge
- Keep the blade flat and steady
- Ensure the angle is exactly 90 degrees
- Use light pressure to avoid shifting
Using Pencils And Markers
Choose a pencil or marker that suits your material. A sharp pencil works well on wood for thin, clear lines.
Markers show better on darker surfaces but may create thicker lines. Test your tool before marking your project.
- Use a sharp pencil for fine lines
- Pick a marker for dark or rough surfaces
- Test on scrap material first
- Keep your marking tool steady
Checking For Squareness
Using a try square helps you check if your project parts meet at a perfect right angle. Squareness is key to making sure everything fits and looks right.
We will look at two important steps: testing corners and adjusting your cuts. These help you keep your small projects accurate.
Testing Corners
Place the try square’s stock firmly against one edge of your workpiece. The blade should rest flat on the adjacent edge. Look closely at the corner.
- Check for any gaps between the blade and the edge.
- Use a pencil to mark areas that do not touch the blade.
- Turn the workpiece to test all corners.
- Repeat this process to ensure all corners are square.
Adjusting Your Cuts
If your corners are not square, you need to adjust your cuts. Small changes can improve the fit and angle.
| Problem | Adjustment |
| Gap at the blade | Slightly trim the edge using a saw or plane |
| Blade does not touch | Sand or plane the edge gently |
| Corner too tight | Recheck measurements and recut if needed |

Credit: www.wikihow.com
Maintenance Tips
Keeping your try square in good shape helps you get accurate measurements. Simple care steps keep it working well for small projects.
Check and maintain your tool regularly. This extends its life and improves its reliability.
Cleaning And Storage
Clean your try square after every use. Dirt and dust can affect its accuracy and wear it down.
Store it in a dry place to stop rust and damage. Keep it away from heavy tools that may bend it.
- Wipe the blade and handle with a dry cloth
- Use a soft brush for stubborn dirt
- Apply a light oil coating to metal parts for rust protection
- Store in a toolbox or hang on a pegboard
Calibration Checks
Check your try square’s accuracy before starting new projects. This prevents mistakes in your work.
Test it by drawing a line and checking the square angle against a known straight edge.
- Place the try square blade against a flat edge
- Draw a line along the handle
- Flip the try square and draw a second line from the same starting point
- If lines match, the tool is accurate
- If lines differ, adjust or replace the try square
Common Mistakes To Avoid
Using a try square helps you make straight cuts and measure angles. Small projects need accuracy. Avoid mistakes that waste time and materials.
Learn about common errors with try squares. Fixing these will give you better results on your projects.
Misalignment Errors
Misalignment happens if you do not place the try square correctly. The blade must sit flat against the workpiece edge. If it is tilted, your cut or mark will be off.
Also, check that the try square’s handle and blade meet at a perfect right angle. Any gap or bend causes wrong measurements.
- Keep the try square flat against the edge
- Do not apply too much pressure that bends the tool
- Check the angle before marking or cutting
Ignoring Tool Wear
Try squares can wear out from frequent use. The blade edge may chip or the angle may shift. Using a worn tool leads to mistakes.
Check your try square often. Look for dents, rust, or loose parts. Replace or fix the tool to keep it accurate.
- Inspect the blade for chips or bends
- Make sure the handle is tight and straight
- Clean the tool after each use to prevent rust
Advanced Techniques
Using a try square is simple for straight cuts. You can also use it for more detailed work. These advanced techniques help improve your precision.
Learning to use the try square with angles and other tools gives you more control. These skills work well for small projects.
Using The Try Square For Angled Cuts
A try square is mainly for 90-degree angles. You can still use it to help with angled cuts. Start by marking a 90-degree line as a reference.
Then, measure the angle you need using a protractor or angle finder. Mark the angle on your wood. Use the try square to check the straight edges around the angle.
- Draw a base line with the try square.
- Mark your desired angle with a protractor.
- Use the try square edges to keep lines straight.
- Cut along the angled line carefully.
Combining With Other Tools
Use the try square together with other tools for better results. For example, combine it with a marking knife to make precise lines.
It also works well with a combination square or a bevel gauge. These tools help measure different angles and depths. The try square keeps your lines straight and square.
- Mark straight lines with the try square.
- Use a marking knife for sharp, clear marks.
- Measure angles with a bevel gauge.
- Check depth or thickness with a combination square.

Credit: www.wikihow.com
Frequently Asked Questions
What Is A Try Square Used For In Woodworking?
A try square measures and marks 90-degree angles on wood. It ensures precision in cuts and joints. It is essential for small projects requiring accuracy and neatness.
How Do I Check If My Try Square Is Accurate?
Place the try square against a straight edge and mark a line. Flip the square and mark another line from the same point. If lines align perfectly, the tool is accurate.
Can A Try Square Measure Angles Other Than 90 Degrees?
No, a try square is designed specifically for 90-degree angles. For other angles, use tools like a bevel gauge or protractor.
How Do I Maintain My Try Square For Long Use?
Keep the try square clean and dry to avoid rust. Store it in a protective case. Regularly check for accuracy and avoid dropping it.
Conclusion
Understanding how to use a try square is valuable for small projects. It helps ensure precision and accuracy. Essential for straight lines and right angles. Saves time and reduces errors. Ideal for crafting and home DIY tasks. It’s simple to learn and apply.
A handy tool for both beginners and experts. Keep practicing to improve your skills. Boost confidence in your woodworking projects. Enjoy the satisfaction of well-done work. Try it on your next project. You’ll appreciate the difference.