When it comes to woodworking, getting your angles just right can make all the difference between a perfect fit and a frustrating gap. If you’ve ever struggled with marking wood for precise angles, you’re not alone.
But here’s the good news: with a few simple tips, you can improve your accuracy and confidence every time you measure and mark. You’ll discover easy-to-follow techniques that will help you master angle marking, save time, and create cleaner, stronger joints.
Ready to take your woodworking skills to the next level? Let’s dive in!
Credit: www.familyhandyman.com
Choosing The Right Tools
Marking wood for precise angles needs the right tools. Using good tools helps you get accurate cuts and better results.
Choosing tools that fit your project makes your work easier and more precise. Let’s look at some essential tools.
Essential Marking Instruments
Basic marking tools include pencils, marking knives, and squares. Each tool helps you mark wood clearly and accurately.
A sharp pencil or marking knife makes thin lines. Try a carpenter’s square to mark right angles quickly.
- Carpenter’s pencil for clear, visible lines
- Marking knife for thin, precise marks
- Combination square for measuring and marking angles
Using Protractors And Angle Finders
Protractors help measure and mark specific angles on wood. They are simple and easy to use for many projects.
Angle finders measure existing angles on objects. You can copy angles from one piece of wood to another with them.
- Use a protractor to mark angles from 0 to 180 degrees
- Angle finders help transfer angles accurately
- Both tools improve precision in angled cuts
Benefits Of Digital Measuring Tools
Digital tools show angle measurements on screens. They give fast and clear readings for better accuracy.
These tools reduce mistakes by showing exact angles. They also save time on measuring and marking tasks.
- Digital protractors display precise angle numbers
- Some tools store measurements for repeated use
- Easy to read screens reduce errors
Preparing The Wood Surface
Marking wood for precise angles begins with preparing the surface. A clean, smooth surface helps you make clear and accurate lines.
Taking time to prepare the wood ensures your measurements and cuts are exact. This reduces mistakes and waste.
Cleaning And Smoothing Techniques
Start by removing dirt, dust, and oils from the wood. Use a soft brush or cloth to clear the surface well.
- Wipe the wood with a damp cloth to remove dust.
- Use fine-grit sandpaper to smooth rough spots.
- Sand along the grain, not against it, to avoid scratches.
- Remove sanding dust with a tack cloth before marking.
Selecting The Best Side For Marking
Choose the wood side with the least defects for marking. This makes your lines easier to see and follow.
| Wood Side | Marking Quality |
| Flat, smooth face | Best for clear, precise lines |
| Rough or knotty face | Hard to mark accurately |
| Side with grain runs visible | Helps guide straight lines |
Accurate Angle Measurement Methods
Measuring angles on wood precisely is key for good results in woodworking. Using the right tools helps you mark angles correctly and avoid mistakes.
Below are some common methods to transfer and mark angles accurately on wood pieces.
Transferring Angles With Bevel Gauges
Bevel gauges are simple tools to copy and transfer angles from one piece to another. You can lock the blade at any angle and move it easily.
- Loosen the wing nut to adjust the blade.
- Place the blade on the angle you want to copy.
- Tighten the nut to lock the angle.
- Transfer the angle to your wood and mark along the blade edge.
Using Combination Squares
Combination squares help measure and mark common angles like 45 and 90 degrees. They are handy for quick and accurate marking.
| Tool Part | Use |
| Blade | Measure angles and mark straight lines |
| Head | Align with edges and set 90 or 45 degrees |
| Bubble Level | Check for level or plumb surfaces |
Marking Common Angles Precisely
Marking common angles like 30°, 45°, and 60° requires careful measuring and steady marking. Use a protractor or angle finder for these angles.
Tips for marking common angles:
- Use a clear protractor to measure the exact angle.
- Align the tool’s center point with the wood’s edge.
- Draw a fine pencil line along the angle mark.
- Double-check measurements before cutting.
Marking Techniques For Clarity
Marking wood correctly helps create accurate cuts and angles. Clear marks guide your tools and save time.
Using the right marking tools and techniques improves the visibility of your lines. This reduces mistakes and improves the final result.
Creating Sharp, Visible Lines
Use a sharp pencil or marking knife to make thin lines. Thick lines can cause cutting errors.
Always mark on the face side of the wood. This side is where you will see the final cut, so lines must be clear.
- Use a sharp pencil or mechanical pencil for thin lines
- Try a marking knife for very precise, thin marks
- Mark on the face side or finished side of the wood
- Use a square or angle guide to draw straight lines
- Keep your tools clean to avoid smudging
Avoiding Common Marking Mistakes
Do not press too hard with your pencil. Heavy lines can blur and confuse your cuts.
Check your measuring tools before marking. Wrong measurements lead to poor cuts.
- Avoid thick or smudged lines
- Double-check measurements before marking
- Mark clearly but lightly to avoid confusion
- Do not rely on faded or old markings
- Keep your marking tools sharp and clean
Double-checking Measurements
Marking wood for precise angles needs care and attention. Double-checking measurements helps avoid mistakes.
It saves wood from waste and keeps your project accurate. Always verify angles before cutting.
Using Templates And Jigs
Templates and jigs guide your marks for repeating angles. They help keep angles consistent on different pieces.
Check the template against your measurements before use. This ensures it matches the needed angle exactly.
- Inspect templates for wear or damage
- Measure the angle on the jig with a protractor
- Test the template on scrap wood first
Cross-referencing With Multiple Tools
Use different tools to confirm your angle marks. Each tool can check your measurements from another view.
Compare a protractor, speed square, and combination square. Cross-checking reduces errors and boosts precision.
- Mark angle with a protractor first
- Verify with a speed square
- Use a combination square for final check
- Repeat measurements if tools disagree

Credit: www.youtube.com
Tips For Complex Angle Layouts
Marking wood for complex angles can be tricky. It needs careful measuring and clear lines.
Using the right tools and methods helps you get precise cuts and perfect fits.
Handling Compound Angles
Compound angles have two different angles at once. These are common in crown molding and furniture.
Use a bevel gauge to find the exact angles on both planes. Transfer these angles carefully to your wood.
- Set the bevel gauge to match the compound angle
- Mark the angle lines clearly on the wood
- Double-check your measurements before cutting
Breaking Down Complex Shapes
Complex shapes can be confusing. Break them into simple parts to make marking easier.
Draw each simple shape separately. Then combine the marks to get the full layout.
- Sketch the entire shape on paper first
- Divide the shape into basic triangles and rectangles
- Mark each part on the wood one by one
- Check that all parts fit together before cutting
Maintaining Tools For Precision
Marking wood for precise angles needs sharp and accurate tools. Keeping your tools in good shape helps you get exact lines every time.
Regular tool care saves time and reduces mistakes. It also makes your work look professional and clean.
Regular Calibration And Care
Check your tools often to make sure they measure and mark angles correctly. Small errors can cause big problems in your project.
Clean your tools after each use. Dust and dirt can change how tools work and make marks less clear.
- Use a soft cloth to wipe tools clean
- Apply light oil to metal parts to stop rust
- Store tools in a dry place
- Test tools on scrap wood before use
Replacing Worn Marking Instruments
Marking tools like pencils and knives wear out over time. Dull tips make marks blurry and less precise.
Replace worn tools quickly to keep your marks sharp. Using fresh instruments keeps your angles exact and your work tidy.
- Sharpen knives and marking blades regularly
- Use new pencils or leads for clear lines
- Check for cracks or damage before each use
- Keep spare tools handy for quick swaps

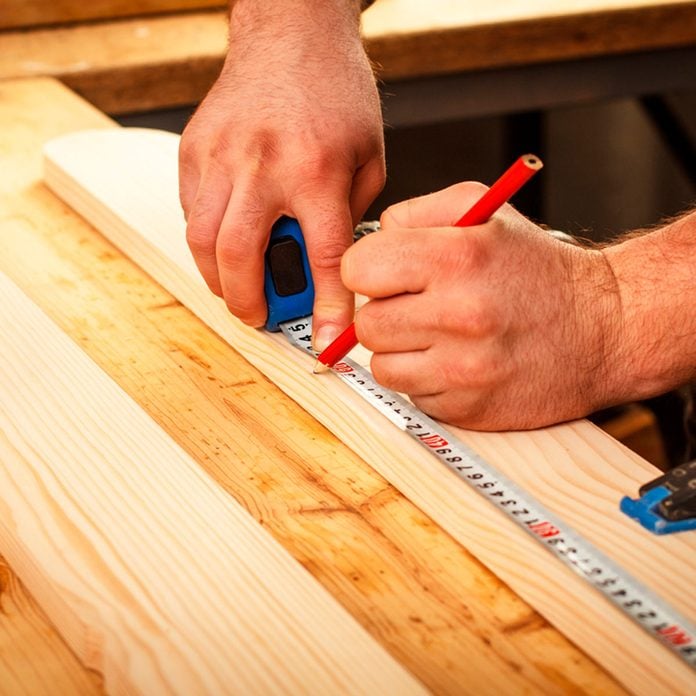
Credit: www.wikihow.com
Frequently Asked Questions
How Do I Mark Wood For Accurate Angle Cuts?
Use a protractor or angle finder to measure the exact angle. Transfer the angle carefully with a pencil and a straightedge. Double-check measurements before cutting to ensure precision and avoid mistakes.
What Tools Help Mark Angles On Wood Precisely?
Essential tools include a protractor, combination square, speed square, and marking knife. These tools improve accuracy and make angle marking easier. Choose based on the angle type and your project needs.
Why Is Marking Wood Angles Important In Woodworking?
Marking ensures cuts are accurate, fitting pieces correctly. It prevents waste and saves time by reducing errors. Precise angles improve the strength and appearance of your project.
How Can I Improve Angle Marking Accuracy On Wood?
Use sharp pencils or marking knives for clear lines. Secure wood firmly to prevent movement. Measure twice, mark once. Practice steady hand control for consistent markings.
Conclusion
Marking wood accurately ensures successful woodworking projects. Practice boosts precision. Use quality tools for better results. Double-check measurements before cutting. Mistakes cost time and materials. Choose the right marking tools. Pencils, scribes, and squares are useful. Ensure clear and visible lines.
Patience and attention to detail matter. Slow and steady wins the race. Proper marking makes complex angles easier. Share your tips and learn from others. Consistent practice leads to improvement. Happy woodworking!