If you’ve ever struggled with loose or faulty cable connections, you know how frustrating it can be. Crimping coaxial connectors properly is the key to getting a strong, reliable signal every time.
But if you’re unsure where to start or worried about making mistakes, don’t worry. This guide will walk you through the simple steps to crimp your own coaxial connectors with confidence. By the end, you’ll have the skills to secure your cables like a pro and avoid those annoying signal drops.
Ready to take control of your connections? Let’s dive in.

Credit: www.youtube.com
Choosing The Right Coaxial Connector
Choosing the right coaxial connector is important for good signal quality. The connector must fit the cable and the device.
A wrong connector can cause signal loss or damage. Knowing the types helps you pick the best one.
Types Of Coaxial Connectors
Coaxial connectors come in many types. Each type works for certain uses and cables.
Common types include F connectors, BNC connectors, and SMA connectors. Each has a different shape and size.
- F Connectors:Used for TV and satellite cables.
- BNC Connectors:Often used in CCTV and radio equipment.
- SMA Connectors:Small connectors for high-frequency signals.
- N Connectors:Larger connectors for outdoor and heavy-duty use.
Matching Connectors To Cable Types
Each coaxial cable type fits best with certain connectors. Match them to avoid signal problems.
For example, RG6 cables usually use F connectors. RG59 cables can use BNC connectors. Use the right match for secure connections.
| Coaxial Cable Type | Common Connector | Use Case |
|---|---|---|
| RG6 | F Connector | TV, Satellite |
| RG59 | BNC Connector | CCTV, Video |
| RG58 | BNC Connector | Radio, Networking |
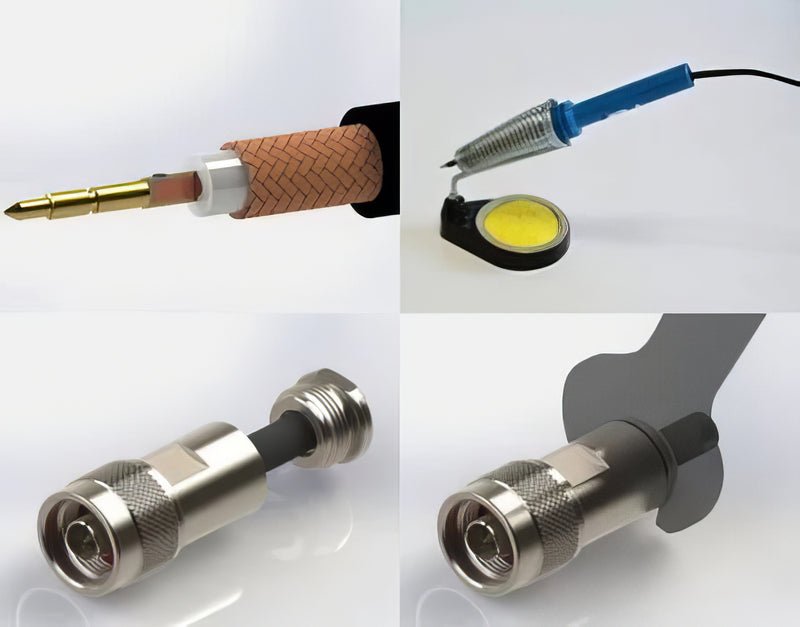
| LMR-400 | N Connector | Outdoor Antennas |
| Various Thin Cables | SMA Connector | Wireless Devices |
Credit: www.vevor.com
Essential Tools For Crimping
Crimping coaxial connectors needs the right tools to work well. Using proper tools helps you get secure and reliable connections.
This guide covers the main tools you need for crimping coaxial connectors correctly and safely.
Crimping Tool Selection
Choose a crimping tool made for coaxial connectors. It must fit the size of the connector and cable.
A good crimping tool helps press the connector tightly on the cable without damage. Look for tools with clear size markings.
- Tools for RG6, RG59, or other cable sizes
- Adjustable ratchet crimpers for consistent pressure
- Tools with interchangeable dies for different connectors
- Comfortable grips for ease of use
Additional Tools Needed
You need more than just a crimping tool. Other tools help prepare the cable and make connections easier.
- Cable Stripper:Removes the outer jacket and shield cleanly.
- Coaxial Cutter:Cuts cable without crushing it.
- Compression Tool:Used for compression-type connectors.
- Utility Knife:Helps with fine trimming and cleaning.
- Wire Brush or Cloth:Cleans the cable before connecting.
Having these tools ready will make crimping easier and improve connection quality.
Preparing The Coaxial Cable
Preparing a coaxial cable correctly is important before crimping the connector. Proper preparation ensures a strong connection and clear signal.
This guide covers stripping the cable and cleaning and inspecting it for the best results.
Stripping The Cable
Stripping the coaxial cable means removing the outer layers carefully. You want to expose the inner conductor without damaging it.
- Use a coaxial cable stripper tool for a clean cut.
- Remove about half an inch of the outer jacket.
- Peel back the braided shield gently.
- Cut the foil shield away carefully.
- Expose the inner conductor without nicking it.
Cleaning And Inspecting The Cable
Cleaning the cable after stripping removes dust and oils. Inspecting helps catch any damage before crimping.
| Task | Details |
|---|---|
| Clean the conductor | Use a lint-free cloth or alcohol wipe |
| Check the conductor | Look for nicks, bends, or corrosion |
| Inspect the braid | Ensure it is intact and evenly spread |
| Confirm cable length | Check stripped length matches connector specs |

Credit: m.youtube.com
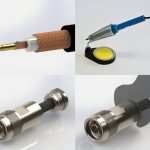
Attaching The Connector
Attaching a coaxial connector is a key step in cable assembly. You must prepare the cable and connector carefully. A good connection ensures signal quality and durability.
This guide explains how to slide the connector onto the cable and check its fit. Follow these steps for a strong and reliable connection.
Sliding The Connector Onto The Cable
Start by holding the prepared cable end firmly. Slide the coaxial connector straight onto the cable without twisting. The connector should cover the stripped part completely.
Do not force the connector too hard. If it does not slide easily, check the cable preparation again. The cable jacket and shielding must be trimmed correctly.
Ensuring Proper Fit
After sliding the connector, make sure it sits flush on the cable. The connector should not wobble or feel loose. A proper fit prevents signal loss and damage.
- The center conductor must extend into the connector pin.
- The cable shielding should touch the connector body.
- No exposed wires should be outside the connector.
- The connector should align straight with the cable.
If the connector does not fit well, remove it and check the cable again. Proper trimming and cleaning help achieve a secure fit.
Crimping The Connector
Crimping coaxial connectors secures the cable to the connector firmly. A proper crimp ensures good signal quality and prevents connection problems. Follow the right steps for a strong connection.
This guide covers how to position the tool, apply the crimp, and check the crimp quality for reliable results.
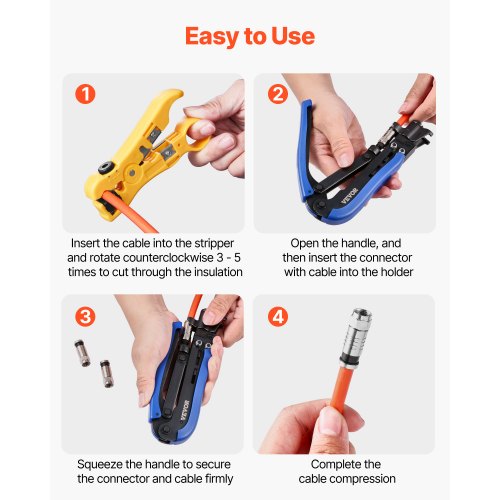
Positioning The Tool
Place the coaxial cable into the connector carefully. Make sure the cable jacket, shield, and center conductor fit well. Position the crimping tool jaws around the metal sleeve of the connector. The tool must line up evenly to avoid uneven pressure.
- Insert the cable fully into the connector.
- Align the crimp tool jaws on the connector’s metal ring.
- Check that the tool fits the connector size.
- Hold the tool steady before crimping.
Applying The Crimp
Squeeze the handles of the crimping tool evenly and firmly. Apply steady pressure until the tool completes the crimp cycle. Do not release the tool too early, or the connector may be loose.
Use the correct die on the tool for your connector type. A proper crimp compresses the metal ring evenly around the cable for a tight fit.
| Connector Type | Recommended Crimp Die | Pressure Level |
| RG-6 | Hex Die 6.0mm | Medium |
| RG-59 | Hex Die 4.8mm | Low to Medium |
| RG-11 | Hex Die 7.8mm | High |
Checking The Crimp Quality
After crimping, inspect the connector closely. Check for any gaps or loose parts. The connector should not move on the cable. Look for even compression around the metal ring.
- Confirm the cable jacket is under the crimp ring.
- Ensure the center conductor is visible and undamaged.
- Test the connection by gently pulling the cable.
- Check that the connector fits snugly on the cable.
Testing The Connection
After crimping coaxial connectors, testing the connection is important. It ensures the cable works well and has no faults.
Proper testing helps avoid signal loss and improves overall performance of your setup.
Visual Inspection
Start by looking closely at the connector and cable. Check if the connector is fully seated and crimped tightly.
- Make sure the coaxial cable’s center conductor is straight and extends slightly beyond the connector.
- Check that the outer shield is properly folded back and inside the connector.
- Look for any cracks or damage on the connector’s body.
- Confirm the crimp ring is evenly compressed around the cable.
Signal Testing Methods
Use tools to measure the signal quality and connection integrity. These tools can find problems not visible to the eye.
| Test Type | Purpose | How to Use |
| Continuity Tester | Check if the conductor is unbroken | Connect leads to cable ends; look for beep or light |
| Signal Level Meter | Measure strength of the cable signal | Attach meter to connector; read signal strength on screen |
| Network Analyzer | Detect reflection and loss in cable | Connect analyzer; follow device instructions for detailed test |
Common Mistakes To Avoid
Crimping coaxial connectors is important for a good signal. Avoiding mistakes helps keep the connection strong and clear.
Some errors can cause signal loss or connector damage. Learn which mistakes to watch out for to make your work easier.
Over-crimping Or Under-crimping
Crimping too hard can damage the connector or cable. It may crush the cable and break the inner conductor.
Crimping too lightly makes the connection loose. The connector can slip off or cause signal problems.
- Use the right crimping tool for your connector type.
- Apply firm but controlled pressure when crimping.
- Check the crimped connector for tightness and damage.
Incorrect Cable Preparation
Not preparing the cable correctly leads to bad connections. The cable must be stripped to the right length.
Removing too much or too little insulation causes signal loss or shorts. The braid and foil should stay intact.
- Use a proper coaxial cable stripper for clean cuts.
- Remove only the required amount of outer jacket and insulation.
- Make sure the center conductor is straight and clean.
- Keep the shield braid flared or folded back properly.
Maintaining Your Crimped Connections
Good maintenance keeps your coaxial connectors working well. Proper care prevents signal loss and connection problems.
Check your connections often and handle them carefully. This helps your cables last longer and work better.
Regular Inspection
Look at your crimped connections regularly to find any damage or wear. Inspect the connectors for cracks, rust, or loose fittings.
- Check for corrosion on the metal parts.
- Ensure the connector is tightly crimped without movement.
- Look for any bent or broken pins inside the connector.
- Test the signal strength to spot any drop-offs.
Handling And Storage Tips
Handle your cables and connectors with care to avoid damage. Store them in a dry, cool place to keep them safe from moisture and heat.
| Tip | Reason |
| Keep connectors covered when not in use | Prevents dust and dirt buildup |
| Do not bend cables sharply near connectors | Avoids wire breakage inside the cable |
| Store in a dry place | Stops corrosion and rust |
| Use cable ties loosely | Prevents crushing the cable |
Frequently Asked Questions
What Tools Are Needed To Crimp Coaxial Connectors?
You need a coaxial cable stripper, crimping tool, and the correct connector. These tools ensure a secure, reliable connection. Using the right tools prevents signal loss and connector damage during installation.
How Do I Prepare The Cable Before Crimping?
Strip the cable jacket carefully without damaging the inner conductor. Expose the braided shield and dielectric properly. Proper preparation ensures a strong connection and optimal signal transmission.
What Is The Correct Crimping Technique For Coax Connectors?
Place the connector over the cable and use a crimping tool on the metal ring. Apply even pressure until the connector is firmly attached. This technique prevents signal interference and connector loosening.
How Can I Test If My Crimped Connector Works?
Use a cable tester or signal meter to check continuity and signal strength. Testing confirms a proper connection and helps identify any faults quickly.
Conclusion
Crimping coaxial connectors can be simple with practice. Follow each step carefully. Have your tools ready and organized. Secure connections ensure optimal signal performance. Double-check every crimp for tightness and security. Practice makes perfect, so don’t rush. Over time, you’ll gain confidence.
Always handle cables gently to avoid damage. Keep learning and improving your skills. Share your knowledge with others. Proper technique leads to better connections. Crimping is a valuable skill for many projects. Enjoy the process and results. Happy crimping!