Choosing the right sanding grit can make all the difference between a smooth, professional finish and a frustrating, uneven surface. If you’ve ever wondered why your sanding efforts don’t look quite right or take longer than expected, the problem might be in the grit you’re using.
This guide will help you understand which grit to pick for your project, saving you time, effort, and money. Keep reading to discover simple tips that will transform your sanding experience and give your work the flawless finish it deserves.
Credit: ukam.com
Types Of Sanding Grit
Sanding grit refers to the roughness of the sandpaper. It changes how much material the sandpaper removes.
Different grit types work best for different jobs. Choosing the right grit helps you get smooth results.
Coarse Grit Uses
Coarse grit has large particles. It removes material quickly and rough surfaces fast.
Use coarse grit for sanding rough wood or removing old paint and finishes.
- Grit numbers: 40 to 60
- Best for heavy sanding and shaping
- Not good for fine finishing
Medium Grit Applications
Medium grit balances material removal and smoothness. It works well for general sanding tasks.
This grit is good for preparing surfaces before finishing or between coats of paint.
- Grit numbers: 80 to 120
- Good for leveling surfaces
- Prepares wood for finer sanding
Fine Grit Benefits
Fine grit has small particles. It smooths surfaces and removes minor scratches.
Use fine grit for finishing touches and polishing before applying varnish or paint.
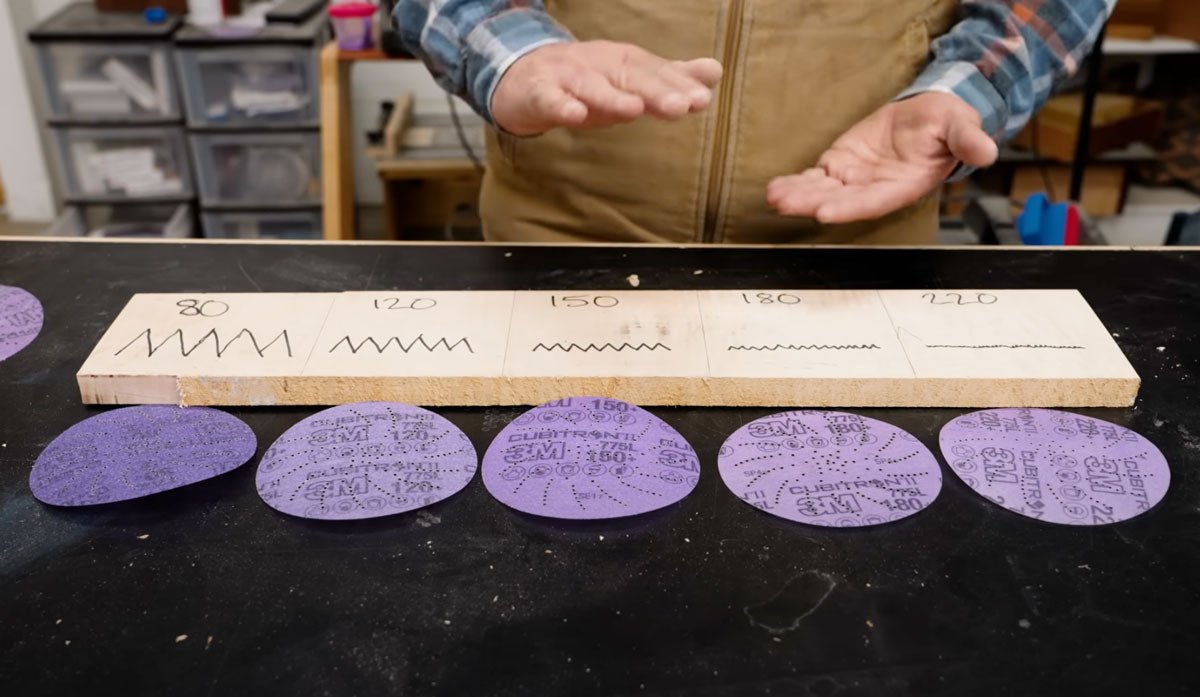
- Grit numbers: 150 to 220 and higher
- Creates smooth, clean surfaces
- Prevents damage to finished wood

Credit: www.blstrsander.com
Material Considerations
Choosing the right sanding grit depends on the material you plan to work on. Different materials need different grits to get the best finish without damage.
Understanding the sanding needs of wood, metal, and plastic helps you pick the correct grit for a smooth and even surface.
Wood Sanding Tips
Wood requires sanding grits that start coarse and move to fine for a smooth finish. Softwoods need gentler sanding than hardwoods.
- Use 60-80 grit for rough shaping and removing old finishes.
- Use 100-150 grit for smoothing surfaces before finishing.
- Use 180-220 grit for final sanding before applying paint or stain.
Metal Surface Prep
Metal surfaces need sanding to remove rust or paint and prepare for coating. Choosing grit depends on the metal type and condition.
| Metal Type | Recommended Grit Range | Purpose |
| Steel | 80-120 | Rust removal and smoothing |
| Aluminum | 120-220 | Light sanding and polishing |
| Copper | 150-220 | Surface cleaning and finishing |
Plastic Finishing
Plastic needs very fine grits to avoid scratches and heat damage. Sand lightly and use wet sanding for best results.
Tips for sanding plastic:
- Start with 400 grit or finer.
- Use wet sanding to reduce heat buildup.
- Progress to 600 or 800 grit for a smooth finish.
Project Goals And Grit Selection
Choosing the right sanding grit depends on what you want to do with your project. Different grits help you reach different results.
Coarse grits remove material fast, while fine grits smooth and polish surfaces. Pick grit based on your project needs.
Removing Old Finish
Use coarse grit sandpaper to remove old paint or varnish quickly. This helps prepare the surface for new finish.
Start with 40 to 60 grit for heavy removal. Be careful not to damage the wood below.
- Use 40-60 grit for tough old finishes
- Sand evenly to avoid gouges
- Switch to finer grit after removing finish
Smoothing Rough Surfaces
After removing finish, use medium grit sandpaper to smooth rough wood or surfaces. This creates a nice base.
Use 80 to 120 grit for this step. It removes scratches from coarse sanding and evens the surface.
- Use 80-120 grit for smoothing surfaces
- Sand with the grain to avoid marks
- Check surface often for evenness
Final Polishing
Fine grit sandpaper helps create a smooth, polished finish. Use it before applying paint or stain.
Choose 180 to 220 grit or higher. This removes small scratches and gives a clean look.
- Use 180-220 grit for final polishing
- Lightly sand to avoid removing too much material
- Clean dust before finishing

Credit: onmaplelane.com
Grit Progression Strategies
Choosing the right sanding grit is key for smooth finishes. Grit progression helps you move from rough to fine surfaces.
Using the right sequence of grits makes sanding easier and prevents damage to your workpiece.
Step-by-step Sanding
Start sanding with a coarse grit to remove rough spots. Then use medium grits to smooth the surface. Finish with fine grit for a polished look.
- Begin with 60-80 grit for heavy sanding
- Use 100-150 grit for general smoothing
- Apply 180-220 grit for final finishing
Change grits gradually to avoid scratches. Skip no more than two grit levels between steps for best results.
Avoiding Surface Damage
Using too coarse grit can leave deep scratches. Sanding with too fine grit first wastes time and effort.
- Always clean the surface between grit changes
- Sand with the grain to prevent marks
- Use light pressure to avoid gouging
- Check your work often under good light
Follow grit progression and sanding tips to protect your project and get smooth, even results.
Common Mistakes To Avoid
Choosing the right sanding grit is key for a smooth finish. Many people make simple mistakes that hurt their projects.
Understanding what to avoid helps you get better results fast and saves time and materials.
Using Too Coarse Grit
Using sandpaper that is too rough can leave deep scratches on your surface. These scratches take more work to remove later.
Coarse grit is good for heavy material removal but bad for finishing. Choose grit size based on the job stage.
- Coarse grit: 40-60, removes a lot fast but roughens surface
- Medium grit: 80-120, smooths rough areas
- Fine grit: 150-220, prepares surface for finishing
Skipping Grit Steps
Skipping grit steps means jumping from rough to very fine sandpaper. This causes uneven surfaces and visible scratches.
Sanding in small increments helps create a smooth surface without marks. Always follow grit sizes in order.
- Start with coarse grit to remove defects
- Move to medium grit to smooth scratches
- Finish with fine grit for polish
- Avoid skipping grits to save time
- Check surface between each step
Tools And Accessories
Choosing the right sanding grit depends on the tools and accessories you use. Different tools need different types of sandpaper and grit sizes.
Using the correct sanding accessories helps you get a smooth finish and saves time. It also prevents damage to your workpiece.
Choosing The Right Sandpaper
Sandpaper comes in many grit sizes. Lower numbers mean coarse grit, good for heavy sanding and removing paint. Higher numbers mean fine grit, best for finishing.
Pick sandpaper grit based on the material and the job. Start with coarse grit to remove rough surfaces. Then use finer grits to smooth the surface.
- Coarse grit (40-60) for heavy removal and shaping
- Medium grit (80-120) for smoothing and preparing surfaces
- Fine grit (150-220) for finishing and polishing
- Extra fine grit (240 and above) for very smooth finishes
Sanding Blocks And Machines
Sanding blocks help hold sandpaper flat for even sanding. They work well on flat surfaces and give you better control.
Power sanding machines speed up the process. Orbital and belt sanders use different grit sizes to match the task. Always match the grit size to the machine and material.
- Sanding blocks are good for small or detailed work
- Orbital sanders work well for smooth finishes
- Belt sanders remove material quickly with coarse grit
- Use finer grits on machines for finishing touches
Frequently Asked Questions
What Grit Should I Use For Rough Sanding?
Use coarse grit (40-60) for rough sanding. It removes material quickly and shapes wood or metal efficiently.
How To Choose Grit For Finishing Work?
Select fine grit (220-400) for finishing. It smooths surfaces without scratching, preparing for paint or sealant.
Can I Use The Same Grit For All Projects?
No, grit choice depends on material and project stage. Coarse for heavy sanding, fine for detail work.
Why Is Sanding Grit Important?
Sanding grit affects surface texture and finish quality. Correct grit ensures smoothness and proper adhesion for coatings.
Conclusion
Choosing the right sanding grit makes a big difference in your project. Start with a coarser grit for rough surfaces. Gradually move to finer grits for a smooth finish. Always match the grit to the material and desired outcome. Testing on a small area helps avoid mistakes.
Remember, patience and practice lead to the best results. Proper grit selection saves time and effort. Your projects will look more professional with the right grit. So, take your time and choose wisely. Your work will reflect your careful choices.
Enjoy the process and happy sanding!