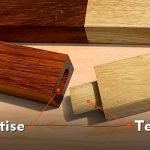
If you want your woodworking projects to fit together perfectly, mastering tenons and mortises is key. But cutting them cleanly and accurately can be tricky.
What if you could learn simple tips that make the process easier and boost your confidence every time you pick up your tools? This article is packed with practical advice designed just for you—helping you create strong, precise joints without frustration.
Keep reading, and you’ll discover how to turn a challenging task into something you actually enjoy doing.
Choosing The Right Tools
Cutting tenons and mortises is a key part of woodworking. Using the right tools makes the job easier and more precise. This guide helps you pick the best tools for your work.
Different tools suit different tasks. Choosing between hand tools and power tools affects your speed and accuracy. Learn how to select chisels, saws, and more.
Selecting Chisels And Saws
Good chisels and saws are sharp and strong. Choose chisels with comfortable handles and hard steel blades. Saws should have fine teeth for clean cuts.
- Chisels come in different widths; pick one that matches your joint size.
- Use bench chisels for general work and mortise chisels for deeper cuts.
- Saws like dovetail or tenon saws give you better control on joints.
- Keep your tools sharp to reduce effort and improve results.
Power Tools Vs Hand Tools
Power tools speed up cutting but need care and skill to use well. Hand tools give you more control but take more time.
| Tool Type | Advantages | Disadvantages |
| Power Tools | Faster cuts, less physical effort | Noisy, needs power source, less control |
| Hand Tools | Better precision, quieter, portable | Slower, requires more skill |
Preparing The Wood
Cutting tenons and mortises starts with well-prepared wood. Proper preparation helps you make precise cuts and strong joints.
Focus on clear marking and stable work holding. These steps improve accuracy and safety.
Marking Accurate Layouts
Marking is key for tight-fitting tenons and mortises. Use sharp pencils or marking knives for clean lines.
- Check the wood surface is smooth and flat before marking.
- Use a marking gauge to set consistent lines.
- Double-check measurements with a ruler or square.
- Mark both the tenon and mortise clearly.
- Label parts to avoid confusion during assembly.
Securing The Workpiece
Hold the wood firmly to avoid movement. This helps you cut clean and exact joints.
| Method | Benefit |
| Bench Vise | Strong hold, good for small pieces |
| Clamps | Flexible positioning and easy release |
| Holdfasts | Quick to apply and remove |
| Workbench Dogs | Secure larger boards flat on the bench |
Cutting Tenons
Cutting tenons is a key skill in woodworking. Tenons fit into mortises to join wood pieces securely.
Good tenons need accurate cuts on the shoulder and cheek areas. Careful setup improves fit and strength.
Setting Shoulder And Cheek Cuts
Start by marking the tenon size on the wood. Use a square and pencil to draw shoulder lines.
Cut the shoulders first. Make sure your saw is steady and straight. This creates a clean edge for the joint.
Next, cut the cheeks. These are the flat sides of the tenon. Cut close to the line but avoid going over.
- Mark shoulder lines clearly
- Cut shoulders with a fine saw
- Cut cheeks carefully with a saw or router
- Check fit often with the mortise
Using A Tenon Jig
A tenon jig helps guide your saw or router. It keeps cuts straight and even every time.
Clamp the wood in the jig. Adjust the jig stops for the correct tenon length and thickness. Then make your cuts safely.
- Secure wood firmly in the jig
- Set jig stops to match tenon size
- Use a sharp blade for clean cuts
- Make slow, controlled passes

Credit: www.familyhandyman.com
Cutting Mortises
Cutting mortises is a key woodworking skill. Mortises create strong joints when paired with tenons.
Good mortises fit tightly and look clean. Using the right tools and methods helps achieve this.
Drilling Out Waste
Drilling removes most of the wood inside the mortise. It makes chiseling easier and faster.
- Mark the mortise outline clearly on the wood.
- Use a drill with a bit slightly smaller than the mortise width.
- Drill holes along the mortise length, inside the outline.
- Keep the drill steady and straight for even depth.
- Remove loose wood chips before chiseling.
Cleaning With Chisels
Chisels shape the mortise walls and corners after drilling. Sharp chisels make clean cuts.
| Tip | Reason |
| Use a mallet for controlled force | Prevents splitting the wood |
| Cut along the grain | Keeps edges smooth |
| Work slowly near corners | Avoids chisel slips |
| Check fit often | Ensures tight joint |
Ensuring Perfect Fit
Cutting tenons and mortises accurately is key for strong wood joints. A perfect fit keeps your project sturdy and neat.
Careful measuring and cutting help avoid gaps or tight spots in your joints. This guide gives tips to get the best results.
Testing And Adjusting Joints
Always test your tenon and mortise before final assembly. Dry fitting helps spot errors early.
If the joint is too tight, trim the tenon slightly. If it is loose, add thin shims or adjust the mortise walls.
- Fit the tenon into the mortise without glue
- Look for gaps or too much pressure
- Use a chisel or sandpaper to adjust the tenon
- Carefully pare mortise edges to widen if needed
- Repeat fitting until the joint fits snugly
Avoiding Common Mistakes
Many beginners cut joints too loose or too tight. These mistakes weaken the structure or make assembly hard.
Use sharp tools and measure twice before cutting. Work slowly and check your progress often.
- Don’t rely on guesswork—always mark your cuts
- Avoid dull tools that cause rough edges
- Keep tenon shoulders square for better fit
- Cut mortises to the exact depth needed
- Check alignment to prevent angled joints

Credit: www.youtube.com
Finishing Techniques
Cutting tenons and mortises is just the start of joinery. Finishing these joints well ensures strength and a clean look.
Good finishing helps the wood pieces fit tightly and last longer. This section covers key tips for finishing your cuts.
Smoothing Edges
Smooth edges on tenons and mortises prevent gaps and make joints fit better. Use sandpaper or a file for this task.
Start with medium grit sandpaper, then move to finer grit for a clean finish. Remove any splinters or rough spots.
- Check edges for sharp corners and round them slightly
- Sand in the direction of the wood grain
- Use a fine file for tight spots in mortises
- Test fit pieces often while smoothing
Applying Glue And Clamping
Apply glue evenly on both tenon and mortise surfaces for a strong bond. Avoid using too much glue to prevent squeeze-out.
Clamp the joint firmly but not too tight. Proper clamping holds pieces together while glue dries and keeps them aligned.
- Use a brush or small roller to spread glue
- Remove excess glue with a damp cloth before it dries
- Clamp for the recommended drying time on the glue label
- Check joint alignment before tightening clamps

Credit: www.familyhandyman.com
Frequently Asked Questions
What Tools Are Best For Cutting Tenons And Mortises?
A sharp tenon saw and a mortise chisel are ideal. Power tools like a router or mortising machine can speed up the process. Always choose tools that provide precision and control for clean, accurate cuts.
How Do I Ensure Tight-fitting Tenon Joints?
Measure twice and cut once for accuracy. Test fit the tenon frequently during cutting. Slightly trim the tenon if needed to achieve a snug, secure fit without forcing the pieces together.
What Safety Tips Should I Follow When Cutting Mortises?
Always wear safety goggles and hearing protection. Secure your wood firmly to prevent slips. Use sharp tools and keep hands clear of cutting paths to avoid injury.
Can I Cut Tenons And Mortises Without Power Tools?
Yes, hand tools like saws and chisels work well. Hand cutting requires patience but offers excellent control. Proper technique ensures strong joints even without power tools.
Conclusion
Cutting tenons and mortises gets easier with practice. Start with simple projects. Use sharp tools for clean cuts. Patience and precision ensure good results. Measure twice, cut once. Mistakes happen, so stay calm and learn. Keep your workspace organized and safe.
Ask for help if needed. Enjoy the process and watch your skills grow. Woodworking offers rewarding experiences. Each project teaches something new. Keep experimenting and improving. Your efforts will show in your craftsmanship. Remember, practice makes progress. Happy woodworking!