If you want to make precise cuts quickly and easily, a speed square is your best friend. This simple tool can help you mark perfect angles and straight lines every time, saving you frustration and wasted materials.
Whether you’re a beginner or have some experience, mastering the speed square will boost your confidence and improve your woodworking or DIY projects. Keep reading, and you’ll learn exactly how to use a speed square to mark cuts like a pro.

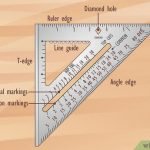
Credit: www.familyhandyman.com
Speed Square Basics
A speed square is a simple tool used to mark straight and angled cuts on wood. It helps carpenters and DIYers make accurate measurements quickly.
You can use a speed square to draw lines for cutting, measuring angles, and checking squareness on your projects.
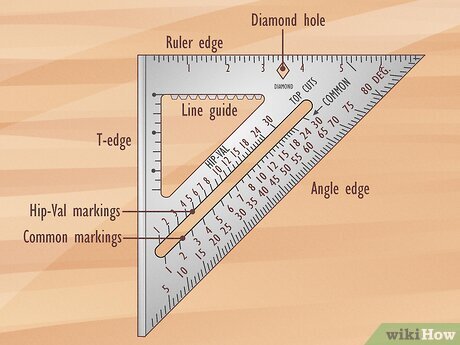
Parts Of A Speed Square
A speed square has several parts that make it useful for marking cuts. Knowing these parts helps you use the tool better.
- Fence:The thick edge that rests against the wood for stability.
- Body:The flat triangular plate with measurement markings.
- Pivot point:The corner where the fence and body meet, used for marking angles.
- Ruler edge:The straight edge used for measuring and drawing lines.
- Protractor scale:The angled markings for measuring degrees.
- Scriber notch:A small cut near the pivot point to guide a pencil for precise marks.
Materials And Sizes
Speed squares come in different materials and sizes. The choice depends on your needs and budget.
Common materials include aluminum, steel, and plastic. Aluminum is light and durable. Steel is very strong. Plastic is cheap but less durable.
| Material | Advantages | Disadvantages |
|---|---|---|
| Aluminum | Lightweight, rust-resistant, durable | Can bend if dropped hard |
| Steel | Very strong, long-lasting | Heavier, may rust without coating |
| Plastic | Inexpensive, lightweight | Less durable, can break easily |
Sizes usually range from 7 inches to 12 inches. Larger squares cover bigger surfaces but may be harder to handle.
Choosing The Right Speed Square
A speed square is a tool used for marking cuts and measuring angles. Picking the right one helps you work faster and more accurately.
This guide explains different types of speed squares and what to think about before buying one.
Types Of Speed Squares
Speed squares come in various designs and materials. Each type fits different jobs and user needs.
- Aluminum Speed Square:Lightweight and strong, lasts a long time.
- Steel Speed Square:Heavy but very durable, good for tough jobs.
- Plastic Speed Square:Cheap and light, best for light work or beginners.
- Combination Squares:Include extra features like levels or rulers.
Factors To Consider
Think about your work style and the tasks you do before choosing a speed square.
- Size:Larger squares are easier to read but less portable.
- Material:Aluminum is good for balance, steel for strength.
- Markings:Clear, easy-to-read numbers help with accuracy.
- Weight:Lighter squares reduce hand fatigue during long use.
- Durability:Pick a square that stands up to your work environment.
- Additional Features:Some have extra tools like protractors or rulers.
Preparing For Accurate Cuts
Using a speed square helps you mark straight and precise cuts. Preparing well makes your work easier and safer.
Before cutting, you need to set up your tools and materials correctly. This guide shows how to get ready for accurate marks.
Selecting Your Workpiece
Choose the right wood or material for your project. Make sure it is free of cracks and knots that could cause mistakes.
Check the thickness and length to match your needs. Flat and smooth surfaces help you get better marks with the speed square.
Measuring Tools Setup
Set up your measuring tools before marking cuts. Use a tape measure or ruler to get exact dimensions for your workpiece.
Keep your speed square clean and free of damage. Align it firmly on the workpiece edge to keep your lines straight and accurate.
- Check the tape measure for clear numbers
- Use clamps to hold the workpiece steady
- Position the speed square flush against the edge
- Mark with a sharp pencil for clear lines

Credit: www.wikihow.com
Marking Straight Cuts
Using a speed square helps you mark straight cuts quickly and accurately. It is a simple tool that guides your pencil along a straight edge.
Marking straight cuts is important for clean, precise woodworking or construction projects. The speed square makes this task easier.
Aligning The Speed Square
Place the speed square against the edge of the wood. Make sure the lip of the square is firmly against the wood’s edge to keep it steady.
Check that the speed square is flat on the wood surface. This ensures your marks are straight and your cuts will be precise.
- Hold the square firmly against the wood edge
- Keep the square flat on the wood surface
- Double-check the square’s position before marking
Making Clear Marks
Use a sharp pencil or marking tool to draw your line along the straight edge of the speed square. Press lightly but clearly for visible marks.
Draw the line slowly to keep it straight. Avoid lifting the pencil until you finish the mark for the best accuracy.
- Use a sharp pencil for clear lines
- Draw along the edge of the speed square
- Keep the pencil steady for a straight mark
Marking Angled Cuts
Using a speed square helps you mark angled cuts quickly and accurately. It is a simple tool that fits in your hand.
Knowing how to read the degree scale and common angles makes your work easier. This guide explains these key points.
Using The Degree Scale
The speed square has a degree scale on its angled edge. You use this scale to measure and mark angles.
To mark an angle, place the square on the wood. Align the pivot point, then slide the square until the desired degree matches the edge.
- Place the pivot at the wood’s edge
- Move the square until the degree number lines up
- Draw your cut line along the square’s edge
Common Angle Settings
Many projects use standard angles like 45 and 90 degrees. The speed square helps mark these quickly without extra tools.
Here are common angles and how to find them on the speed square for your cuts.
| Angle | Use | How to Set |
|---|---|---|
| 90° | Square cuts and right angles | Align the square’s flat edge flush with wood |
| 45° | Common for miter joints and trim | Pivot to 45 on degree scale, mark line |
| 30° | Roof pitches and special cuts | Pivot to 30 on degree scale, mark line |
| 60° | Used in framing and decorative cuts | Pivot to 60 on degree scale, mark line |
Tips For Consistent Marking
Using a speed square helps you mark cuts quickly and accurately. Consistent marking leads to better cuts and less waste.
Focus on steady hand movements and double-check your measurements. This will improve your cutting results every time.
Maintaining Tool Stability
Keep the speed square firmly pressed against the workpiece. A stable tool prevents slipping and wrong marks.
- Hold the square with your thumb near the pivot point.
- Press the lip of the square tightly against the edge of the board.
- Use your other hand to steady the board if needed.
- Mark your line in one smooth motion without lifting the square.
Checking Measurements Twice
Measure twice before marking cuts to avoid mistakes. Confirming sizes saves time and material.
| Check | Why It Matters |
| Measure length | Ensures cut fits properly |
| Verify angle | Keeps joints tight and accurate |
| Confirm mark position | Prevents cutting the wrong spot |
Safety Practices With A Speed Square
Using a speed square helps make accurate cuts in wood and other materials. Safety is important to avoid injuries while marking cuts.
Follow safety practices to keep your hands safe and prevent mistakes when using a speed square.
Proper Hand Placement
Hold the speed square firmly with your non-dominant hand. Keep your fingers away from the cutting line. This stops the blade from cutting your skin.
Press the square flat against the wood edge. This keeps it steady and prevents slipping.
- Grip the speed square near the corner for control
- Keep fingers below the cutting line
- Use your thumb to apply pressure on the square
- Do not hold the square with a loose grip
Avoiding Slips And Mistakes
Make sure the wood surface is clean and dry before marking. Dust or moisture can cause the speed square to slip.
Use a sharp pencil or marking tool for clear lines. Blurry lines can lead to cutting errors.
- Check the speed square for damage before use
- Hold the wood firmly to stop it from moving
- Mark slowly and steadily to avoid slips
- Double-check measurements before cutting

Credit: www.wikihow.com
Maintaining Your Speed Square
Keeping your speed square in good shape helps you make accurate cuts. Regular care stops damage and wear.
Simple steps like cleaning and checking for wear protect your tool for a long time.
Cleaning And Storage
After each use, wipe dirt and dust off your speed square. Use a damp cloth for sticky spots. Dry it well to stop rust.
- Clean with a soft cloth or brush
- Remove paint or glue with mild solvent
- Dry completely before storing
- Store in a dry place away from moisture
- Keep it flat or hang to avoid bending
Checking For Wear
Inspect your speed square often for signs of damage. Look for worn edges or faded markings. These can cause mistakes in your work.
| Issue | Effect | Action |
| Worn edges | Inaccurate lines | Replace the square or file edges smooth |
| Faded markings | Hard to read measurements | Use a permanent marker to refresh |
| Bent body | Uneven cuts | Do not use; get a new square |
Frequently Asked Questions
What Is A Speed Square Used For In Woodworking?
A speed square is a versatile tool for marking straight, angled, and square cuts. It helps ensure precision and consistency. Woodworkers use it to measure and mark angles quickly and accurately, improving cut quality and reducing errors.
How Do You Mark A 45-degree Cut With A Speed Square?
Place the speed square’s pivot point on the wood’s edge. Align the 45-degree mark on the square with the edge. Draw a line along the square’s ruler to mark the cut accurately and quickly.
Can A Speed Square Measure Angles Other Than 45 Degrees?
Yes, a speed square measures various angles from 0 to 90 degrees. It has degree markings along its hypotenuse for precise angle measurements. This makes it ideal for marking bevels and rafters.
How To Use A Speed Square For Straight Cuts?
Align the speed square’s fence against the wood edge. Use the ruler edge to mark a straight line across the wood. This ensures a perfectly square and straight cut every time.
Conclusion
Mastering the speed square makes marking cuts simple and precise. It’s a handy tool for any DIY project. With practice, your confidence will grow. Accurate measurements lead to better results. Save time and avoid mistakes. Always keep your speed square within reach.
Whether you’re building or repairing, it’s essential. Remember, practice makes perfect. Experiment with different techniques to find what works best. Enjoy the satisfaction of a job well done. Happy building!