Are you tired of guessing angles and ending up with crooked cuts? Getting precise measurements can be tricky, but it doesn’t have to be.
A speed square is a simple tool that can make your work faster and more accurate. Whether you’re a beginner or a seasoned DIYer, mastering the speed square will save you time and frustration. Keep reading to discover how you can use this handy tool to achieve perfect angles every time.
Your projects will thank you.
Choosing The Right Speed Square
A speed square helps you measure and mark angles quickly. Picking the right one makes your work easier and more accurate.
There are many types of speed squares. Knowing the differences helps you find one that fits your needs.
Material Types
Speed squares come in different materials. Each type has its own strength and weight.
Aluminum is light and rust-resistant. Steel is very strong but heavier. Plastic is cheap and light but less durable.
- Aluminum:Lightweight, rustproof, good for outdoor use
- Steel:Heavy, very strong, lasts long
- Plastic:Affordable, light, less sturdy
Size And Markings
Speed squares come in different sizes. Most common sizes are 7-inch and 12-inch models.
Look for clear, easy-to-read markings. Good markings help you measure angles without mistakes.
- 7-inch:Compact, easy to carry, good for small projects
- 12-inch:Larger, better for framing and bigger work
- Markings:Clear numbers and lines improve accuracy
Additional Features
Some speed squares have extra features. These make measuring angles and marking easier.
Look for features like a lip for easy alignment or extra angle guides. These help speed up your work.
- Notched edges:Hold pencil for marking lines
- Protractor scale:Measure angles beyond 45 degrees
- Ruler edges:Measure short distances quickly
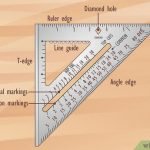
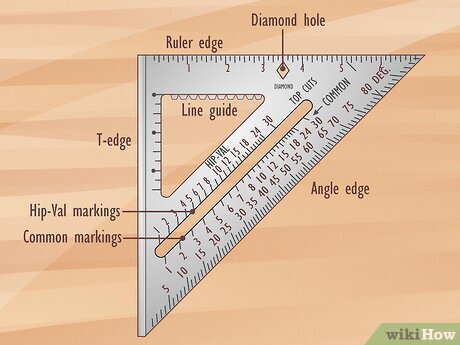
Basic Speed Square Components
A speed square is a tool used for marking and measuring angles. It helps carpenters and builders make precise cuts. Knowing its parts makes it easier to use.
This guide explains the main parts of a speed square. These parts are the body and lip, degree scale, and pivot point.
Body And Lip
The body is the flat triangular part of the speed square. It has straight edges that help you draw lines. The lip is a small raised edge along one side of the body.
- The body acts as a ruler and guide.
- The lip fits against the wood edge to keep the square steady.
- Together, they help you hold the square firmly in place.
Degree Scale
The degree scale is marked along the body of the square. It shows angles from 0 to 90 degrees. This scale helps you mark common angles for cutting.
| Angle (Degrees) | Use |
| 0° | Straight cut |
| 45° | Common miter cut |
| 90° | Square cut |
| Other angles | Custom cuts |
Pivot Point
The pivot point is the corner where the body and lip meet. It acts as a fixed point for rotating the square. This helps you measure and mark angles accurately.
The pivot point lets you:
- Place the lip against the wood edge.
- Rotate the square to the desired angle.
- Draw a line along the body at that angle.
Setting Up For Accurate Measurements
Using a speed square correctly ensures your angles are precise. Setting up the square right can save time and avoid mistakes.
Before marking or cutting, prepare your tools and work area. This helps maintain accuracy throughout your project.
Securing The Square
Hold the speed square firmly against the edge of your material. A secure grip stops the square from slipping while you mark.
- Place the square’s lip flush against the material’s edge.
- Press the square down with your palm to keep it steady.
- Use clamps if possible to hold the square for long lines.
- Check for any gaps between the square and the workpiece.
Aligning With Workpiece
Proper alignment is key for accurate angle measurement. Make sure the square lines up with your marking points and edges.
| Alignment Point | Purpose |
|---|---|
| Square’s base edge | Rest against the workpiece edge for stability |
| Pivot point | Place at the angle vertex to measure or mark |
| Angle markings | Line up with the pencil or marking tool |
Checking For Calibration
Ensure your speed square is accurate before use. Calibration checks help avoid errors in your work.
To check calibration:
- Place the square on a flat surface.
- Draw a line along the square’s edge.
- Flip the square over and draw a line from the same starting point.
- Compare the two lines; they should overlap perfectly.
- If lines do not match, adjust or replace the square.
Measuring Common Angles
A speed square is a simple tool that helps measure angles quickly. It is useful for many building and woodworking projects.
You can mark exact angles with it, like 90 degrees, 45 degrees, and other common angles. This guide shows how to use a speed square for these tasks.
Marking 90-degree Angles
To mark a 90-degree angle, place the speed square’s fence against the edge of the board. The square side should rest flat on the surface.
Draw a line along the edge of the speed square. This line will be perfectly perpendicular to the board’s edge.
- Place fence flush against board edge
- Ensure the square lies flat on the surface
- Draw along the square’s edge to mark 90 degrees
Creating 45-degree Lines
To make a 45-degree line, flip the speed square so the pivot point is at the corner of the board. Align the square’s diagonal edge with the board’s edge.
Draw a line along the diagonal edge. This line will form a 45-degree angle with the board edge.
- Place pivot point at board corner
- Align diagonal edge with board edge
- Draw line along the diagonal edge
Adjusting For Other Angles
Speed squares have degree markings for other angles. Place the pivot on the board edge. Rotate the square until the desired angle lines up with the board’s edge.
Draw a line along the square’s edge at that angle. This helps mark angles like 30, 60, or any common angle quickly.
- Place pivot point on board edge
- Rotate square to desired angle marking
- Draw line along the angled edge
Using The Speed Square For Roof Layouts
The speed square is a handy tool for roof work. It helps measure angles fast and easy. You can use it to lay out rafters and mark cuts clearly.
This guide shows how to use the speed square for roof layouts. Learn to calculate roof pitch, mark birdsmouth cuts, and lay out rafters accurately.
Calculating Roof Pitch
Roof pitch is the angle of the roof’s slope. Use the speed square to find this angle quickly. Place the square on the rafter’s edge, then read the pitch where the blade lines up.
- Place the speed square’s pivot at the rafter edge.
- Hold the square flat against the rafter.
- Read the pitch number on the square’s scale.
- Note this number for making cuts and layouts.
Marking Birdsmouth Cuts
The birdsmouth cut lets the rafter sit on the wall plate. Use the speed square to mark this cut easily. Align the square for both the seat and heel cuts.
Follow these steps to mark birdsmouth cuts:
- Place the speed square on the rafter edge.
- Mark the seat cut at the wall plate angle.
- Flip the square to mark the heel cut.
- Double-check angles before cutting the rafter.
Laying Out Rafters
Laying out rafters needs exact measurements. The speed square helps mark lengths and angles fast. Use it to draw cut lines and check common angles.
| Mark | Use |
| Common Cut | Marks the top cut angle |
| Plumb Cut | Marks the vertical cut at the ridge |
| Seat Cut | Marks where rafter rests on wall plate |

Credit: m.youtube.com
Advanced Techniques
A speed square is more than a simple measuring tool. It helps with precise and efficient work.
These advanced techniques improve your accuracy and save time on complex tasks.
Scribing Lines
Scribing lines means marking a cut line on wood using the speed square as a guide. It helps make straight and angled marks quickly.
Place the speed square against the wood edge. Hold it firmly. Use a pencil to draw along the square’s edge at the desired angle.
- Use the lip of the square to keep it steady on the wood edge.
- Mark multiple lines by moving the square along the wood.
- Double-check angles before cutting to avoid mistakes.
Making Repetitive Cuts
A speed square helps make several cuts of the same size and angle. This keeps your work consistent and saves time.
Clamp the speed square to the wood at the correct angle. Use it as a stop or guide for your saw or marking tool.
- Set the square once and mark all pieces before cutting.
- Use a pencil to mark cut lines along the square’s edge.
- Check each cut piece against the square for accuracy.
Using As A Saw Guide
The speed square can act as a straight edge to guide your saw blade for clean cuts. This reduces errors and improves safety.
Place the square firmly against the wood edge. Hold it steady with one hand while running the saw along the square’s edge.
- Use the square’s lip to keep it tight against the wood edge.
- Keep your saw blade flush with the square for a straight cut.
- Practice on scrap wood to get comfortable with this technique.
Maintenance And Care Tips
Taking care of your speed square helps keep it accurate and useful. Proper maintenance stops damage and saves money.
Simple steps like cleaning, storing, and checking calibration make your tool last longer.
Cleaning And Storage
Clean your speed square after each use. Dirt and dust can cause wrong readings over time.
Use a soft cloth to wipe the surface. Avoid harsh chemicals that may damage the markings.
- Remove dust with a dry cloth
- Use mild soap if needed
- Dry completely before storing
- Store in a dry place away from sunlight
Avoiding Damage
Handle your speed square gently to prevent dents and bends. These can affect the tool’s accuracy.
Do not drop or use it for tasks it was not made for. Avoid placing heavy objects on top of it.
- Keep away from sharp tools
- Do not use as a hammer or pry bar
- Place on flat surfaces only
- Carry in a protective case or pouch
Calibration Checks
Check your speed square’s accuracy regularly. This ensures your angles are correct every time.
Use a known angle or a framing square to compare measurements. If the tool is off, consider replacing it.
- Test 90-degree angles against a framing square
- Check 45-degree marks with a protractor
- Repeat checks after heavy use or impact
- Replace if calibration is consistently off

Credit: www.wikihow.com

Credit: www.wikihow.com
Frequently Asked Questions
What Is A Speed Square Used For In Carpentry?
A speed square is a versatile tool for marking angles, measuring, and guiding saw cuts. It helps create precise 90° and 45° angles quickly.
How Do I Measure Angles Accurately With A Speed Square?
Place the pivot point on the workpiece edge, rotate the square to the desired angle, and mark along the ruler for accuracy.
Can A Speed Square Replace A Protractor For Angles?
While a speed square is less precise than a protractor, it offers quick, reliable angle measurements for most carpentry tasks.
What Materials Can I Use A Speed Square On?
Speed squares work well on wood, plywood, and soft materials. They are ideal for framing, roofing, and general carpentry projects.
Conclusion
Using a speed square helps achieve precise angles with ease. It’s a handy tool for many projects. Whether you’re building or repairing, it offers great accuracy. Remember to practice regularly for best results. Familiarity with its features enhances your work quality.
Many find it useful for quick measurements. Keep your speed square in your toolbox. It serves as a valuable companion for various tasks. With time, your confidence in using it will grow. Enjoy the simplicity and efficiency it brings to your work.
Your projects will reflect this precision and skill.