If you want your small carpentry projects to look sharp and professional, mastering the try square is a must. This simple tool helps you make perfect right angles, so your cuts and joints fit together just right.
Whether you’re building a birdhouse, a picture frame, or a small shelf, using a try square can save you time and frustration. You’ll learn exactly how to use a try square like a pro—no confusion, no guesswork. Get ready to take your woodworking skills to the next level with easy, step-by-step tips you can start using today.
Credit: commonwoodworking.com
Choosing The Right Try Square
A try square helps you check right angles in small carpentry projects. Picking the right one makes your work easier and more accurate.
Learn about the materials, sizes, and types of try squares. This guide helps you find one that fits your needs.
Materials And Sizes
Try squares come in different materials and sizes. The material affects durability and weight. The size affects how you use it on your workpieces.
| Material | Features | Best For |
| Steel | Strong and long-lasting | Frequent use and tough projects |
| Wood | Lightweight and traditional | Light projects and beginners |
| Aluminum | Light and rust-resistant | Outdoor or humid environments |
Common sizes range from 6 inches to 12 inches. Smaller try squares fit tight spaces. Larger ones help with bigger wood pieces.
Types Of Try Squares
Try squares come in different types. Each type suits specific tasks and preferences.
- Engineer’s Try Square:Made with a metal blade and stock. Used for metal and fine woodworking.
- Carpenter’s Try Square:Has a wooden stock with a metal blade. Good for general woodworking.
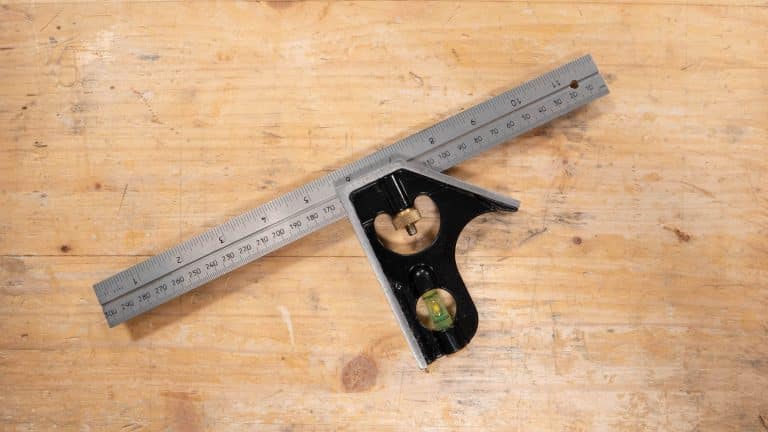
- Combination Try Square:Features adjustable parts. Useful for measuring and marking angles.

Credit: www.thisoldhouse.com
Preparing Your Workspace
Setting up your workspace is important before using a try square. A clean and well-lit area helps you work safely and accurately.
Organizing your space makes measuring and marking easier. It also prevents mistakes and accidents.
Clearing The Surface
Remove tools, scraps, and dust from your work surface. A clear surface lets you place your wood flat and steady.
Check for any bumps or dirt that could affect your measurements. Clean surfaces help your try square sit flush against the wood.
- Take away loose items and clutter
- Wipe the surface to remove dust and debris
- Make sure the surface is flat and stable
Ensuring Good Lighting
Good lighting helps you see the edges and marks clearly. It reduces the chance of making wrong cuts or marks.
Use natural light or bright lamps. Avoid shadows on your work area that can hide lines or edges.
- Work near a window during the day
- Use a strong desk lamp or overhead light
- Position lights to avoid shadows on your project
Basic Try Square Techniques
A try square is a simple tool used in carpentry. It helps you check right angles and mark straight lines.
Learning basic try square techniques makes small projects easier and more accurate.
Checking Squareness
To check if two edges meet at a right angle, place the try square’s stock against one edge.
The blade should touch the other edge evenly. If there is a gap, the angle is not square.
- Hold the stock firmly on one edge
- Let the blade rest on the adjacent edge
- Look for gaps between the blade and the edge
- Adjust your workpiece if needed
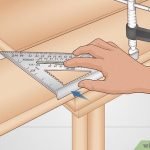
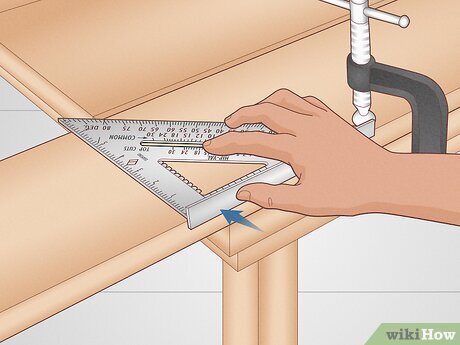
Marking Lines Accurately
Place the stock of the try square against the edge of the wood to mark a straight line.
Run a pencil along the blade to draw a precise, straight line at a right angle to the edge.
- Keep the stock tight against the wood edge
- Hold the try square steady to avoid slipping
- Use a sharp pencil for clear lines
- Check your marks before cutting

Credit: www.wikihow.com
Advanced Tips For Precision
A try square is a simple tool for checking right angles. Using it well can improve your carpentry work.
These tips help you use the try square for more exact measurements and checks on small projects.
Using The Try Square For Depth Measurement
You can measure the depth of grooves or cuts with a try square. Place the blade inside the cut to check how deep it is.
Keep the stock firmly against the edge and note where the blade ends. This shows the exact depth.
- Hold the try square so the stock touches the surface edge
- Slide the blade into the groove or hole
- Mark or note the blade’s position inside the cut
- Remove and measure from the blade’s end to the stock
Detecting Warped Or Uneven Edges
Use the try square to find bends or twists in wood edges. This helps you fix problems early.
Press the stock against the edge and slide the blade along the surface. Gaps between the blade and wood show uneven spots.
- Place the stock flat on the wood edge
- Move the blade slowly along the edge
- Look for light or space between blade and wood
- Mark uneven areas for sanding or cutting
Maintaining Your Try Square
Keeping your try square in good shape helps you make accurate cuts. Regular care will extend its life and improve your work.
Simple maintenance tasks like cleaning and checking for accuracy prevent mistakes in your carpentry projects.
Cleaning And Storage
Clean your try square after each use to remove dust and wood particles. Use a soft cloth to avoid scratches.
Store your try square in a dry place. Avoid damp areas to prevent rust on metal parts and warping of wooden handles.
- Wipe blade and handle with a dry or slightly damp cloth
- Remove any sticky residue gently
- Apply light oil to metal parts to stop rust
- Keep in a toolbox or hang on a pegboard
- Do not leave it on the floor or exposed to sunlight
Calibrating For Accuracy
Check your try square’s accuracy regularly to ensure precise measurements. A small error can affect your project.
Use a simple test to see if your square is true. Mark a line along the blade, flip it, and mark again. The lines should match.
- Place the try square on a flat board
- Draw a line along the blade edge
- Flip the square over to the opposite side
- Draw a second line along the blade
- If lines are not aligned, adjust or replace the square
Common Mistakes To Avoid
Using a try square correctly is important for small carpentry jobs. Many beginners make simple mistakes that affect their work.
Knowing these mistakes helps you use the tool better and get accurate results.
Misreading The Tool
One common mistake is misreading the try square. This happens when you do not look at the blade and stock properly.
The blade must be flush against the edge of the wood. If it is not, your measurement will be wrong.
- Always check that the blade sits flat on the wood
- Make sure you read the markings from directly above
- Do not guess angles; use the square carefully
Applying Uneven Pressure
Applying uneven pressure is another mistake. Pressing too hard on one side can shift the square and cause errors.
Hold the try square firmly but gently. This keeps it in place without bending or moving the tool.
- Use your fingers to hold the stock steady
- Do not push the blade too hard against the wood
- Check the square’s position before marking or cutting
Project Ideas For Practice
Using a try square is key to accurate carpentry. Practicing with small projects builds skill and confidence.
Two great projects to try are simple box construction and picture frame assembly. Both require precise right angles.
Simple Box Construction
Start with a small wooden box to practice measuring and marking square corners. A try square helps check each joint.
- Cut four equal pieces for the sides
- Use the try square to mark 90-degree angles on the edges
- Join the sides with nails or glue, checking angles as you go
- Sand edges to smooth the box
Picture Frame Assembly
Picture frames need precise corners for a neat look. Use your try square to measure and cut the frame pieces.
| Frame Part | Length (inches) | Angle to Check |
| Top and Bottom | 12 | 90° |
| Left and Right Sides | 10 | 90° |
| Corner Joints | N/A | 45° miter cut angle |
Frequently Asked Questions
What Is A Try Square Used For In Carpentry?
A try square helps check and mark right angles on wood. It ensures precise 90-degree cuts and measurements. This tool is essential for accuracy in small carpentry projects and helps maintain clean, professional results.
How Do You Properly Hold A Try Square?
Hold the try square firmly with the stock against the wood edge. Keep the blade flat on the surface for an accurate angle. This grip prevents movement and ensures precise marking or measuring.
Can A Try Square Measure Angles Other Than 90 Degrees?
No, a try square is designed only for 90-degree angles. For other angles, use a bevel gauge or protractor. The try square is perfect for ensuring perpendicular cuts and joints in woodworking.
How To Check If A Try Square Is Accurate?
Place the try square on a known straight edge and mark a line. Flip it and mark again. If lines overlap perfectly, the try square is accurate. This simple test ensures your tool gives precise measurements.
Conclusion
Using a try square makes carpentry projects accurate and neat. It helps ensure straight lines and perfect angles. Beginners find it helpful for small tasks. Practice handling the tool for better results. Quality tools improve your work. Always check your measurements twice.
This prevents mistakes and saves time. Keep your try square clean and dry. Proper care extends its lifespan. Remember, patience and practice lead to improvement. Enjoy crafting with precision and skill. Your projects will reflect your effort and attention. Happy woodworking!