If you use pliers for your home repairs, keeping them in good shape is key. Imagine reaching for your pliers only to find they’re rusty, sticky, or won’t grip properly.
Frustrating, right? You don’t want your tools to slow you down or make simple jobs harder. You’ll discover easy steps to maintain your pliers so they stay sharp, strong, and ready whenever you need them. By taking just a little time for care, you can save money and avoid headaches during your next project.
Keep reading to learn how to make your pliers last longer and work better every time.
Choosing The Right Pliers
Pliers are essential tools for many home repair tasks. Choosing the right type helps you work safely and efficiently.
This guide explains common types of pliers and what to look for in materials and build quality.
Types Of Pliers For Home Repairs
Different pliers serve different purposes. Picking the right type makes repairs easier and safer.
- Slip-Joint Pliers:Adjustable jaws for gripping various sizes.
- Needle-Nose Pliers:Long, thin jaws for tight spaces and precision work.
- Linesman Pliers:Strong jaws for cutting and twisting wires.
- Channel-Lock Pliers:Adjustable with a wide opening for large objects.
- Cutting Pliers:Designed mainly for cutting wires and nails.
Materials And Build Quality
Good materials and solid build extend the life of your pliers. Look for rust resistance and strong grips.
| Material | Features | Benefits |
| Carbon Steel | Hard and durable | Long-lasting and strong |
| Stainless Steel | Rust-resistant | Works well in wet areas |
| Forged Steel | Shaped under heat | Extra strength and toughness |
| Rubber Handles | Non-slip grip | Comfort and safety |

Credit: www.thisoldhouse.com
Cleaning Pliers After Use
Keeping pliers clean helps them work better and last longer. Dirt and grease can build up after use. Cleaning pliers is an easy way to maintain them.
Regular cleaning stops rust and damage. It also keeps the handles safe to hold. You should clean pliers after every repair job.
Removing Dirt And Debris
Start by wiping off loose dirt with a dry cloth. Use a brush to remove stuck debris from the jaws and joints. Pay attention to small crevices where dirt hides.
If dirt is hard to remove, soak the pliers in warm soapy water for a few minutes. This softens grime and makes cleaning easier. After soaking, scrub again with a brush.
- Use a dry cloth for loose dirt
- Brush tight spaces and joints
- Soak in warm soapy water if needed
- Scrub again after soaking
Using Appropriate Cleaning Agents
Choose cleaning agents that remove grease without harming metal. Mild dish soap works well for most cleaning jobs. Avoid harsh chemicals that can damage the pliers.
For stubborn rust, use a rust remover made for tools. Always follow the instructions on the product label. After cleaning, dry the pliers completely to stop rust from forming.
- Mild dish soap is safe and effective
- Avoid bleach or strong acids
- Use rust remover for corrosion
- Dry pliers fully after cleaning
Lubricating Moving Parts
Pliers have moving parts that need care to work well. Lubricating these parts helps them move smoothly and last longer.
Regular lubrication stops rust and reduces friction. This keeps your pliers ready for any home repair job.
Selecting The Right Lubricant
Choose a lubricant that protects metal and moves easily. Avoid thick oils that can attract dirt.
Common lubricants include light machine oil, silicone spray, or penetrating oil. Each works well for pliers.
- Light machine oil: smooths moving parts without gumming up
- Silicone spray: repels water and prevents rust
- Penetrating oil: loosens stuck joints and cleans rust
How To Apply Lubricant Effectively
Clean the pliers before adding lubricant. Remove dirt and old grease with a cloth or brush.
Apply a small amount of lubricant to the joint and moving parts. Open and close the pliers to spread it well.
- Wipe off any extra oil to avoid dust buildup
- Repeat lubrication regularly for best results
- Store pliers in a dry place to protect the lubricant
Inspecting For Damage
Maintaining your pliers is important for safe home repairs. Inspecting them often helps spot problems early. This keeps your tools working well and lasts longer.
Look closely at all parts of the pliers. Check for any signs of damage or wear. Fixing small issues can prevent accidents during use.
Checking Joints And Handles
Joints and handles need careful inspection. The joint should open and close smoothly without sticking. The handles must be tight and free from cracks.
- Test the joint movement by opening and closing the pliers.
- Look for rust or dirt blocking the joint.
- Check if the handles have loose parts or cracks.
- Ensure handle grips are secure and not worn out.
Identifying Wear And Tear
Wear and tear can reduce pliers’ effectiveness. Check the gripping surfaces and cutting edges for damage. Worn tools may slip or fail during use.
| Part | Signs of Wear | Possible Effect |
|---|---|---|
| Gripping jaws | Rounded or chipped teeth | Slips on objects |
| Cutting edges | Dull or nicked edges | Harder to cut wires |
| Handles | Cracks or loose grips | Uncomfortable or unsafe hold |
Storing Pliers Properly
Keeping pliers in good shape starts with proper storage. Poor storage can cause damage and reduce their life.
Organizing your pliers well saves time and keeps them ready for any home repair job.
Choosing Suitable Storage Options
Select storage that fits your space and protects your tools. You want to avoid clutter and damage.
- Use a tool box with separate compartments
- Hang pliers on a pegboard for easy access
- Place pliers in a drawer lined with soft material
- Store pliers in a magnetic strip if they have metal parts
- Keep pliers in a closed container to prevent dust
Protecting From Moisture And Rust
Moisture causes rust, which weakens pliers. Protect them by controlling moisture in your storage area.
| Method | How It Helps |
| Silica Gel Packs | Absorbs moisture inside toolboxes |
| Oil Coating | Creates a rust barrier on metal parts |
| Dry Storage Room | Keeps humidity low around tools |
| Plastic Wrap | Prevents air and moisture contact |

Credit: www.tataagrico.com
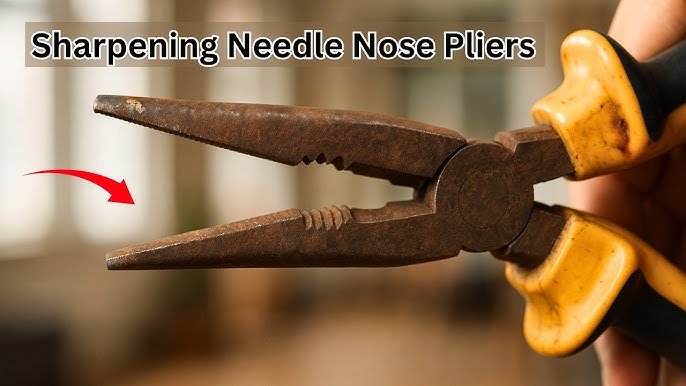
Sharpening And Adjusting
Pliers are useful tools for many home repairs. Keeping them sharp and adjusted helps you work better.
This guide explains when to sharpen your pliers and how to adjust them for the best use.
When To Sharpen
You should sharpen pliers when the gripping edges become dull or slip often. Dull jaws reduce your control and can damage materials.
- Check the jaws for worn or rounded edges
- Notice if the pliers slip on nuts or wires
- Look for rust or corrosion that affects sharpness
- Sharpen before major projects to ensure safety
How To Adjust For Optimal Performance
Adjusting pliers helps them open and close smoothly. It also improves grip strength and comfort.
| Adjustment Area | How to Adjust | Effect |
| Pivot Joint | Tighten or loosen the screw or bolt | Controls ease of opening and closing |
| Jaw Alignment | Realign jaws by bending gently if misaligned | Improves grip and prevents slipping |
| Handle Grip | Replace worn grips or add covers | Increases comfort and control |
Safety Tips During Maintenance
Maintaining pliers is important for home repairs. Safety is key to avoid injuries.
Follow simple safety tips to keep your tools and yourself safe during maintenance.
Using Protective Gear
Wear the right protective gear to protect your hands and eyes while working.
- Always wear safety glasses to protect your eyes from flying debris.
- Use sturdy gloves to prevent cuts and pinches from pliers.
- Wear long sleeves to protect your arms from scratches.
- Make sure your shoes have a good grip to avoid slipping.
Avoiding Common Mistakes
Many accidents happen because of simple mistakes when handling pliers. Avoid these errors.
| Common Mistake | How to Avoid |
| Using pliers with oily hands | Clean and dry your hands before use |
| Using the wrong type of pliers | Select pliers designed for the task |
| Applying too much force | Use steady pressure, do not overforce |
| Ignoring tool damage | Inspect pliers regularly and fix or replace |
Credit: www.kendo.com
Frequently Asked Questions
How Often Should I Clean My Pliers?
Clean your pliers after each use to remove dirt and debris. Regular cleaning prevents rust and ensures smooth operation. Use a dry cloth and mild detergent for best results. Proper cleaning maintains tool efficiency and extends pliers’ lifespan.
What Lubricant Is Best For Pliers Maintenance?
Use a light machine oil or multi-purpose lubricant on the pivot joint. Lubrication reduces friction and prevents rust buildup. Apply sparingly and wipe off excess oil. Regular lubrication keeps pliers functioning smoothly and increases durability.
How Do I Prevent Rust On My Pliers?
Store pliers in a dry place and wipe them clean after use. Apply a thin oil layer to metal surfaces to repel moisture. Avoid leaving pliers exposed to humidity or water. Proper care prevents rust and prolongs tool life.
Can I Sharpen The Gripping Teeth On Pliers?
Yes, use a fine metal file to gently sharpen gripping teeth. Sharpening improves grip and performance during repairs. Be careful not to remove too much material to avoid damage. Regular maintenance keeps pliers effective for home projects.
Conclusion
Taking care of your pliers ensures smooth home repairs. Regular cleaning prevents rust and extends lifespan. Always store them in a dry place to avoid moisture damage. Lubricate joints for easy movement and better grip. Check for wear and replace when needed.
Keep handles clean for a firm hold. Proper maintenance saves time and effort in the long run. With these simple steps, your pliers stay ready for any task. Happy repairing!