
Have you ever started a home project only to discover plumbing pipes hidden behind walls or underground? Finding these pipes without causing damage can be tricky and costly.
That’s where a pipe locator comes in. This tool helps you quickly and safely detect hidden plumbing, saving you time, money, and stress. You’ll learn exactly how to use a pipe locator to uncover those unseen pipes with confidence. Keep reading to protect your home and make your plumbing tasks easier than ever.

Credit: www.iars.co.in
Choosing The Right Pipe Locator
Finding hidden plumbing is easier with a pipe locator. Choosing the right tool saves time and effort. This guide helps you pick the best pipe locator for your needs.
Different pipe locators work better for various types of plumbing. Knowing features and costs helps you make a good choice.
Types Of Pipe Locators
Pipe locators use different technologies to find pipes underground or inside walls. Each type has strengths and limits.
- Electromagnetic Locators:Detect metal pipes by sending signals through them.
- Acoustic Locators:Use sound waves to find leaks and pipes.
- Ground Penetrating Radar (GPR):Sends radar pulses to image underground pipes, including non-metal ones.
- Magnetic Locators:Find ferrous metal pipes by sensing their magnetic field.
Features To Consider
Look for features that help you find pipes quickly and clearly. User-friendly tools reduce mistakes.
- Depth Measurement:Shows how deep the pipe is below the surface.
- Signal Strength Indicator:Helps locate pipes by showing signal clarity.
- Display Type:Clear screens with easy-to-read icons improve accuracy.
- Portability:Lightweight and compact locators are easy to carry.
- Battery Life:Long battery life avoids interruptions during work.
- Multi-Frequency Options:Allow detection of different pipe types and sizes.
Budget Vs. Quality
Higher-priced locators often offer better accuracy and features. Low-cost options may lack some important functions.
Choose a pipe locator that fits your budget but still meets your needs. Consider how often you will use it.
- Basic models are good for occasional use and simple tasks.
- Mid-range locators work well for regular plumbing checks.
- Professional-grade tools suit frequent use and complex jobs.
Preparing For Pipe Detection
Using a pipe locator helps find hidden plumbing pipes underground or inside walls. Proper preparation makes the process safer and easier.
Before starting, you need to take safety steps, gather the right tools, and understand utility maps. These steps help avoid mistakes.
Safety Precautions
Safety is very important when detecting hidden pipes. Pipes may carry water, gas, or electricity, which can be dangerous.
Always wear protective gear and keep a safe distance from marked areas. Avoid digging or drilling before locating pipes clearly.
- Wear gloves and safety glasses
- Use insulated tools if electric pipes are nearby
- Keep others away from the work area
- Do not rely only on metal detectors
- Stop work if you detect gas smell
Gathering Necessary Tools
Prepare all tools before starting pipe detection. This saves time and avoids interruptions.
You need a pipe locator device, batteries, a measuring tape, and marking tools. Some locators come with headphones to hear signals clearly.
- Pipe locator or metal detector
- Extra batteries or charger
- Measuring tape or ruler
- Marking paint or flags
- Protective gloves and glasses
Reading Utility Maps
Utility maps show where pipes and cables are buried. Check these maps to avoid hitting important lines.
Contact your local utility company to get accurate maps. Study them carefully to understand pipe locations and depths.
- Locate water, gas, and electric lines on the map
- Note pipe depths and directions
- Mark known pipe areas on your work site
- Compare map info with pipe locator readings
Operating The Pipe Locator
Using a pipe locator helps find hidden plumbing in walls or floors. It detects metal pipes or plastic pipes with a signal transmitter.
Knowing how to operate the device correctly ensures you get accurate results. Follow simple steps to use the locator safely.
Calibrating The Device
Calibrate the pipe locator before use to improve accuracy. Calibration adjusts the device to the environment and pipe type.
Start by turning on the locator and placing it on a known metal object or a test pipe. Adjust settings until the device shows a clear signal.
- Turn on the device and select the correct pipe type.
- Place the locator on a test pipe or metal surface.
- Adjust sensitivity or gain controls as needed.
- Confirm the device shows a steady signal.
Scanning Techniques
Move the pipe locator slowly over the area where pipes may hide. Keep the device close to the surface for best signals.
Scan in straight lines and overlap each pass slightly. This method helps find pipes that run in different directions.
- Hold the locator flat against the surface.
- Move slowly, about 1 to 2 feet per second.
- Scan in rows, covering the entire area.
- Note areas where the signal strengthens.
Interpreting Signals
The pipe locator gives audio or visual signals when it detects a pipe. Stronger signals mean the pipe is closer or larger.
Watch for changes in signal strength. A sudden drop may mean the pipe bends or ends. Use this to map the pipe path.
- Strong, steady signals show pipe presence.
- Weak or no signals mean no pipe or deep pipes.
- Signal changes may indicate joints or bends.
- Repeat scans to confirm pipe locations.
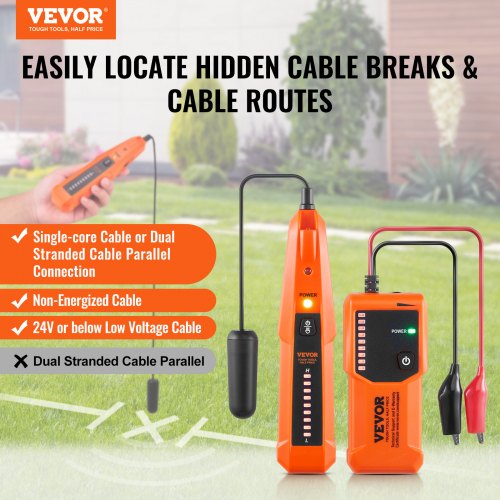
Credit: www.vevor.ca
Common Challenges And Solutions
Using a pipe locator can be tricky when plumbing pipes are hidden. Many problems can arise that make it hard to find pipes accurately.
This guide covers common issues and how to solve them when using a pipe locator.
Dealing With Interference
Signals from other metal objects can cause interference. This makes it hard to detect pipes clearly.
- Turn off nearby electrical devices to reduce signal noise.
- Use the locator at different frequencies to avoid interference.
- Move slowly and keep the locator close to the surface.
- Mark detected areas and cross-check with other tools.
Locating Non-metallic Pipes
Non-metal pipes like PVC do not conduct signals well. This makes detection harder than metal pipes.
| Pipe Type | Detection Method | Notes |
| Metal Pipes | Electromagnetic signal | Easy to detect |
| Non-Metallic Pipes | Sonar or tracer wire | Needs special equipment |
| Plastic Pipes with Tracer Wire | Electromagnetic signal | Tracer wire helps detection |
Using tracer wires or sonar devices helps find plastic pipes. Check if tracer wire is installed before starting.
Navigating Complex Plumbing Layouts
Complex pipe routes can confuse locators. Pipes may cross or run close together.
- Trace pipes slowly to follow each path carefully.
- Use a map or blueprint if available.
- Mark each pipe route clearly as you locate it.
- Check for pipe depth changes at bends or junctions.
Maintaining And Storing Your Locator
Keeping your pipe locator in good shape helps it last longer. Proper care improves its accuracy.
Follow simple tips for cleaning, calibration, and storage. These steps keep your tool ready for use.
Cleaning Tips
Clean the locator after every use. Dirt and moisture can cause damage over time.
- Use a soft, dry cloth to wipe the surface.
- Avoid harsh chemicals or water sprays.
- Remove dust from buttons and screen gently.
- Check for any cracks or loose parts.
Regular Calibration
Calibration keeps the locator accurate. Set a schedule to check it regularly.
| Calibration Frequency | Recommended Action |
| Monthly | Run a test on known pipes |
| Every 6 Months | Perform full calibration with manufacturer tools |
| After Repairs | Recalibrate before use |
Proper Storage Practices
Store the locator in a safe, dry place. Good storage prevents damage and battery drain.
- Keep it in its protective case.
- Remove batteries if not used for long periods.
- Store away from direct sunlight and heat.
- Avoid placing heavy objects on the device.
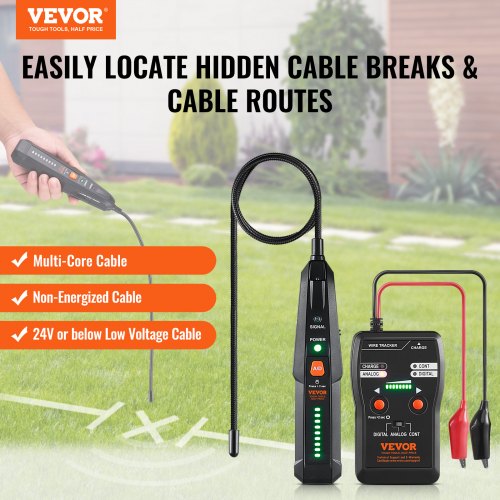
Credit: www.vevor.com
Expert Tips For Accurate Detection
Using a pipe locator helps find hidden plumbing inside walls or underground. It saves time and avoids damage.
To get accurate results, follow expert tips for scanning and marking pipes correctly.
Best Times For Scanning
Scan for pipes when there is little electrical interference. Turn off nearby appliances and lights.
Early morning or late evening usually has less background noise, improving detection.
- Scan during quiet hours to reduce signal noise
- Avoid scanning near heavy machinery or power lines
- Check weather conditions; avoid scanning in heavy rain
Using Multiple Methods
Use different locating tools to confirm pipe locations. Combining methods increases accuracy.
Try a pipe locator with a metal detector or ground-penetrating radar for better results.
- Use a pipe locator to detect signal from pipes
- Metal detectors find metal pipes or fittings
- Ground-penetrating radar shows pipe depth and layout
Documenting Your Findings
Write down pipe locations and depths for future reference. This helps avoid damage later.
Use drawings or photos to mark pipe paths clearly.
- Record pipe positions on a sketch of the area
- Note pipe material and size if possible
- Take photos of marked locations for records
- Keep all notes in a safe and accessible place
Frequently Asked Questions
What Is A Pipe Locator Used For In Plumbing?
A pipe locator helps detect hidden pipes behind walls or underground. It prevents damage during renovations and aids precise repairs. It uses electromagnetic signals to trace pipe paths quickly and safely.
How Do You Operate A Pipe Locator Correctly?
Turn on the locator and calibrate it to the pipe type. Move it slowly over the surface to detect signals. Follow the signal strength to pinpoint pipe location accurately.
Can A Pipe Locator Detect All Pipe Materials?
Most locators detect metal pipes effectively. Some advanced models also locate plastic pipes if tracer wires or signals are present. Always check your locator’s specifications before use.
Why Is Using A Pipe Locator Important For Hidden Plumbing?
It avoids accidental pipe damage during drilling or cutting. It saves time by accurately identifying pipe routes. It ensures safe and efficient plumbing repairs or installations.
Conclusion
Locating hidden pipes can save time and prevent costly mistakes. A pipe locator helps you find pipes beneath floors and walls. Follow the steps to use it effectively. Practice makes the process easier. Remember to check the device’s batteries before starting.
Always ensure the area is safe to work in. Knowing where your pipes are can help in future repairs. Using a pipe locator correctly is crucial for home maintenance. With patience and practice, you can master this skill. Now, you’re ready to tackle plumbing challenges with confidence.
