If you want to take your carpentry skills to the next level, mastering the speed square is a must. This simple tool can save you time, improve your accuracy, and make your projects look professional.
Whether you’re a beginner or have some experience, knowing how to use a speed square correctly will boost your confidence and help you get the job done right. In this guide, you’ll discover easy tips and tricks to make the most of your speed square, turning complicated cuts and measurements into simple tasks.
Ready to work smarter, not harder? Let’s dive in and unlock the full potential of your speed square.
Choosing The Right Speed Square
Picking the right speed square makes your carpentry work easier. You want a tool that fits your needs and lasts long.
Consider the material and size of the speed square. Also, check the features that help with accuracy and ease of use.
Material And Size Options
Speed squares come in different materials like aluminum, steel, and plastic. Each material has its own strength and weight.
- Aluminum:Lightweight and rust-resistant, good for most jobs.
- Steel:Heavy and very durable, best for tough work.
- Plastic:Light and cheap but less durable.
Size also matters. Most speed squares are 7 inches, but you can find smaller or larger ones. Bigger squares offer more surface area for marking.
Features To Look For
| Feature | Benefit |
| Clear Markings | Easier to read and more precise measurements |
| Notched Fence | Helps hold the square firmly on the wood |
| Multiple Scales | Includes common angles and measurements for quick use |
| Ruler Edge | Allows use as a straight edge or ruler |
| Durable Finish | Protects against wear and rust |
Choose a speed square that has clear markings and a strong fence. These features help you make accurate cuts and measurements.

Credit: www.youtube.com
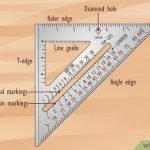
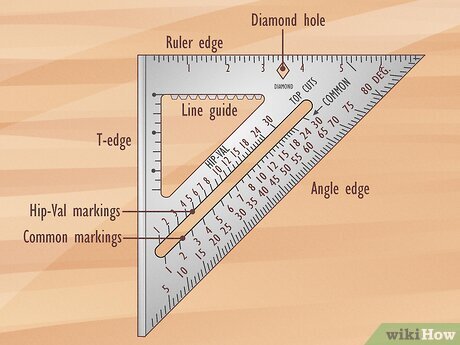
Basic Speed Square Components
The speed square is a simple tool that helps carpenters measure and mark wood quickly. It has several parts, each with a specific job. Knowing these parts makes your work easier and more accurate.
This guide explains the main components: the body and lip, the degree scale, and the notches and markings. Each part helps you use the speed square for different tasks.
Body And Lip
The body is the large, flat triangle part of the speed square. It is the main surface you use to measure and draw lines. The lip is the small raised edge along one side of the body.
The lip fits against the edge of the wood. This keeps the speed square stable and helps you make straight marks.
Degree Scale
The degree scale runs along one side of the speed square. It shows angles from 0 to 90 degrees. You use it to mark different angles for cuts or layouts.
- The scale helps find common angles like 30°, 45°, and 60°.
- It allows quick angle marking without extra tools.
- You can use it for both inside and outside angle measurements.
Notches And Markings
The speed square has small notches along its edges. These notches help you mark lines evenly and measure distances. The markings include numbers and symbols for quick reference.
| Feature | Purpose |
| Common Notches | Mark repeated measurements fast |
| Pivot Point | Center for angle measurements |
| Rafter Tables | Calculate rafter lengths and angles |
Measuring And Marking Angles
A speed square helps carpenters measure and mark angles quickly. It is a simple tool used for making accurate cuts.
Knowing how to use the speed square for angles saves time and improves your work quality.
Common Angles In Carpentry
Carpentry often requires cutting wood at specific angles. The most common are 45 and 90 degrees.
Other angles like 30, 60, and 22.5 degrees are also used for special projects and joints.
- 90 degrees for square corners
- 45 degrees for miter cuts
- 30 and 60 degrees for roof rafters
- 22.5 degrees for octagonal shapes
Using The Degree Scale
The speed square has a degree scale along one edge. You use it to measure angles easily.
To mark an angle, place the pivot point on the wood edge and rotate the square to the desired degree.
- Align the pivot with the wood edge
- Rotate the square to the angle needed
- Hold firmly and draw your cut line along the square edge
Marking Repeated Cuts
For many projects, you need to make the same cut multiple times. The speed square helps you mark these cuts accurately.
Set the square to the angle once. Then use it to mark each board quickly and consistently.
- Set the angle on the speed square
- Place the square on each board
- Draw the cut line using the square’s edge
- Check each mark before cutting

Credit: www.wikihow.com
Making Straight Cuts
Making straight cuts is important in carpentry. It helps create clean and accurate pieces for your project.
A speed square is a useful tool to help you make these cuts quickly and precisely. It acts as a guide and helps align your saw blade correctly.
Using The Speed Square As A Guide
Place the speed square against the edge of your workpiece. This keeps the square steady and gives you a straight line to follow.
Draw a pencil line along the edge of the speed square. This line shows exactly where you need to cut.
- Hold the speed square firmly against the wood edge.
- Use the straight edge to draw a clear cut line.
- Keep the speed square in place while cutting for accuracy.
Aligning With The Saw Blade
After drawing your cut line, align the saw blade with the line. This ensures the cut will be straight and precise.
Use the speed square to check the blade angle. Make sure it is square to the wood for a clean cut.
- Place the speed square next to the saw blade.
- Adjust the blade until it matches the square’s edge.
- Keep the blade steady as you cut along the marked line.
Marking And Cutting Rafters
A speed square is a useful tool for carpenters. It helps mark and cut rafters accurately. Rafters support the roof and must fit well.
Using a speed square saves time and improves precision. This guide explains how to find roof pitch and lay out common and hip rafters.
Finding Roof Pitch
Roof pitch is the slope of the roof. It is expressed as a ratio of rise over run. The rise is the height the roof goes up. The run is the horizontal distance.
To find roof pitch with a speed square, place the tool on the rafter edge. Align the pivot with the rafter’s edge. Read the angle where the tongue meets the scale. This angle tells the pitch.
Laying Out Common And Hip Rafters
Common rafters run from the roof’s ridge to the wall plate. Hip rafters run diagonally from the ridge to the building’s corners. Both need careful marking before cutting.
Use the speed square to mark the cut lines. Align the square with the rafter edge. Mark the plumb cut at the top and the seat cut at the bottom. For hip rafters, use the square to measure the angle of the diagonal run.
- Mark the plumb cut at the top edge
- Mark the seat cut at the bottom edge
- Measure and mark the diagonal angle for hip rafters
- Double-check all measurements before cutting

Credit: www.youtube.com
Scribing And Transferring Measurements
Using a speed square helps carpenters mark precise lines quickly. It simplifies scribing and transferring measurements onto wood.
This guide explains how to use the speed square’s notches and angles for accurate work.
Using The Notches For Scribing
The speed square has small notches along one edge. These notches help you scribe lines easily without extra tools.
- Place the square on the edge of the wood.
- Insert a pencil tip into a notch at the desired measurement.
- Hold the square firmly and slide the pencil along the wood.
- The pencil marks a straight, clean line to follow.
- Use multiple notches for different scribing points.
Transferring Angles To Workpieces
The speed square helps transfer angles from your plans to the wood. This is useful for cuts and joints.
| Angle | How to Mark |
| 45° | Align the square’s 45° edge with the wood edge. |
| 90° | Use the square’s right angle to mark perpendicular lines. |
| Other Angles | Pivot the square to the desired degree using the angle markings, then scribe. |
Additional Tips For Accuracy
Using a speed square correctly improves your carpentry work. Small details help you measure and mark precisely.
These tips focus on keeping your square reliable and avoiding common errors that reduce accuracy.
Maintaining The Square
Keep your speed square clean and free from dirt or rust. Wipe it after each use with a dry cloth. Store it in a dry place to avoid corrosion.
- Check for any dents or bends before use.
- Apply light machine oil to metal parts to prevent rust.
- Replace the square if edges become worn or damaged.
Avoiding Common Mistakes
Errors often happen when users do not secure the square firmly or read measurements incorrectly. Avoid these mistakes to keep your work precise.
| Common Mistake | How to Avoid |
|---|---|
| Loose grip on the square | Hold the square tightly against the material. |
| Misreading the scale | Look closely at the markings and use good light. |
| Using a damaged square | Inspect the tool before each use for damage. |
| Not aligning the square properly | Place the square flush on the edge or surface. |
Creative Uses Beyond Carpentry
A speed square is a simple tool found in many toolboxes. It helps carpenters make quick, accurate cuts. But this tool can do more than just carpentry tasks.
You can use a speed square in art, drawing, and measuring angles. It works well for many creative projects beyond woodwork.
Drawing Circles And Arcs
You can draw circles and arcs using a speed square as a guide. It helps keep your lines smooth and even.
Place a pencil through a hole or mark on the square. Then rotate the square around a fixed point to create a circle or arc.
- Use the corner of the square as a pivot point.
- Hold the square steady while moving the pencil.
- Adjust the radius by changing the pencil’s distance from the pivot.
Using As A Protractor
The speed square has angle markings that work like a protractor. You can measure and mark angles quickly.
Align the square’s edge with your workpiece. Read the angle markings to find the exact angle you need.
- Mark angles from 0 to 90 degrees.
- Use the square to check if corners are square or angled.
- Measure angles for crafts, art, or DIY projects.
Frequently Asked Questions
What Is A Speed Square Used For In Carpentry?
A speed square is a multi-functional tool used for measuring angles, marking cuts, and guiding saws. It helps carpenters quickly make accurate right angles and bevel cuts, improving efficiency and precision on woodworking projects.
How Do You Measure Angles With A Speed Square?
Place the pivot point on the edge and align the tool’s body with the workpiece. Rotate the square until the desired angle matches the degree mark. This method ensures fast, accurate angle measurements for cutting and marking.
Can A Speed Square Replace A Protractor?
While a speed square offers quick angle measurements, it cannot fully replace a protractor for complex angles. It is ideal for common angles used in carpentry but lacks the detailed precision of specialized protractors.
What Materials Can You Use With A Speed Square?
A speed square works well on wood, plywood, and soft metals. It is designed mainly for carpentry materials but can assist in layout tasks on various flat surfaces.
Conclusion
Mastering the speed square boosts your carpentry skills. It ensures accuracy in every cut. This tool is essential for precise measurements. From marking angles to checking square lines, it does it all. Practice using it regularly for better results. The more you use it, the easier it becomes.
Always keep your speed square handy. It saves time and reduces errors. Carpentry projects become more efficient and satisfying. Remember, practice makes perfect. So, keep learning and experimenting. Happy building!