Measuring angles accurately can be tricky, especially when you don’t have the right tools or know-how. But what if you could use a simple, everyday tool to get precise angle measurements every time?
Your combination square is more powerful than you think. You’ll discover easy steps to measure angles quickly and confidently with your combination square. By the end, you’ll save time, avoid mistakes, and tackle your projects with a new level of skill.
Ready to master this essential technique? Let’s dive in.

Credit: www.youtube.com
Basics Of A Combination Square
A combination square is a tool used in woodworking and metalworking. It helps measure angles and check straight edges.
This tool is easy to use and very useful for many projects. Knowing its parts and measurements is important.
Parts Of The Tool
A combination square has several main parts. Each part helps you measure or mark angles correctly.
- Blade:A ruler marked with measurements in inches or millimeters.
- Stock (Handle):The head that holds the blade and has a 90-degree angle.
- Bubble Level:A small level inside the stock to check if surfaces are flat.
- Adjusting Screw:A screw that locks the blade in place at the desired length.
Types Of Measurements
The combination square can measure different angles and distances. It is versatile and practical.
- 90-Degree Angle:Used to check or mark right angles for cutting or joining.
- 45-Degree Angle:Helpful for marking angles for miters or bevels.
- Depth and Height:The blade can measure depth of grooves or height of objects.
- Level Checking:The bubble level helps check if surfaces are horizontal or vertical.
Preparing The Combination Square
Using a combination square to measure angles needs some setup first. This ensures your measurements are accurate and reliable.
Start by checking the tool’s calibration and then set the blade properly. These steps help you get precise angle readings.
Checking Calibration
Calibration means making sure the tool is accurate. If the square is not calibrated, your angle measurements will be wrong.
- Place the combination square against a flat, straight edge.
- Check if the blade lines up exactly with the edge.
- If there is a gap or misalignment, the square needs adjustment.
- Adjust the blade until it fits perfectly at 90 degrees.
- Recheck the alignment after every adjustment.
Setting The Blade
Setting the blade correctly lets you measure angles besides 90 degrees. The blade slides and locks into place for different angles.
| Action | How to Do It |
| Loosen the locking screw | Turn it counterclockwise to slide the blade |
| Position the blade | Move the blade to the desired angle mark |
| Tighten the locking screw | Turn it clockwise to fix the blade firmly |
| Double-check the position | Ensure the blade does not move when pressed |
Measuring 90-degree Angles
Measuring 90-degree angles is important for many building and woodworking tasks. A combination square helps you check these angles easily and accurately.
This tool has a ruler and a head that forms a perfect right angle. You can use it to mark or verify 90-degree corners on your workpiece.
Positioning The Square
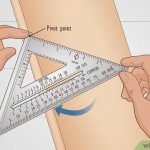
Place the head of the combination square firmly against the edge of the material. The ruler should extend across the surface where you want to check the angle.
Make sure the head fits snugly without gaps. This alignment ensures the ruler is exactly at a 90-degree angle to the edge.
- Hold the square steady against the edge
- Check that the head sits flush without rocking
- Keep the ruler flat on the surface you want to measure
Reading The Angle
Look along the ruler to see if it lines up with the edge or mark you are measuring. If the ruler matches the edge perfectly, the angle is 90 degrees.
If there is a gap or the ruler does not touch the edge evenly, the angle is not exactly 90 degrees. Adjust your workpiece or cut as needed.
- Check for tight contact between ruler and edge
- Move the square slightly to confirm consistent contact
- Use the ruler to mark a perfect 90-degree line if needed

Credit: www.wikihow.com
Measuring 45-degree Angles
Measuring 45-degree angles is important in many woodworking and metalworking projects. A combination square makes this task easier and more precise.
This guide explains how to measure 45-degree angles using a combination square. Follow simple steps to get accurate results every time.
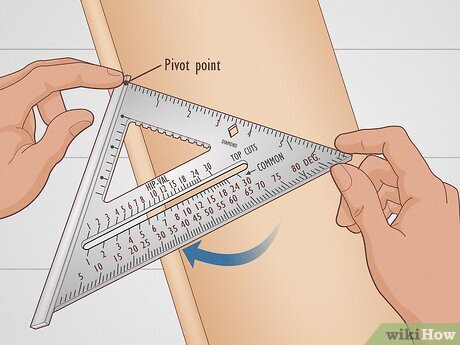
Aligning The Tool
Start by loosening the locking nut on the combination square’s ruler. Slide the ruler until it forms a 45-degree angle with the head. The head has a built-in 45-degree edge for this purpose.
- Place the square’s head flat against the edge of the workpiece.
- Ensure the ruler extends diagonally across the surface.
- Check that the ruler aligns exactly with the 45-degree edge on the head.
- Tighten the locking nut to hold the ruler in place.
Confirming Accuracy
To confirm the measurement is accurate, use a simple test on a scrap piece of material. This step helps avoid mistakes in your final project.
| Action | What to Look For |
|---|---|
| Mark along the ruler edge on scrap wood | Line should form a clear 45-degree angle with the edge |
| Use a protractor to check the marked angle | Angle should read exactly 45 degrees |
| Adjust ruler if angle is off | Loosen nut, realign, and tighten again |
Measuring Other Angles
Measuring angles beyond 90 degrees can be tricky without the right tools. A combination square can help you find many common angles with ease.
Here are two useful ways to measure and mark other angles using your combination square.
Using Protractor Attachments
Protractor attachments fit onto your combination square. They let you measure angles accurately by aligning the tool with your workpiece.
- Attach the protractor head to the combination square ruler.
- Place the ruler flat against the edge you want to measure.
- Rotate the protractor until the pointer matches the angle you need.
- Lock the protractor in place to keep the angle steady.
- Use the combination square to mark or check the angle on your workpiece.
Marking Custom Angles
You can mark custom angles by adjusting the ruler and head of the combination square. This helps when you need angles that are not standard.
| Custom Angle | Method | Tip |
|---|---|---|
| 30° | Set ruler to 60°, then use complementary angle | Use a protractor for accuracy |
| 45° | Use the built-in 45° head of the square | Align ruler edge flush with workpiece |
| 60° | Use the 60° marking on the protractor attachment | Lock the ruler firmly before marking |
| Any angle | Adjust protractor to desired degree | Double-check with a digital angle finder if possible |
Tips For Accurate Measurements
Measuring angles with a combination square is simple if you follow some key tips. Accuracy depends on careful handling and the right technique.
Using the tool correctly helps you get precise results for your projects.
Maintaining Tool Condition
Keep your combination square clean and free of rust. Dirt or damage can cause wrong readings.
- Wipe the blade and body after each use
- Store the tool in a dry place to avoid rust
- Check for bent or loose parts regularly
- Apply light oil to metal parts to prevent corrosion
Common Mistakes To Avoid
Many errors come from rushing or poor positioning of the tool. Avoid these mistakes to improve your measurements.
| Mistake | Effect | How to Fix |
| Loose blade | Inaccurate angle reading | Tighten the locking screw firmly |
| Dirty blade | Slips or wrong contact | Clean the blade before use |
| Incorrect blade alignment | Wrong angle measurement | Align blade flush with the stock |
| Using damaged tool | False readings | Replace or repair the tool |
Applications In Woodworking And Metalworking
A combination square is a tool that helps measure and mark angles. It is useful in woodworking and metalworking tasks. It can measure 90-degree and 45-degree angles easily.
This tool ensures accuracy when cutting and joining materials. Using it correctly saves time and reduces mistakes in projects.
Angle Checking In Projects
Use the combination square to check angles on wood or metal pieces. Place the ruler on the edge and align the head to the surface. This helps confirm if the angle is correct.
Checking angles before cutting or welding avoids errors. It ensures parts fit well and look good.
- Check 90-degree angles with the square’s head flush to the edge
- Use the 45-degree edge to mark miters or bevels
- Adjust the ruler to measure other angles as needed
Ensuring Joint Precision
The combination square helps make joints tight and even. It guides accurate cuts and marks for dovetails, miters, and lap joints.
Precise joints improve strength and appearance. Use the tool to set angles and measure lengths before assembly.
- Mark exact angles for cutting joint parts
- Check alignment of pieces before gluing or welding
- Measure depths and thicknesses for consistent joints

Credit: www.reddit.com
Frequently Asked Questions
How Do You Use A Combination Square To Measure Angles?
To measure angles, place the combination square’s ruler against the object. Adjust the head to the desired angle and lock it. Read the angle on the ruler scale for precise measurement.
Can A Combination Square Measure Both 45° And 90° Angles?
Yes, a combination square is designed to measure both 45° and 90° angles accurately. Its adjustable head allows quick angle setting and measurement for woodworking and metalworking.
What Parts Of A Combination Square Help In Angle Measurement?
The ruler and the adjustable head are key for angle measurement. The head slides along the ruler and locks at specific angles like 45° or 90° for precise readings.
Why Is A Combination Square Preferred Over A Protractor?
A combination square offers more stability and versatility for measuring angles. It doubles as a ruler and square, providing quick, accurate angle checks in various tasks.
Conclusion
Mastering the combination square for angles takes practice. It helps in precise measurements. You can apply this skill in various projects. Accurate angles can make a big difference. Remember to handle the tool carefully. Regular practice builds confidence and accuracy.
Soon, you will measure angles like a pro. Happy measuring, and enjoy your projects!