When you’re working on DIY projects, protecting your hearing is just as important as getting the job done right. Using ear plugs might seem simple, but if you don’t use them correctly, they won’t give you the full protection you need.
Imagine finishing your project without that annoying ringing in your ears or long-term damage. You’ll discover easy and effective tips to use ear plugs the right way. Keep reading to learn how a small change can make a big difference for your ears and your DIY success.
Choosing The Right Ear Plugs
Using ear plugs is important for protecting your ears during DIY projects.
Choosing the right type helps keep your ears safe and comfortable.
Types Of Ear Plugs
There are several types of ear plugs. Each type fits different needs and preferences.
- Foam ear plugs: Soft and disposable. They expand to fit your ear canal.
- Silicone ear plugs: Moldable and reusable. Good for blocking water and noise.
- Wax ear plugs: Shapeable and comfortable. Often used for sleeping or noise blocking.
- Flanged ear plugs: Made of silicone or rubber with ridges. Easy to insert and remove.
Material Considerations
Materials affect comfort, durability, and safety. Choose ear plugs that suit your skin and work environment.
| Material | Comfort Level | Reusability | Best For |
| Foam | High | Single use | Loud noises, short tasks |
| Silicone | Medium | Reusable | Water protection, noise |
| Wax | High | Reusable | Sleeping, noise |
| Rubber | Medium | Reusable | Industrial noise |
Noise Reduction Ratings
Noise Reduction Rating (NRR) shows how much sound ear plugs block. Higher ratings mean more noise protection.
- Choose ear plugs with at least 20 NRR for loud DIY projects.
- For very loud noise, use plugs with 30 NRR or more.
- Make sure plugs fit well to get the full noise reduction.
- Check the packaging for the NRR number.
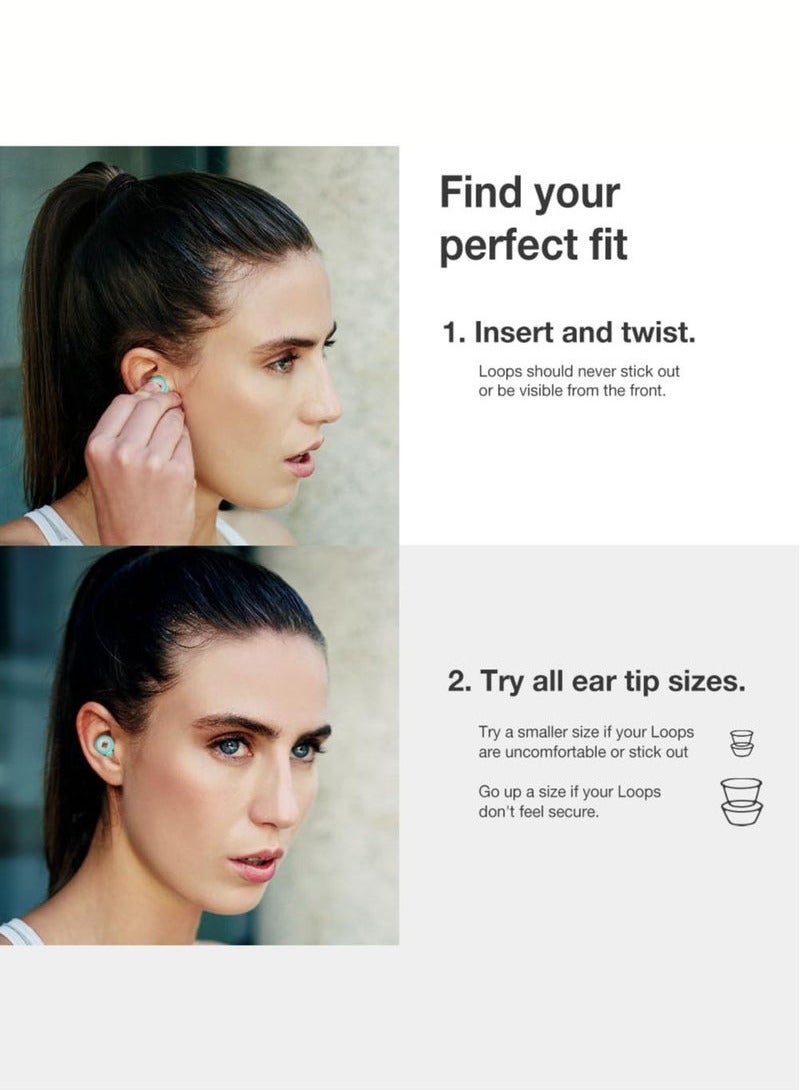
Proper Insertion Techniques
Using ear plugs correctly helps protect your hearing during DIY projects. Proper insertion ensures comfort and effective noise blocking.
Follow simple steps to prepare, insert, and check the fit of your ear plugs for the best results.
Preparing Your Ear Plugs
Clean your hands before handling ear plugs. Inspect the plugs for dirt or damage. Soft foam plugs should be rolled into a thin shape for easy insertion.
Step-by-step Insertion
- Reach over your head with the opposite hand and gently pull your ear upward and outward.
- With your other hand, insert the rolled ear plug into your ear canal slowly.
- Hold the plug in place for a few seconds until it expands and seals the ear canal.
- Repeat the process for the other ear.
Checking The Fit
| Fit Check | What to Do |
|---|---|
| Plug feels loose | Remove and reinsert following the steps carefully. |
| Sounds are not muffled | Try a different size or type of ear plug. |
| Discomfort or pain | Adjust position or use softer plugs. |
| Plug stays in place and noise is reduced | Fit is correct and safe for use. |
Maintaining Ear Plug Hygiene
Using ear plugs during DIY projects protects your ears from loud noises. Keeping them clean and well cared for helps avoid ear infections and keeps them effective.
Learn easy tips to clean, store, and know when to replace your ear plugs.
Cleaning Reusable Ear Plugs
Reusable ear plugs need regular cleaning to remove dirt and bacteria. Use mild soap and warm water to wash them after each use. Avoid harsh chemicals that can damage the material.
- Rinse ear plugs under warm water.
- Apply a small amount of mild soap.
- Gently rub and clean all surfaces.
- Rinse thoroughly to remove soap.
- Let them air dry completely before storage.
Storage Tips
Store ear plugs in a clean, dry case to keep them safe from dust and damage. Avoid leaving them in damp or hot places that can cause mold or deformation.
| Storage Location | Why It Works |
| Ventilated case | Prevents moisture buildup |
| Cool, dry place | Preserves material shape |
| Avoid bathroom | Reduces mold risk |
| Separate from sharp objects | Prevents damage |
When To Replace Ear Plugs
Replace ear plugs if they become hard, cracked, or lose their shape. Dirty plugs that cannot be cleaned properly should also be discarded to avoid ear problems.
- Check ear plugs before each use.
- Replace if they feel uncomfortable or damaged.
- Do not share ear plugs with others.
- Follow the manufacturer’s replacement guidelines.

Credit: www.popularmechanics.com
Maximizing Comfort During Use
Using ear plugs during DIY projects helps protect your hearing. Comfort matters to keep them on for long hours.
Proper fit and care reduce discomfort and make your work easier.
Adjusting For Long-term Wear
Choose ear plugs that fit your ear size well. Soft materials like foam or silicone feel better for many hours.
Insert them gently and check if they block noise without causing pain. Take short breaks to remove them if needed.
- Pick the right size for your ears
- Use soft, flexible materials
- Insert slowly and carefully
- Take breaks to relieve pressure
Managing Ear Fatigue
Wearing ear plugs for a long time can cause ear fatigue. This is a feeling of pressure or tiredness in the ear.
To reduce fatigue, remove ear plugs every hour for a few minutes. Use clean hands to avoid ear infections.
- Remove ear plugs regularly
- Keep your hands clean before handling
- Use ear drops if ears feel dry
- Switch ears if possible
Combining Ear Plugs With Other Safety Gear
Often, you wear ear plugs with goggles or masks during projects. Make sure the ear plugs do not interfere with other gear.
Test your full setup before starting work. Adjust the position of ear plugs or safety gear for a good seal and comfort.
- Put on ear plugs before other gear
- Check for gaps or pressure points
- Adjust straps and ear plugs as needed
- Choose low-profile plugs if needed
Common Mistakes To Avoid
Using ear plugs during DIY projects helps protect your hearing. Many people make simple errors that reduce ear plugs’ effectiveness.
Knowing what mistakes to avoid makes your ear protection stronger and safer. This guide covers common errors and how to fix them.
Ignoring Fit Issues
Ear plugs must fit well to block noise properly. Wearing plugs that are too loose or too tight lowers their protection.
Check if your ear plugs seal your ear canal comfortably. Poor fit lets noise in and can cause discomfort during work.
- Test fit by inserting the plug fully into your ear
- Choose the right size for your ear shape
- Replace ear plugs that do not fit well
Using Damaged Ear Plugs
Damaged ear plugs lose their ability to protect your ears. Cracks, tears, or dirt reduce their effectiveness against noise.
Always inspect ear plugs before use. Throw away any plugs that look worn out or dirty to keep your ears safe.
- Look for cracks or holes
- Check for dirt or debris
- Use clean plugs every time
Neglecting Ear Health
Ignoring your ear health can cause pain or infections. Using ear plugs without cleaning your ears or plugs can lead to problems.
Clean your ears gently and keep ear plugs clean. If you feel pain or discomfort, stop using the plugs and see a doctor.
- Wash reusable ear plugs regularly
- Keep your ears dry and clean
- Do not share ear plugs with others

Credit: www.kickstarter.com
Enhancing Safety Beyond Ear Protection
Using ear plugs during DIY projects protects your hearing. Yet, safety goes beyond just your ears. Other precautions help keep you safe and comfortable.
Following simple safety tips can prevent injuries and make your workspace better. Focus on eye protection, tool handling, and creating a quiet area.
Using Eye Protection
Eye protection stops dust, wood chips, and sparks from hurting your eyes. Always wear safety glasses or goggles during your work.
Choose glasses that fit well and do not fog up. Keep them clean for clear vision and better safety.
- Wear safety glasses with side shields
- Use goggles for wet or dusty work
- Replace scratched or damaged lenses
Safe Tool Handling
Handle tools carefully to avoid accidents. Keep blades sharp and tools in good condition to work smoothly.
Use the right tool for the job. Follow instructions and always keep hands clear of moving parts.
- Inspect tools before each use
- Store tools safely after use
- Wear gloves if needed for grip and protection
Creating A Quiet Workspace
A quiet workspace helps you focus and reduces stress. Ear plugs protect your hearing but lowering noise also helps your concentration.
Use sound-absorbing materials and keep noisy tools away from your work area. Take breaks to rest your ears and mind.
- Place rugs or foam panels on walls
- Use quieter tools or mufflers if possible
- Work in a space with good ventilation and lighting
Credit: www.noon.com
Frequently Asked Questions
How Do Ear Plugs Protect During Diy Projects?
Ear plugs reduce noise exposure by blocking loud sounds. They protect your hearing from damage caused by power tools and machinery. Using ear plugs consistently helps prevent long-term hearing loss during DIY tasks.
What Types Of Ear Plugs Are Best For Diy Work?
Foam ear plugs are affordable and effective for most DIY jobs. Silicone plugs offer reusable and comfortable options. Choose plugs with a high Noise Reduction Rating (NRR) for maximum protection.
How Should I Insert Ear Plugs Properly?
Roll foam plugs into a tight cylinder. Pull your ear upward and outward to open the canal. Insert the plug deeply and hold it until it expands to fit snugly.
Can Ear Plugs Be Reused For Diy Projects?
Foam ear plugs are typically single-use and should be discarded after each use. Silicone and custom ear plugs can be cleaned and reused. Always check manufacturer guidelines for reuse instructions.
Conclusion
Using ear plugs protects your ears during noisy DIY projects. They reduce loud sounds and help avoid ear pain. Choose the right type for comfort and safety. Clean and store them properly to last longer. Always wear ear plugs before starting any loud work.
This small step keeps your hearing safe and helps you focus. Stay safe and enjoy your DIY tasks without ear damage. Simple habits make a big difference over time. Keep your ears healthy with these easy tips.