
Are you confident that your electrical systems are fully protected? Electrical insulation testing is a crucial step to ensure safety and prevent costly breakdowns.
But how do you make sure you’re doing it right? You’ll discover simple yet powerful tips that can help you test insulation effectively and keep your equipment running smoothly. Keep reading, and you’ll learn how to avoid common mistakes and boost your confidence in every test you perform.
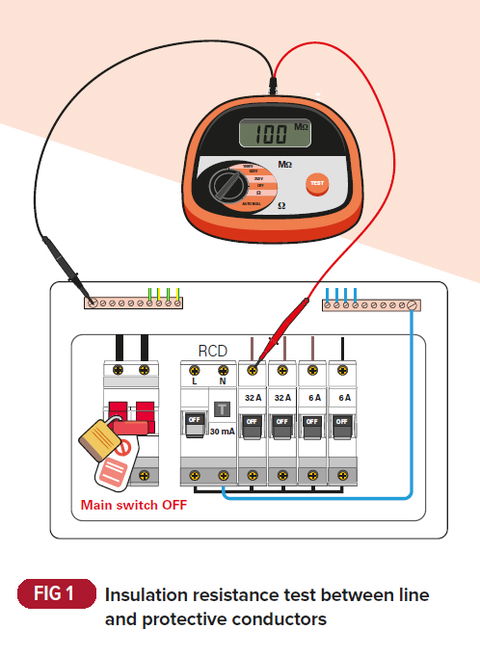
Credit: www.voltimum.co.uk
Preparing For Insulation Testing
Electrical insulation testing helps check the quality of wires and equipment. Preparing well ensures accurate results and safety. This guide covers key steps before testing.
Understanding the right tools, safety rules, and environment will make testing easier and safer. Follow these tips to get ready.
Selecting The Right Equipment
Choose equipment that matches the type of insulation and voltage levels. Use testers with clear displays and stable output. Check that the tools are calibrated and in good condition.
- Pick insulation testers suitable for your system’s voltage
- Ensure meters show accurate readings
- Use leads and probes that fit securely
- Check calibration dates before use
Ensuring Safety Measures
Safety is key during insulation testing. Wear protective gear and keep the testing area clear. Verify that power is off and locked out before starting. Follow local safety rules strictly.
| Safety Step | Reason |
| Wear insulated gloves | Protect against electric shock |
| Use safety glasses | Protect eyes from sparks |
| Clear work area | Prevent accidental contact |
| Lock out power supply | Ensure no live current during test |
Environmental Considerations
Test insulation in dry and clean places. Moisture and dust can affect results. Keep temperature stable and avoid windy or wet conditions. Proper lighting helps see connections clearly.
- Choose a dry environment to avoid false readings
- Keep the area free of dust and dirt
- Avoid testing in extreme heat or cold
- Use good lighting to check all connections

Credit: vitrek.com
Conducting Accurate Tests
Electrical insulation testing helps find problems in wires and equipment. Accurate tests keep people and machines safe.
Following clear steps during testing gives good results. This guide shows tips for better testing.
Setting Proper Test Parameters
Choose the right voltage and time for each test. Use settings that match the equipment’s specifications.
Too high voltage can damage parts. Too low voltage may not show problems.
- Check the equipment manual for voltage limits
- Set the test time long enough to get stable readings
- Adjust parameters for temperature and humidity
Connecting Test Leads Correctly
Connect test leads firmly to the right points. Loose or wrong connections cause false results.
Clean the contact points before attaching leads. Use proper clips or probes for a secure fit.
- Attach the positive lead to the conductor
- Connect the negative lead to the ground or shield
- Keep leads away from each other to avoid interference
Avoiding Common Testing Errors
Errors can happen if you rush or skip steps. Take time to follow safety rules and test procedures.
Watch for problems like dirty leads, poor contact, or wrong settings. These can lead to wrong results.
- Always discharge capacitors before testing
- Keep test equipment calibrated and checked
- Do not test wet or damp insulation
- Record all readings carefully for comparison
Interpreting Test Results
Electrical insulation testing helps check the condition of wires and equipment. Understanding test results is key to keeping systems safe. This guide explains how to read and use these results well.
Good interpretation can spot problems early. It also helps plan maintenance and avoid failures. Focus on typical values, signs of wear, and trends over time.
Recognizing Typical Insulation Values
Typical insulation resistance depends on the type of equipment and age. New insulation shows high resistance, usually in megaohms. Lower values may mean moisture or dirt.
| Equipment Type | Typical Resistance Range (Megaohms) |
| Low Voltage Cables | > 100 |
| Medium Voltage Motors | 10 to 100 |
| Transformers | 50 to 500 |
| Older Equipment | 5 to 50 |
Identifying Signs Of Deterioration
Deterioration shows as lower resistance and unstable readings. Look for these signs:
- Resistance drops below normal ranges
- Fluctuating test results over short time
- High leakage current detected
- Visible damage or cracks in insulation
- Test results worsen after moisture exposure
Using Trend Analysis
Track insulation values over time to find slow changes. Trend analysis highlights gradual wear and sudden faults. Keep a simple record of test dates and results.
- Test insulation at regular intervals
- Record results with date and equipment ID
- Compare new results to past data
- Watch for steady decreases or spikes
- Schedule maintenance if trend shows decline
Maintaining Equipment For Reliability
Electrical insulation testing ensures safety and performance. Keeping equipment reliable helps avoid failures and downtime.
Proper care and routine checks extend the life of your testing tools. This guide covers key steps to maintain your equipment well.
Routine Calibration
Calibration keeps your testing instruments accurate. It prevents false readings that could lead to wrong decisions.
- Schedule calibration at regular intervals
- Use certified calibration services
- Record all calibration results
- Check calibration after any repair
Proper Storage And Handling
Store your equipment in a clean, dry place. Avoid extreme temperatures and moisture to protect sensitive parts.
| Storage Tip | Reason |
| Keep in protective case | Prevents physical damage |
| Store away from dust | Stops contamination |
| Avoid direct sunlight | Protects from heat damage |
| Use silica gel packs | Controls moisture |
Regular Maintenance Checks
Inspect your equipment before and after use. Look for signs of wear or damage that could affect results.
- Check cables and connectors for cracks
- Clean contacts with a soft cloth
- Test batteries and replace if low
- Verify display and controls work properly
Advanced Testing Techniques
Electrical insulation testing ensures safety and performance in electrical systems. Advanced techniques help find hidden problems early.
These methods give detailed information about insulation health. They improve maintenance and reduce equipment failures.
Using Megohmmeters Effectively
Megohmmeters measure insulation resistance by sending a high voltage through the material. Proper use is key to accurate results.
Always check the test leads and connections before starting. Use the right voltage for the equipment tested to avoid damage.
- Clean surfaces to remove dust and moisture
- Allow the meter to stabilize before reading
- Record readings over time to track changes
- Discharge the equipment after testing for safety
Applying Polarization Index Tests
The Polarization Index (PI) test compares insulation resistance at two different times. It shows how moisture or dirt affects the insulation.
PI is the ratio of resistance at 10 minutes to resistance at 1 minute. A higher PI means better insulation quality.
- Start the test with a clean, dry surface
- Record resistance at 1 minute and 10 minutes
- Calculate PI by dividing 10-minute value by 1-minute value
- Use PI to decide if maintenance is needed
Integrating Partial Discharge Measurements
Partial discharge tests detect small electrical sparks inside insulation. These sparks can cause damage over time.
Using partial discharge measurements helps find weak spots before failure. This test uses special sensors and equipment.
- Place sensors near the insulation to capture signals
- Analyze signal patterns to identify discharge sources
- Use results to plan repairs and avoid breakdowns
- Combine with other tests for full insulation assessment

Credit: www.youtube.com
Frequently Asked Questions
What Is Electrical Insulation Testing?
Electrical insulation testing measures the resistance of insulating materials. It ensures electrical systems are safe and reliable. This test detects faults like moisture, dirt, or wear that cause insulation failure. Regular testing prevents equipment damage and electrical hazards.
How Often Should Insulation Testing Be Done?
Insulation testing frequency depends on equipment type and environment. Generally, test critical systems annually. Harsh conditions may require more frequent checks. Routine testing maintains system integrity and prevents unexpected failures.
What Tools Are Used For Insulation Testing?
Common tools include megohmmeters (megger) and insulation resistance testers. These devices apply voltage and measure resistance levels. They are portable, easy to use, and provide accurate insulation condition data.
Why Is Insulation Resistance Important?
High insulation resistance prevents current leakage and electrical shocks. It enhances equipment lifespan and operational safety. Low resistance indicates potential faults, risking failure and hazards. Monitoring resistance helps maintain electrical system health.
Conclusion
Testing electrical insulation ensures safety and equipment reliability. Consistent checks prevent costly failures. Use proper tools for accurate results. Follow expert guidelines to enhance testing efficiency. Address issues promptly to maintain system integrity. Regular testing can extend equipment lifespan. Remember, safety comes first in every task.
Take precautions during testing to avoid hazards. Keep learning about new testing techniques. Stay informed and improve your skills. This knowledge helps you ensure a safe working environment.