Are you struggling to get your floors perfectly level? Using a laser level can make the job easier, faster, and more accurate—but only if you know how to use it right.
You’ll discover simple yet powerful tips that help you get the most out of your laser level for floor alignment. Whether you’re a DIY enthusiast or a professional, these insider tricks will save you time, reduce mistakes, and give you confidence in every step you take.
Keep reading, and soon you’ll be leveling floors like a pro.

Credit: www.youtube.com
Choosing The Right Laser Level
Using a laser level helps keep floors even and straight. Picking the right one makes your work easier and more accurate.
There are many types and features to consider. Your budget and the brand also play a role in your choice.
Types Of Laser Levels
Laser levels come in different styles. Each type suits a specific task or space.
- Dot Laser Levels:Projects single or multiple points for alignment.
- Line Laser Levels:Creates straight horizontal or vertical lines.
- Rotary Laser Levels:Spins a laser beam 360 degrees for large areas.
- Combination Laser Levels:Offers both dot and line features.
Features To Consider
Look for features that improve accuracy and ease of use. Some features matter more depending on the project.
| Feature | Benefit |
| Self-Leveling | Auto-adjusts to level surface quickly |
| Range | Distance the laser can project accurately |
| Battery Life | How long the device works without charging |
| Mounting Options | Ability to attach to tripods or walls |
| Durability | Resistance to dust and water for job site use |
Budget And Brand Options
Prices vary from basic to professional models. Choose a brand with good reviews and support.
- Set a spending limit based on how often you will use it.
- Consider brands known for quality and warranty.
- Look for models that balance price and features.
- Check if replacement parts and batteries are easy to find.
Preparing The Floor Surface
Using a laser level helps align your floor precisely. Preparing the floor surface is key for accurate results.
Clean and smooth floors make it easier to read the laser lines. Follow these tips to prepare your floor well.
Cleaning And Clearing Debris
Remove all dirt, dust, and debris from the floor. A clean surface ensures the laser level works correctly.
Debris can block the laser line or cause the level to sit unevenly. Sweep and vacuum the floor thoroughly.
- Use a broom or vacuum to clear loose dirt
- Wipe sticky spots with a damp cloth
- Remove any tools or materials from the floor
Checking For Uneven Spots
Look for bumps, dips, or cracks on the floor. These can affect the laser level’s accuracy.
Mark uneven spots and fix them before starting. Use a straight edge or level to find problem areas.
- Place a straight board across the floor
- Check for gaps or rocking
- Fill dips with floor patch or compound
- Sand down high spots if needed
Marking Reference Points
Mark key points on the floor to guide your work. These points help keep your alignment consistent.
Use a pencil or chalk to mark spots where the laser lines will pass. These references make the job easier.
- Mark corners and edges of the room
- Mark points at regular intervals along walls
- Label marks clearly to avoid confusion
Setting Up The Laser Level
Using a laser level for floor alignment helps you get precise results. Setting it up correctly is key to success.
Follow these tips to position, calibrate, and stabilize the laser level properly.
Positioning The Device
Place the laser level where it covers the entire floor area. Make sure it points in the direction you want to measure.
Keep the device at a height that matches your working level. Avoid placing it too low or too high.
- Find a central spot to cover the whole floor
- Align the laser beam with your layout lines
- Keep it at a comfortable height for easy reading
Calibrating The Laser
Check if the laser is level before starting. Use the built-in bubble vials or automatic leveling features.
If the device has an adjustment knob, use it to fine-tune the laser line. Make small changes and recheck the level.
- Turn on the laser and check the bubble vials
- Use adjustment knobs to center the bubbles
- Confirm the laser line stays steady and straight
Ensuring Stability
Keep the laser level stable during use. A shaky device can give wrong readings.
Use a tripod or flat surface to hold the laser steady. Avoid placing it where it can be bumped.
- Mount the laser on a tripod for best stability
- Place it on a flat, firm surface if no tripod is available
- Keep the area clear to avoid accidental movements

Credit: www.engineersupply.com
Aligning The Floor Accurately
Using a laser level helps keep your floor perfectly aligned. It shows clear lines to follow during installation.
Accurate floor alignment prevents uneven surfaces and ensures a smooth finish. It saves time and reduces errors.
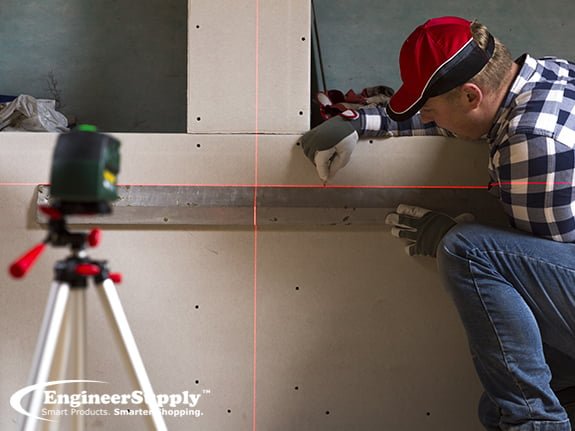
Using Laser Lines For Guidance
Turn on the laser level and place it at a central point on the floor. The laser will project straight lines along the surface.
Use these laser lines to guide the placement of floorboards or tiles. They help keep everything straight and even.
- Set the laser level at the correct height.
- Mark reference points along the laser line.
- Check the line frequently during installation.
- Adjust materials to stay aligned with the laser.
Adjusting Floor Height
Use the laser level to check floor height differences. The laser line shows if one area is higher or lower than another.
| Action | What to Check | Result |
| Measure from laser line | Distance to floor surface | Identify high or low spots |
| Adjust flooring material | Thickness or leveling compound | Match the laser height |
| Re-check after adjustment | Laser line alignment | Confirm even floor height |
Verifying Alignment Consistency
After placing some flooring, check alignment with the laser again. Make sure the lines stay straight across the whole floor.
To verify consistency, rotate the laser level and check multiple directions:
- Check lengthwise alignment.
- Check widthwise alignment.
- Confirm no gaps or bends in the laser line.
- Fix any misalignments immediately.
Common Mistakes To Avoid
Using a laser level for floor alignment can make your work easier. But mistakes can cause errors and delays. Avoid these common problems to get the best results.
Understanding these mistakes helps you use your laser level properly and save time and money.
Ignoring Calibration
Calibration keeps your laser level accurate. If you ignore calibration, your floor alignment may be wrong. Always check the device before starting your project.
Calibration errors lead to uneven floors and more work later. Regular calibration ensures the laser beam is level and reliable.
Improper Device Placement
Placing the laser level on an unstable or uneven surface causes wrong readings. Always set the device on a flat, steady base. Use a tripod if needed.
Check the placement before you start. A small tilt can change the laser line and ruin your floor alignment.
- Use a stable platform or tripod
- Make sure the surface is flat
- Secure the device to avoid movement
Overlooking Environmental Factors
Lighting, dust, and obstacles affect laser visibility and accuracy. Bright sunlight can make the laser line hard to see. Dust can block the beam.
Clear the area and control light for the best results. Also, watch for vibrations or wind that can move the device.
- Work in shaded or low light areas
- Keep the laser path clean and clear
- Protect the device from wind and vibration
Maintenance And Care Tips
Using a laser level for floor alignment needs care to keep it accurate. Proper maintenance helps the tool last longer.
Simple steps like cleaning, safe storage, and calibration checks keep the laser level working well.
Cleaning The Laser Level
Clean the laser level after each use to remove dust and dirt. Use a soft, dry cloth to wipe the surface gently.
Avoid using water or harsh chemicals that can damage the device. Clean the lens carefully to keep the laser clear and bright.
- Use a soft brush or cloth to remove dust
- Do not spray liquid directly on the device
- Wipe the lens with a microfiber cloth
Storing Safely
Store the laser level in a dry, cool place to protect it from moisture and heat. Use the original case or a padded box for extra safety.
Keep the device away from heavy objects and vibrations that can cause damage. Always turn off the laser level before storing.
- Keep in original or padded case
- Store in a dry, cool area
- Avoid placing heavy items on top
- Turn off before storage
Regular Calibration Checks
Check the calibration of your laser level regularly to ensure accuracy. Calibration can drift from bumps or long use.
Follow the manufacturer’s instructions or get help from a professional service for calibration. Keep a schedule to check calibration often.
- Test calibration before important projects
- Use a flat surface for testing
- Send for professional calibration if needed
- Keep a log of calibration dates
Advanced Techniques For Precision
Using a laser level for floor alignment needs care and exact methods. Precision helps create a flat and even surface.
These advanced techniques improve accuracy and speed. They help handle complex jobs with confidence.
Using Multiple Laser Levels
Setting up more than one laser level covers large areas quickly. It reduces errors from moving the tool repeatedly.
- Place laser levels at different points around the room.
- Check that all lasers line up to the same height.
- Use targets or receivers to confirm alignment.
- Adjust any laser that is off to keep the floor level.
- Mark reference points on the floor for guidance.
Incorporating Digital Tools
Digital tools like apps and laser detectors improve control and data tracking. They make adjustments faster and more exact.
| Tool | Purpose | Benefit |
| Laser Detector | Detects laser beam in bright light | Ensures visibility outdoors or in bright rooms |
| Smartphone App | Records alignment data | Keeps precise measurements and notes |
| Digital Level | Measures slopes and angles | Helps set exact floor gradients |
Working In Challenging Environments
Floors in uneven, dusty, or wet places need special care with laser levels. Protecting the tools and setup is key.
- Use protective covers on laser levels to prevent dust and water damage.
- Secure tripods and mounts to avoid movement from wind or vibrations.
- Check laser calibration often to keep accuracy in tough conditions.
- Use bright lasers or detectors in areas with strong sunlight.
- Clear obstacles and debris before starting alignment work.

Credit: alltracon.com
Frequently Asked Questions
How Do I Set Up A Laser Level For Floor Alignment?
Place the laser level on a stable surface or tripod. Adjust it until the laser beam is perfectly horizontal. Ensure the device is calibrated for accurate floor alignment.
What Safety Precautions Are Needed When Using Laser Levels?
Always avoid direct eye exposure to the laser beam. Use protective eyewear if recommended. Keep the laser level away from children and pets during operation.
How Can I Ensure Accurate Floor Leveling With A Laser?
Check the laser’s calibration before starting. Use a measuring rod or tape to verify beam height. Mark reference points on the floor for consistent alignment.
What Are Common Mistakes To Avoid With Laser Levels?
Avoid placing the laser on unstable or uneven surfaces. Don’t ignore calibration checks. Avoid moving the device during measurements to prevent errors.
Conclusion
Using a laser level simplifies floor alignment tasks. It ensures precision and saves time. Even beginners find it handy and efficient. Remember to check the tool’s calibration regularly. Practice makes perfect, so don’t hesitate to try. With patience, you’ll achieve great results.
Avoid rushing and focus on accuracy. Review these tips before each project. Consistency in practice builds confidence. A well-aligned floor enhances any space. Enjoy the process and learn as you go. Happy leveling!
