Measuring small objects with precision can be tricky, especially when a regular ruler just won’t cut it. If you want to get accurate results every time, learning how to use a micrometer is a game-changer.
In this guide, you’ll discover simple steps to measure tiny items with confidence and ease. Whether you’re working on a DIY project, fixing gadgets, or just curious, mastering this tool will save you time and frustration. Keep reading, and you’ll soon handle even the smallest measurements like a pro.

Credit: www.angi.com
Micrometer Basics
A micrometer is a tool used to measure small objects with high accuracy. It helps find the exact size of things that are hard to measure with a ruler.
Micrometers are common in workshops and labs where precise measurements are needed. They work by using a calibrated screw to measure thickness or diameter.
Types Of Micrometers
There are several types of micrometers made for different measuring tasks. Each type fits a specific use to measure small parts accurately.
- Outside Micrometer: Measures the outside size of objects like rods or sheets.
- Inside Micrometer: Measures the inside diameter of holes or tubes.
- Depth Micrometer: Measures the depth of holes or slots.
- Digital Micrometer: Shows measurements on a digital screen for easy reading.
Parts Of A Micrometer
A micrometer has several key parts that help in taking precise measurements. Knowing these parts helps you use the tool correctly.
- Frame: The C-shaped body that holds the tool together.
- Anvil: The fixed part that touches the object being measured.
- Spindle: The moving part that presses against the object.
- Sleeve: The stationary tube with the main scale markings.
- Thimble: The rotating part with a scale that moves the spindle.
- Ratchet Stop: Ensures consistent pressure when measuring.
- Lock Nut: Holds the spindle in place after measuring.
When To Use A Micrometer
Use a micrometer when you need very precise measurements of small objects. It is best for parts where millimeters or thousandths of an inch matter.
Micrometers work well on metal parts, small machine pieces, and thin materials. They give better accuracy than rulers or calipers in tight spaces.
Preparing The Micrometer
Using a micrometer to measure small objects needs care. Preparing the micrometer correctly helps get accurate results.
This guide shows how to prepare the micrometer before measuring tiny parts.
Cleaning And Calibration
Clean the micrometer before use to remove dust and dirt. Dirt can cause wrong readings.
Calibration checks if the micrometer measures correctly. Use a standard gauge block for this.
- Wipe the spindle and anvil with a clean cloth.
- Check the micrometer against a gauge block of known size.
- Adjust the micrometer if the reading is off.
Zeroing The Micrometer
Zero the micrometer before measuring. This means setting the scale to zero when the spindle and anvil touch.
Close the micrometer gently and check if the zero mark lines up. Adjust if needed.
- Turn the thimble until the spindle meets the anvil.
- Look at the scale to see if it reads zero.
- Use the micrometer’s adjustment tool to fix the zero point.
Selecting The Right Micrometer
Choose a micrometer that fits the size of the object. Different micrometers measure different ranges.
Use a micrometer with a small range for very tiny parts. Use a larger range for bigger objects.
- 0-25 mm micrometers for very small items.
- 25-50 mm micrometers for medium-sized parts.
- 50-75 mm or larger for bigger objects.
Measuring Small Objects
Measuring small objects needs a tool that is both accurate and easy to use. A micrometer is perfect for this task.
This tool helps you get precise measurements in millimeters or inches, even for tiny items.
Positioning The Object
Place the small object between the micrometer’s spindle and anvil. Make sure it is centered for a correct reading.
Hold the micrometer steady with one hand to keep the object in place during measurement.
Applying Correct Pressure
Turn the ratchet or thimble until the spindle gently touches the object. Do not force it.
Using the ratchet ensures the right pressure. Too much pressure can give wrong measurements.
- Turn the ratchet slowly
- Stop when it clicks
- Avoid squeezing the object too hard
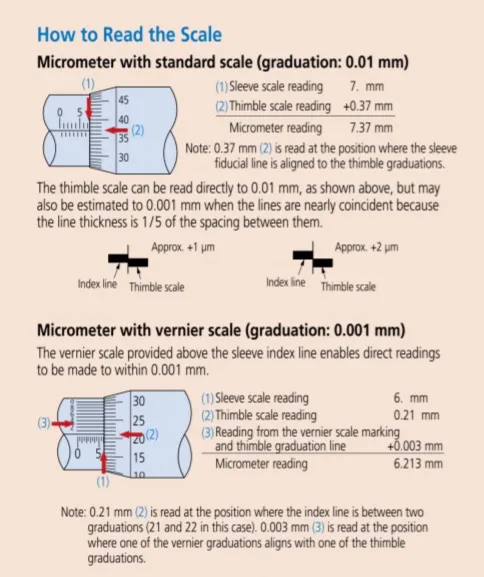
Reading The Scale
Look at the sleeve scale first to find the main measurement. This shows whole millimeters or inches.
Next, check the thimble scale for the smaller part. Add this to the main reading for the total size.
| Scale Part | What It Shows | Example |
|---|---|---|
| Sleeve | Main units (mm or inches) | 5 mm |
| Thimble | Fraction of a unit | 0.25 mm |
| Total | Sum of sleeve and thimble | 5.25 mm |

Credit: www.wikiwand.com
Tips For Accurate Measurements
Measuring small objects with a micrometer needs care and attention. Accurate results depend on good habits and proper use.
This guide shares tips to help you avoid common mistakes. Follow these to get the best measurements every time.
Avoiding Parallax Errors
Parallax errors happen when you do not look straight at the micrometer scale. This mistake causes wrong readings.
- Keep your eye level with the scale when reading.
- Use a magnifying lens if needed to see clearly.
- Hold the micrometer steady to prevent movement.
- Check the reading from different angles to confirm.
Consistent Measurement Technique
Using the same method each time keeps your measurements reliable. Changing technique can cause variation.
| Technique | Tip |
| Pressure applied | Use the ratchet stop for steady force |
| Object placement | Place object flat between anvil and spindle |
| Reading scale | Read the thimble and sleeve carefully |
| Resetting | Zero the micrometer before each use |
Environmental Considerations
Temperature and cleanliness affect micrometer accuracy. Keep the tool and object clean and stable.
| Factor | Effect | Solution |
|---|---|---|
| Temperature | Metal expands or contracts | Measure at room temperature |
| Dust and dirt | Blocks proper contact | Clean the micrometer and object |
| Humidity | Can cause rust or swelling | Store in dry place |
| Vibration | Causes unstable readings | Measure on a steady surface |
Common Mistakes To Avoid
Measuring small objects with a micrometer requires care and focus. Mistakes can cause wrong readings and waste time. Avoiding common errors helps get accurate results every time.
Below are key mistakes to watch for when using a micrometer. Learn how to avoid them for precise measurements.
Misreading The Scale
Micrometer scales can be tricky to read. The sleeve and thimble scales show different parts of the measurement. Misreading either can cause big errors.
- Always line up the thimble markings carefully with the sleeve scale.
- Check the zero mark on the thimble before measuring.
- Use good light to see the numbers clearly.
- Practice reading the scale before measuring important objects.
Over-tightening The Spindle
Tightening the spindle too hard can damage both the tool and the object. It also changes the measurement by squeezing the item.
| Problem | Effect |
| Too much force | Crushes object, distorts reading |
| Too little force | Loose contact, inaccurate reading |
| Proper force | Correct contact, accurate measurement |
Use the ratchet stop or friction thimble on the micrometer. This tool limits pressure and prevents over-tightening.
Ignoring Calibration
Calibration ensures the micrometer gives correct readings. Ignoring calibration can cause slow errors that build over time.
Follow these tips to keep your micrometer calibrated:
- Check zero reading before each use.
- Use calibration standards like gauge blocks.
- Have the tool professionally calibrated regularly.
- Store the micrometer in a clean, dry place.

Credit: www.wikiwand.com
Maintaining Your Micrometer
Keeping your micrometer in good shape helps it measure small objects accurately. Proper care extends its life and ensures precise readings.
Regular maintenance is simple and does not take much time. Follow these tips to keep your tool reliable.
Regular Cleaning
Clean your micrometer after each use to remove dust and dirt. Use a soft, dry cloth to wipe the surfaces gently.
Avoid using water or harsh chemicals that can damage the tool. Use a small brush to clean hard-to-reach areas carefully.
- Wipe frame and spindle with a soft cloth
- Use a small brush for threads and crevices
- Keep the anvil and spindle faces clean
Proper Storage
Store your micrometer in a dry, safe place to prevent damage. Avoid places with high humidity or extreme temperatures.
Use the case that came with the micrometer or a padded box. This protects it from dust and accidental drops.
- Keep micrometer in its protective case
- Store in a dry, cool environment
- Avoid placing heavy items on top of it
Routine Calibration
Check your micrometer’s accuracy regularly by calibrating it. Calibration ensures your measurements stay precise over time.
Use a standard calibration gauge or a reference block. Adjust the micrometer as needed following the manufacturer’s instructions.
- Calibrate with a standard gauge block
- Check zero reading before use
- Adjust spindle or thimble if readings are off
Frequently Asked Questions
How Do I Use A Micrometer To Measure Small Objects?
To measure with a micrometer, place the object between the spindle and anvil. Turn the thimble until it gently touches the object. Read the scale on the sleeve and thimble for an accurate measurement. Always ensure the micrometer is calibrated before use.
What Types Of Small Objects Can A Micrometer Measure?
Micrometers can measure small objects like wires, sheets, and mechanical parts. They are perfect for items requiring precision, such as metal or plastic components. Avoid measuring soft or irregular shapes that could be damaged or give inaccurate readings.
How Accurate Is A Micrometer For Small Measurements?
A micrometer typically measures with an accuracy of up to 0. 01 mm or 0. 001 inches. This high precision makes it ideal for tasks requiring detailed measurements. Proper technique and calibration are essential to maintain this accuracy.
How Do I Calibrate A Micrometer Before Measuring?
To calibrate, close the micrometer gently and check the zero reading. If it’s off, use the adjustment wrench to set the zero correctly. Calibration ensures reliable and precise measurements for every object you measure.
Conclusion
Using a micrometer helps you measure small objects accurately. Remember to always start by calibrating the tool. Measure carefully, ensuring the object fits snugly. Adjust the thimble gently to avoid errors. Check the reading for precise measurements. Practice makes perfect.
With time, you’ll get quicker and more accurate. Mastering this tool takes patience and attention. It’s worth the effort for precise work. Now, you can confidently measure small objects at home or work. Keep practicing, and your skills will grow.
Happy measuring!
