If you want your DIY projects to turn out perfect, mastering the use of a hand drill for pilot holes is a must. You might think it’s simple, but a few key tips can make a huge difference in how smooth your work goes and how strong your screws hold.
Imagine avoiding cracks, splits, and misaligned holes every time you drill. You’ll discover easy-to-follow advice that will help you get clean, precise pilot holes with less effort. Keep reading, and you’ll gain the confidence to handle your hand drill like a pro.
Choosing The Right Drill Bit
Using a hand drill for pilot holes needs the right drill bit. The bit affects hole size and quality.
Choosing a proper bit helps prevent wood or metal from splitting. It also saves time and effort.
Material-specific Bits
Different materials need different drill bits. Wood, metal, and plastic each require special bits.
Using the right bit protects your project and bit from damage. It also makes drilling easier.
- Wood bits have a pointed tip for clean holes
- Metal bits are made of harder steel for strength
- Plastic needs sharp bits that cut smoothly without cracking
Bit Size Selection
Pick a drill bit size that matches your screw or fastener. The hole should be slightly smaller than the screw.
This helps screws grip tightly without splitting the material. Using too big or too small bits causes problems.
- Check screw diameter before choosing the bit
- Use a drill bit gauge or ruler for accuracy
- Test on scrap material if unsure about size
Sharpness And Quality
Sharp drill bits cut cleaner holes with less effort. Dull bits cause rough holes and can damage material.
Choose high-quality bits made from durable materials. Regularly sharpen or replace bits for best results.
- Inspect bits for chips or dull edges before use
- Use bits with proper coatings for longer life
- Store bits safely to avoid damage
Preparing The Work Surface
Using a hand drill to create pilot holes needs a clean, stable work surface. This helps you drill safely and accurately.
Before drilling, prepare the material and tools carefully. This reduces mistakes and protects your workpiece.
Marking Pilot Hole Locations
Mark the exact spots where you want to drill pilot holes. Use a pencil or a fine-tip marker for clear marks.
- Measure carefully to keep holes aligned
- Double-check measurements before marking
- Use a square or ruler for straight lines
- Mark all holes before starting to drill
Securing The Material
Hold the material firmly to avoid slipping while drilling. Use clamps or a vise to keep it steady.
| Method | Use |
| Clamps | Hold boards on a workbench |
| Vise | Secure small pieces for precision |
| Non-slip Mat | Prevent sliding on smooth surfaces |
Using A Center Punch
A center punch makes a small dent on the marked spot. This guides the drill bit and stops it from wandering.
How to use a center punch:
- Place the punch tip on the marked spot
- Hold it straight and steady
- Tap gently with a hammer to make a small indentation
- Check that the dent is visible before drilling
Proper Hand Drill Handling
Using a hand drill correctly makes drilling easier and safer. Good handling helps you drill straight pilot holes and protects your workpiece.
This guide focuses on grip techniques, drill stability, and controlling speed and pressure for best results.
Grip Techniques
Hold the drill firmly with your dominant hand. Use your other hand to steady the drill near the bit if possible.
- Wrap your fingers around the handle, not just your thumb.
- Keep your wrist straight to avoid strain.
- Apply steady, even pressure with your grip.
Maintaining Drill Stability
Keep the drill steady to avoid slipping and crooked holes. Position your body to support the drill.
| Tip | How to Do It |
| Use a flat surface | Place the workpiece on a stable, even surface. |
| Align drill bit | Hold the drill perpendicular to the surface. |
| Support your arms | Rest elbows or arms against your body for steadiness. |
| Secure workpiece | Clamp or hold the workpiece tightly to avoid movement. |
Controlling Speed And Pressure
Control the drill speed and pressure for clean pilot holes. Too much force can damage the drill bit or workpiece.
Follow these tips for better control:
- Start drilling slowly to guide the bit into the material.
- Increase speed gradually once the bit is steady.
- Apply light, consistent pressure; do not push hard.
- Pause if the drill bit overheats or stalls.
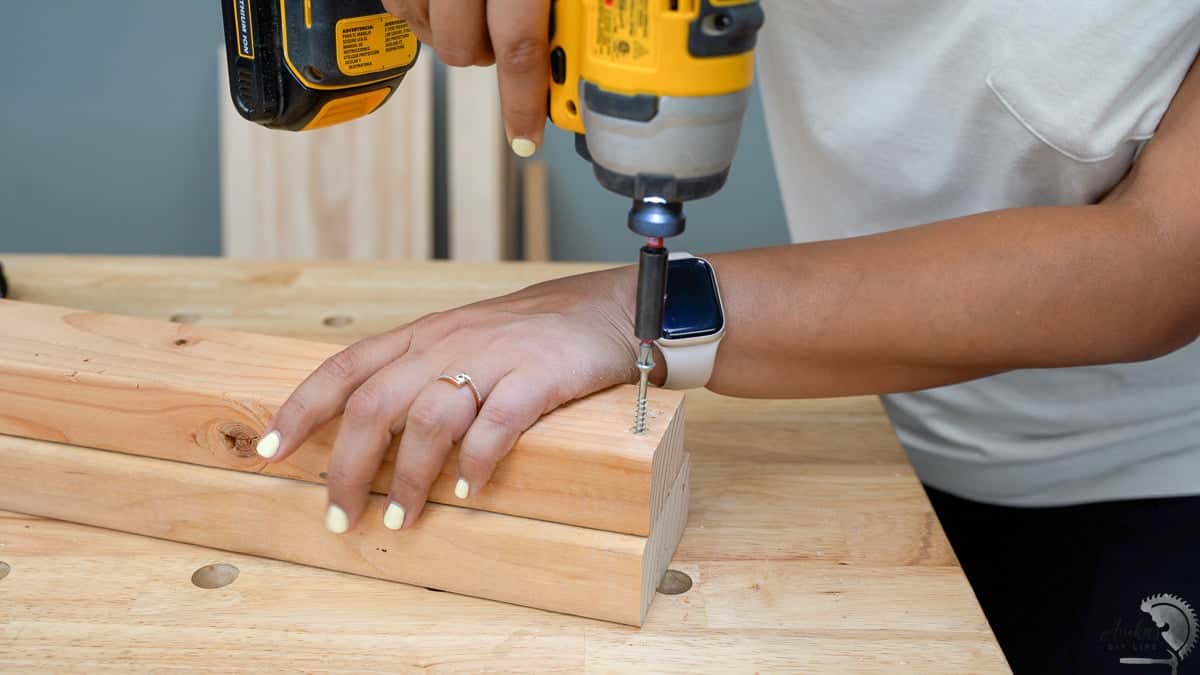
Credit: www.anikasdiylife.com
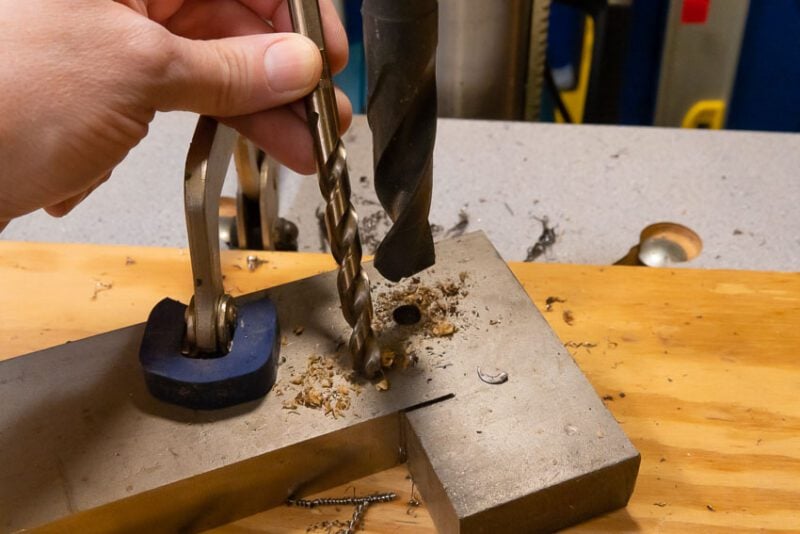
Drilling Techniques For Accuracy
Using a hand drill for pilot holes needs care and focus. Accurate drilling helps screws fit well and keeps materials safe.
This guide explains ways to start the hole, keep the drill straight, and clear debris for the best results.
Starting The Hole
Begin by marking the spot where you want the hole. Use a pencil or a center punch to make a small dent. This dent keeps the drill bit from slipping as you start.
Hold the drill steady and press lightly to make a shallow hole. This helps guide the drill bit deeper without moving off target.
Drilling Straight And Even
Keeping the drill straight is key for accuracy. Tilted holes can cause screws to go in at the wrong angle or break the material.
- Align the drill bit perpendicular to the surface.
- Hold the drill handle firmly with both hands.
- Start drilling slowly to stay on the marked spot.
- Apply steady pressure without forcing the drill.
- Stop and check the angle often during drilling.
Clearing Debris
Removing wood or metal shavings helps keep the hole clean. This makes drilling smoother and the hole more precise.
| Tip | How to Clear Debris |
| Pause often | Stop drilling every few seconds to clear out shavings. |
| Use a brush | Remove debris with a small brush or compressed air. |
| Blow out dust | Blow gently into the hole to clear dust and chips. |
Safety Tips And Precautions
Using a hand drill for pilot holes needs care and attention. Safety helps avoid accidents and injuries. Follow these tips to work safely and effectively.
Always prepare your workspace and tools before drilling. Keep the area clean and well-lit. Wear the right gear and check your drill often.
Protective Gear
Wear safety equipment to protect yourself from flying debris and sharp bits. Eye protection and gloves are must-haves.
- Safety glasses or goggles to shield your eyes
- Work gloves to protect your hands
- Close-fitting clothes to avoid catching in the drill
- Dust mask if drilling creates dust or particles
Avoiding Slips And Injuries
Keep control of the drill to prevent slips that can cause harm. Hold the drill firmly and keep your hands clear of the bit.
- Place the drill bit at the mark before starting
- Use steady, even pressure while drilling
- Do not force the drill if it binds or stops
- Keep your feet on a stable surface
- Clear away debris before drilling again
Tool Maintenance
Regularly check and care for your hand drill to keep it safe and working well. A well-maintained drill reduces the risk of accidents.
| Maintenance Task | Frequency | Reason |
|---|---|---|
| Check drill bit for sharpness | Before each use | Sharp bits drill cleaner and safer holes |
| Lubricate moving parts | Monthly | Reduces wear and prevents rust |
| Tighten loose screws | Weekly | Keeps drill stable during use |
| Clean dust and debris | After each use | Prevents clogging and damage |

Credit: www.familyhandyman.com
Troubleshooting Common Issues
Using a hand drill for pilot holes can be tricky at times. Some common problems may slow down your work or damage your materials.
This guide helps you fix three frequent issues: bit slippage, overheating drill bits, and uneven holes.
Bit Slippage
Bit slippage happens when the drill bit slips inside the chuck. This causes the bit to spin without drilling properly.
Slippage can damage the bit or make the hole incorrect. To avoid this, tighten the chuck firmly by hand or with a chuck key.
- Check if the bit fits the chuck size
- Clean the chuck and bit shank before inserting
- Replace worn or damaged bits
- Do not use too much force when tightening
Overheating Drill Bits
Drill bits get hot when used for a long time or at high speed. Overheating can dull the bit or harm the material.
Cool down the bit by stopping every few holes. Use cutting oil or water for metal drilling to keep the bit cool.
- Use slow, steady pressure
- Take breaks to let the bit cool down
- Apply lubricant if drilling metal
- Choose the right bit for the material
Uneven Holes
Uneven holes happen if the drill is not steady or the bit wanders on the surface. This makes the hole crooked or too big.
Start holes by making a small guide mark with a nail or center punch. Hold the drill straight and steady while drilling.
- Use a clamp to hold the workpiece
- Keep the drill at a 90-degree angle to the surface
- Begin drilling slowly to avoid wandering
- Replace dull bits that slip or wobble
Credit: www.protoolreviews.com
Frequently Asked Questions
What Size Drill Bit Is Best For Pilot Holes?
Use a drill bit slightly smaller than the screw’s diameter. This prevents wood splitting and ensures a tight screw fit. Match the bit size to the screw core, not the threads, for optimal pilot holes.
How Deep Should Pilot Holes Be Drilled?
Drill pilot holes slightly deeper than the screw length. This allows the screw to enter fully without resistance. Mark the drill bit with tape to maintain consistent depth.
Can I Use A Hand Drill For Metal Pilot Holes?
Yes, a hand drill works for metal pilot holes. Use a high-speed steel bit and apply steady pressure. Keep the drill steady to avoid bit damage or misalignment.
Why Are Pilot Holes Important Before Screwing?
Pilot holes prevent wood from splitting and guide screws accurately. They reduce wood damage and make screwing easier. This improves the overall strength and finish of your project.
Conclusion
Mastering pilot holes with a hand drill is simple. Start with the right drill bit size. Always mark your spots carefully. Steady hands help with precision. Drill slowly for cleaner holes. This prevents splitting the wood. Protect your drill bit with proper pressure.
Practice makes perfect. Each project gets easier with experience. Try different materials to understand their needs. Enjoy the process of learning and building. Your skills will grow over time. With patience, you’ll become more confident. Now, grab your drill and start creating.
Happy drilling!